Gravity Forms Notion Integration
Sync Gravity Forms with Notion automatically - form entries, submissions, and field data always current, no coding needed.
Free to start. No credit card required.
Trusted worldwide
500+ teams stopped copying data manually.
Yours can too.














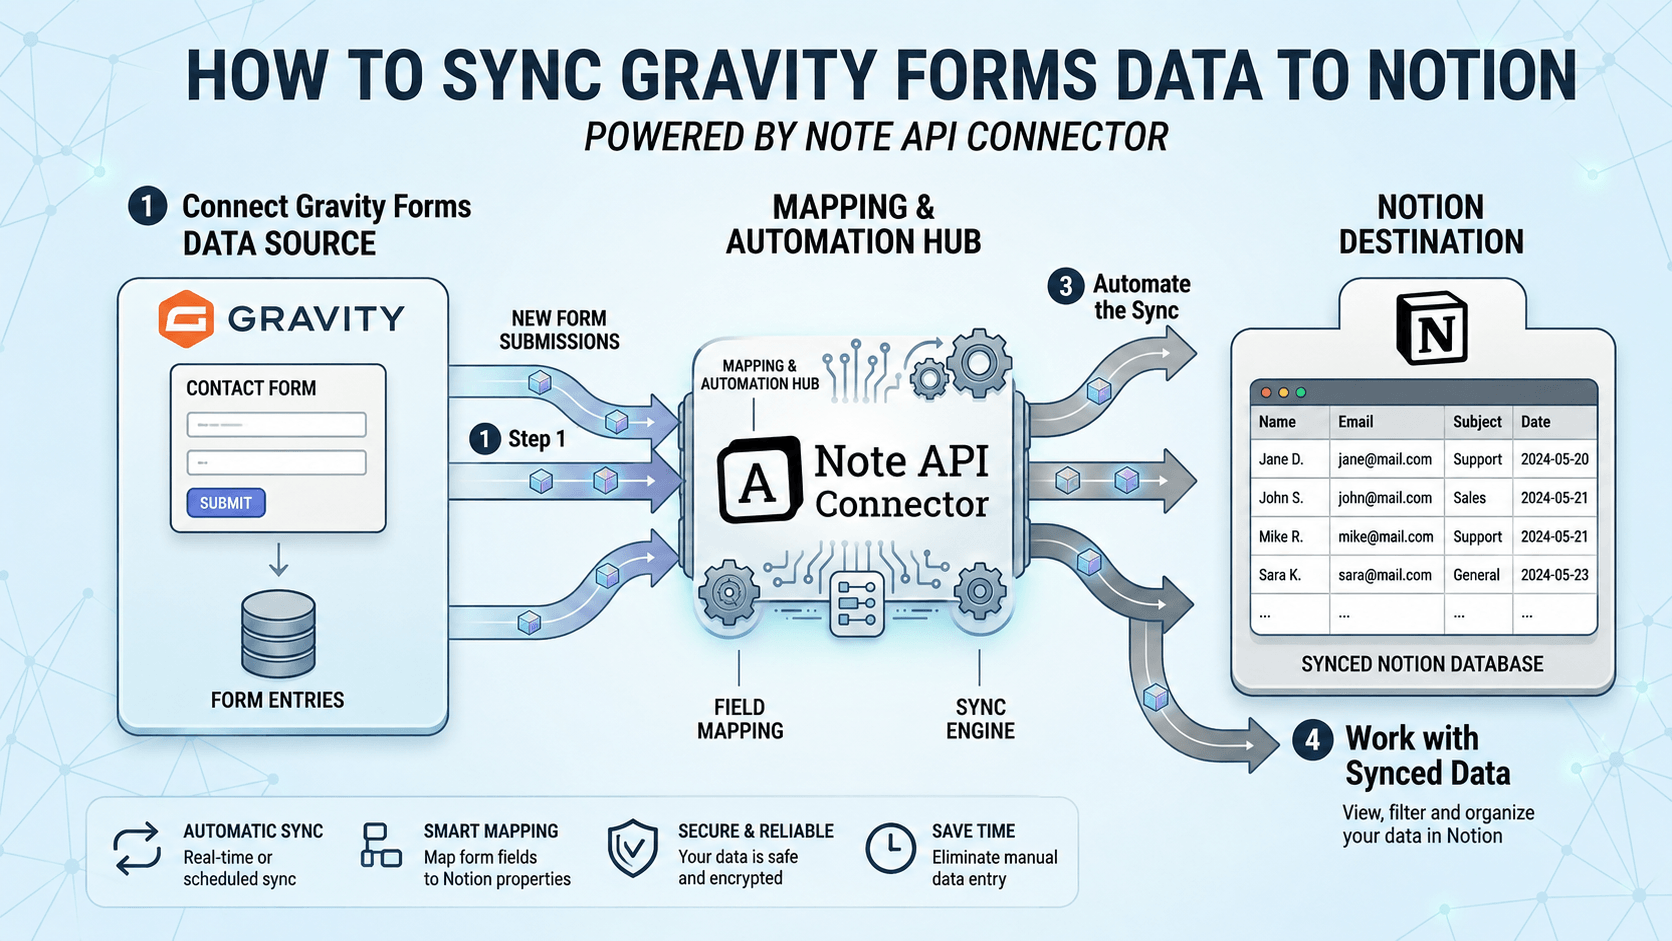
The Gravity Forms Notion integration lets you pull live submission data directly from your WordPress site into Notion using Note API Connector. Whether you collect leads, run surveys, process orders, or gather event registrations through Gravity Forms, this integration keeps every form entry synced into a structured Notion database automatically - no manual CSV exports, no copy-paste, no custom code.
With Note API Connector you can sync Gravity Forms with Notion on a fully automated schedule (hourly, daily, or at custom intervals) using the Gravity Forms REST API built into your WordPress installation. Connect with Basic Auth credentials generated inside your WordPress admin, choose a Notion database, map submission fields visually to Notion properties, and your form data flows in on autopilot from that point forward. No third-party middleware, no Zapier required.
How to connect Gravity Forms to Notion
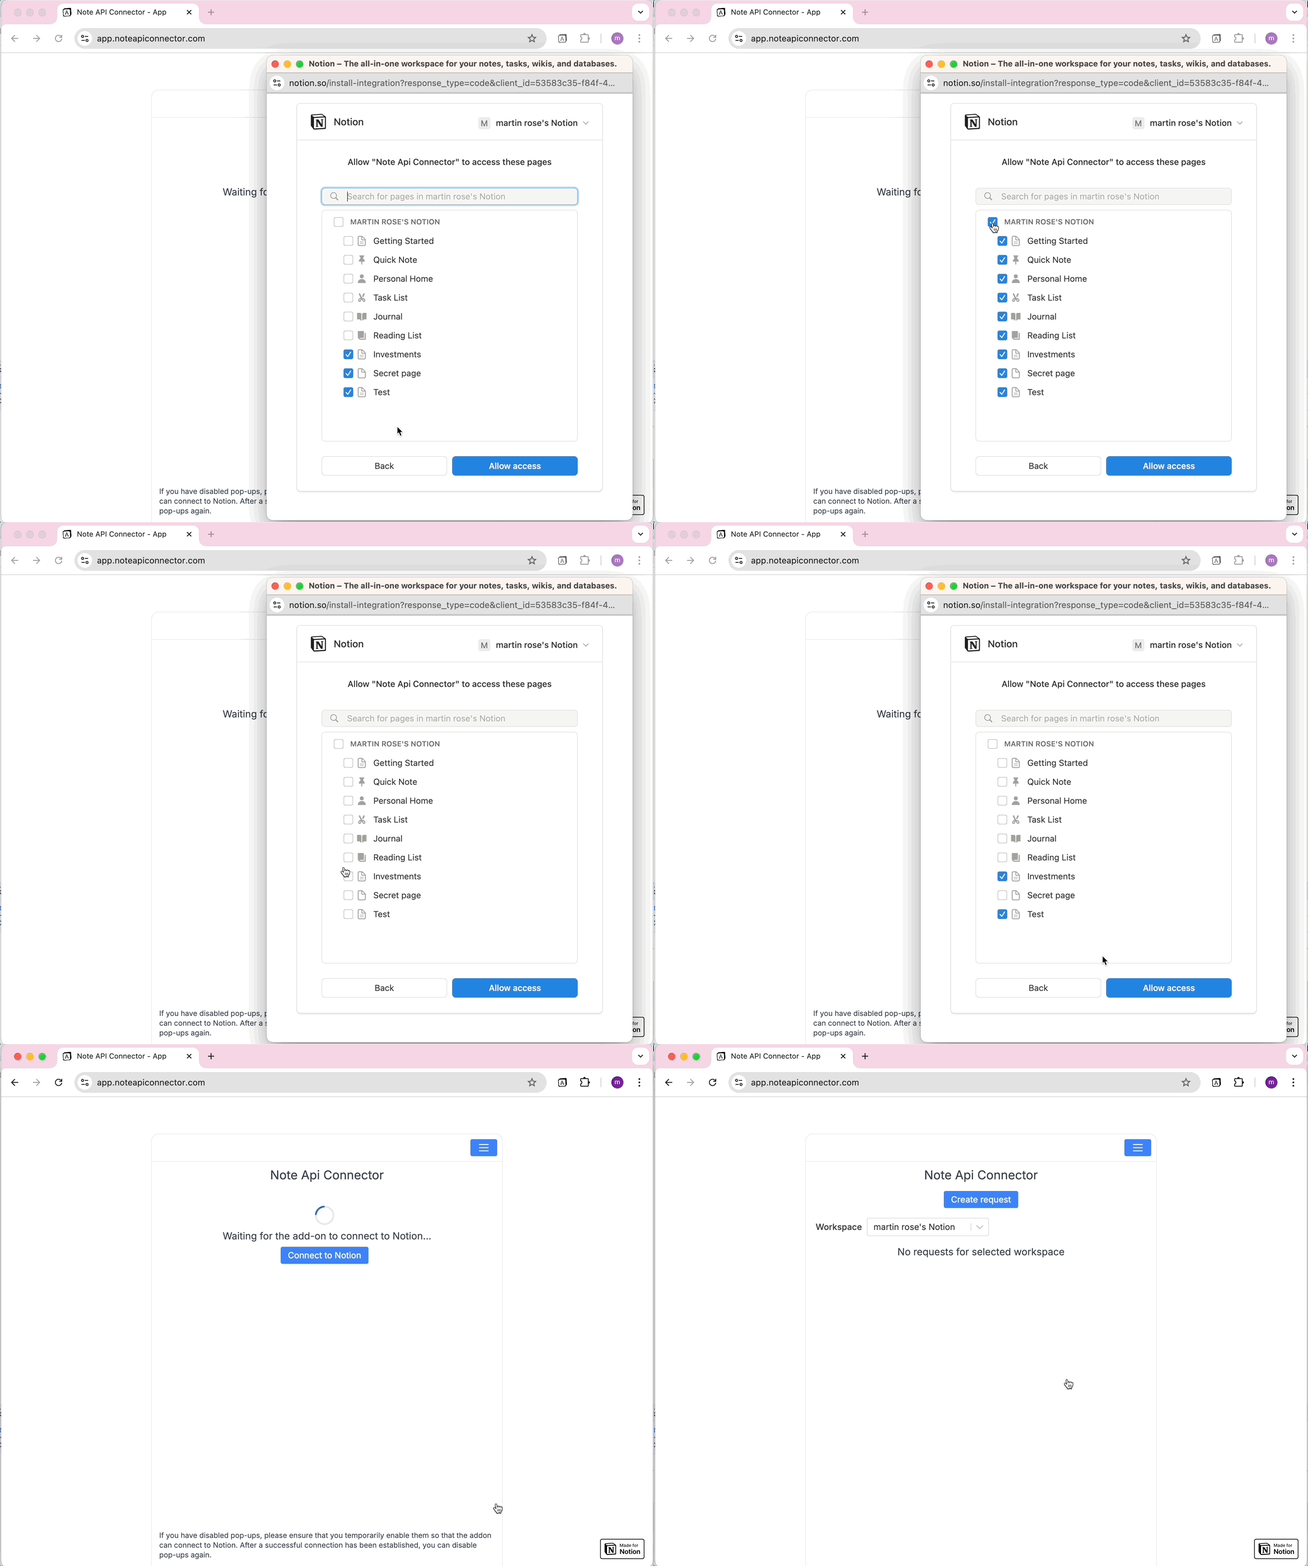
Connect your Notion workspace
Click Connect to Notion, authorize Note API Connector, and select the pages and workspace where your Gravity Forms data should appear.
Enable the Gravity Forms REST API and create API credentials
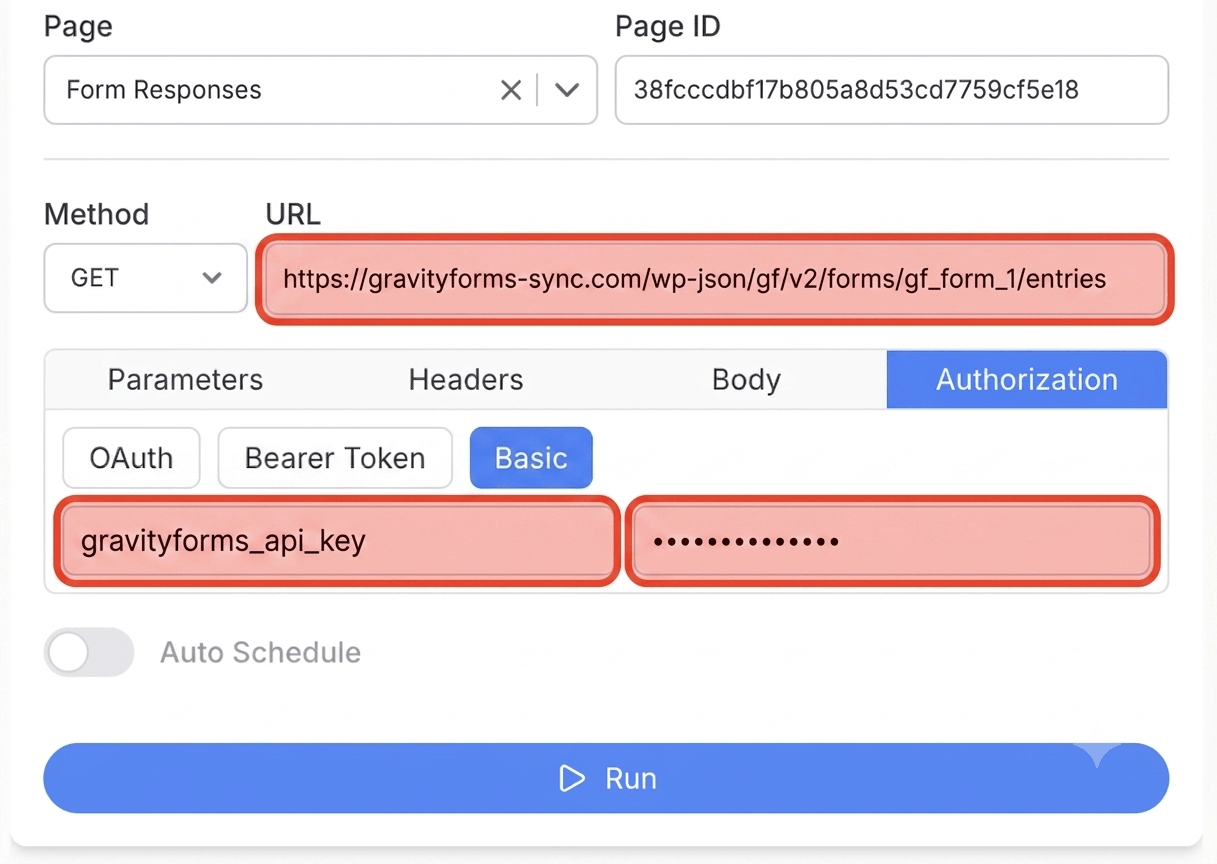
In your WordPress admin, go to Forms > Settings > REST API. Enable the REST API if it is not already on. Click Add Key, give it a description (e.g. "Note API Connector"), set permissions to Read, and click Generate API Key. WordPress will show you a Consumer Key (starting with ck_) and a Consumer Secret (starting with cs_) - copy both now, as the secret will not be shown again. In Note API Connector, click Create Request, paste your Gravity Forms API endpoint URL (using your own WordPress domain in place of {your-site}), open the Authorization tab, and click the Basic tab. Enter your Consumer Key as the Username and your Consumer Secret as the Password. Give the request a name and click Run.
Choose your data and map fields
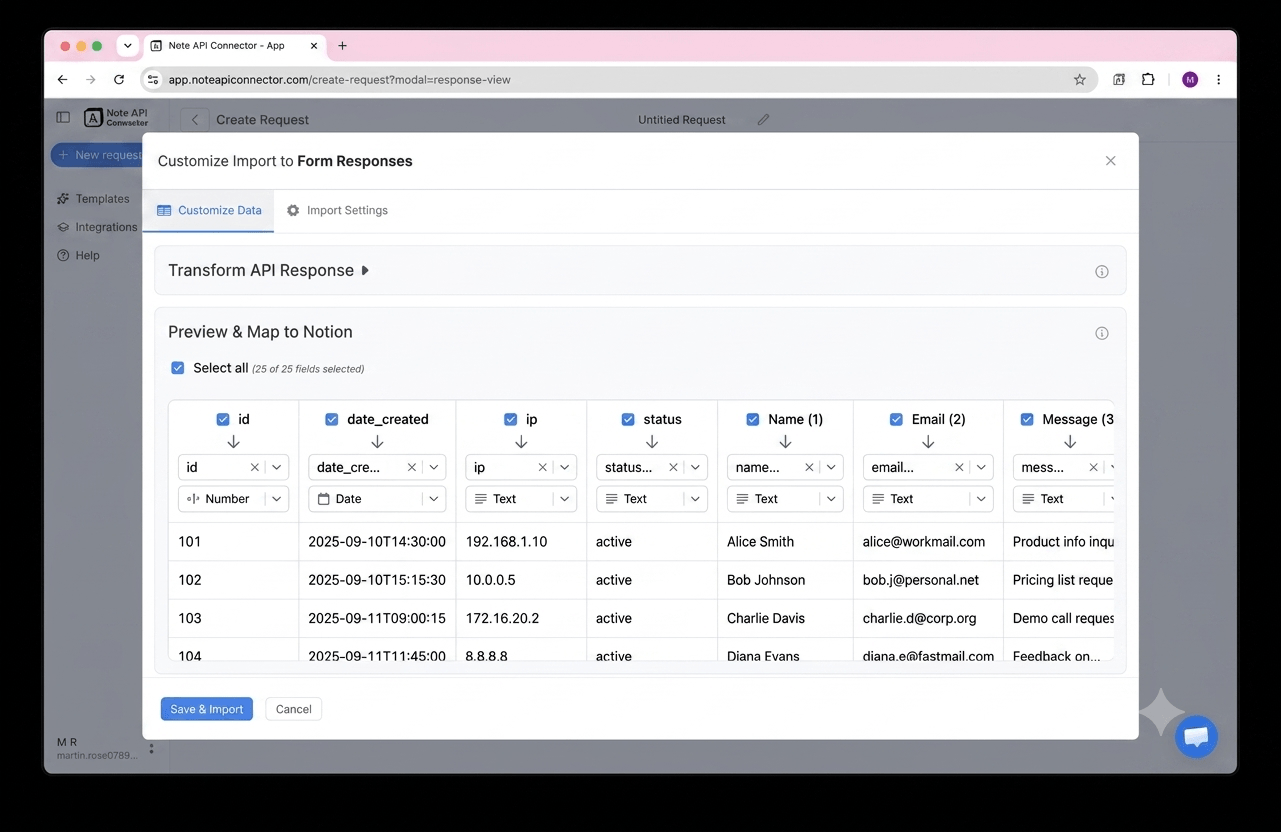
In the Response Field Mapping screen, select which Gravity Forms fields to include - such as entry ID, submission date, field values, source URL, or entry status - and map each one to a Notion property. You can match existing properties, create new ones, or set the field type. Click Save & Import when you're done.
Set your sync schedule and go live
Enable Auto Schedule and choose your refresh interval. Your Gravity Forms submission data will sync with Notion automatically from that point forward, with no manual refreshes needed.
⏱ Hourly / Daily / Custom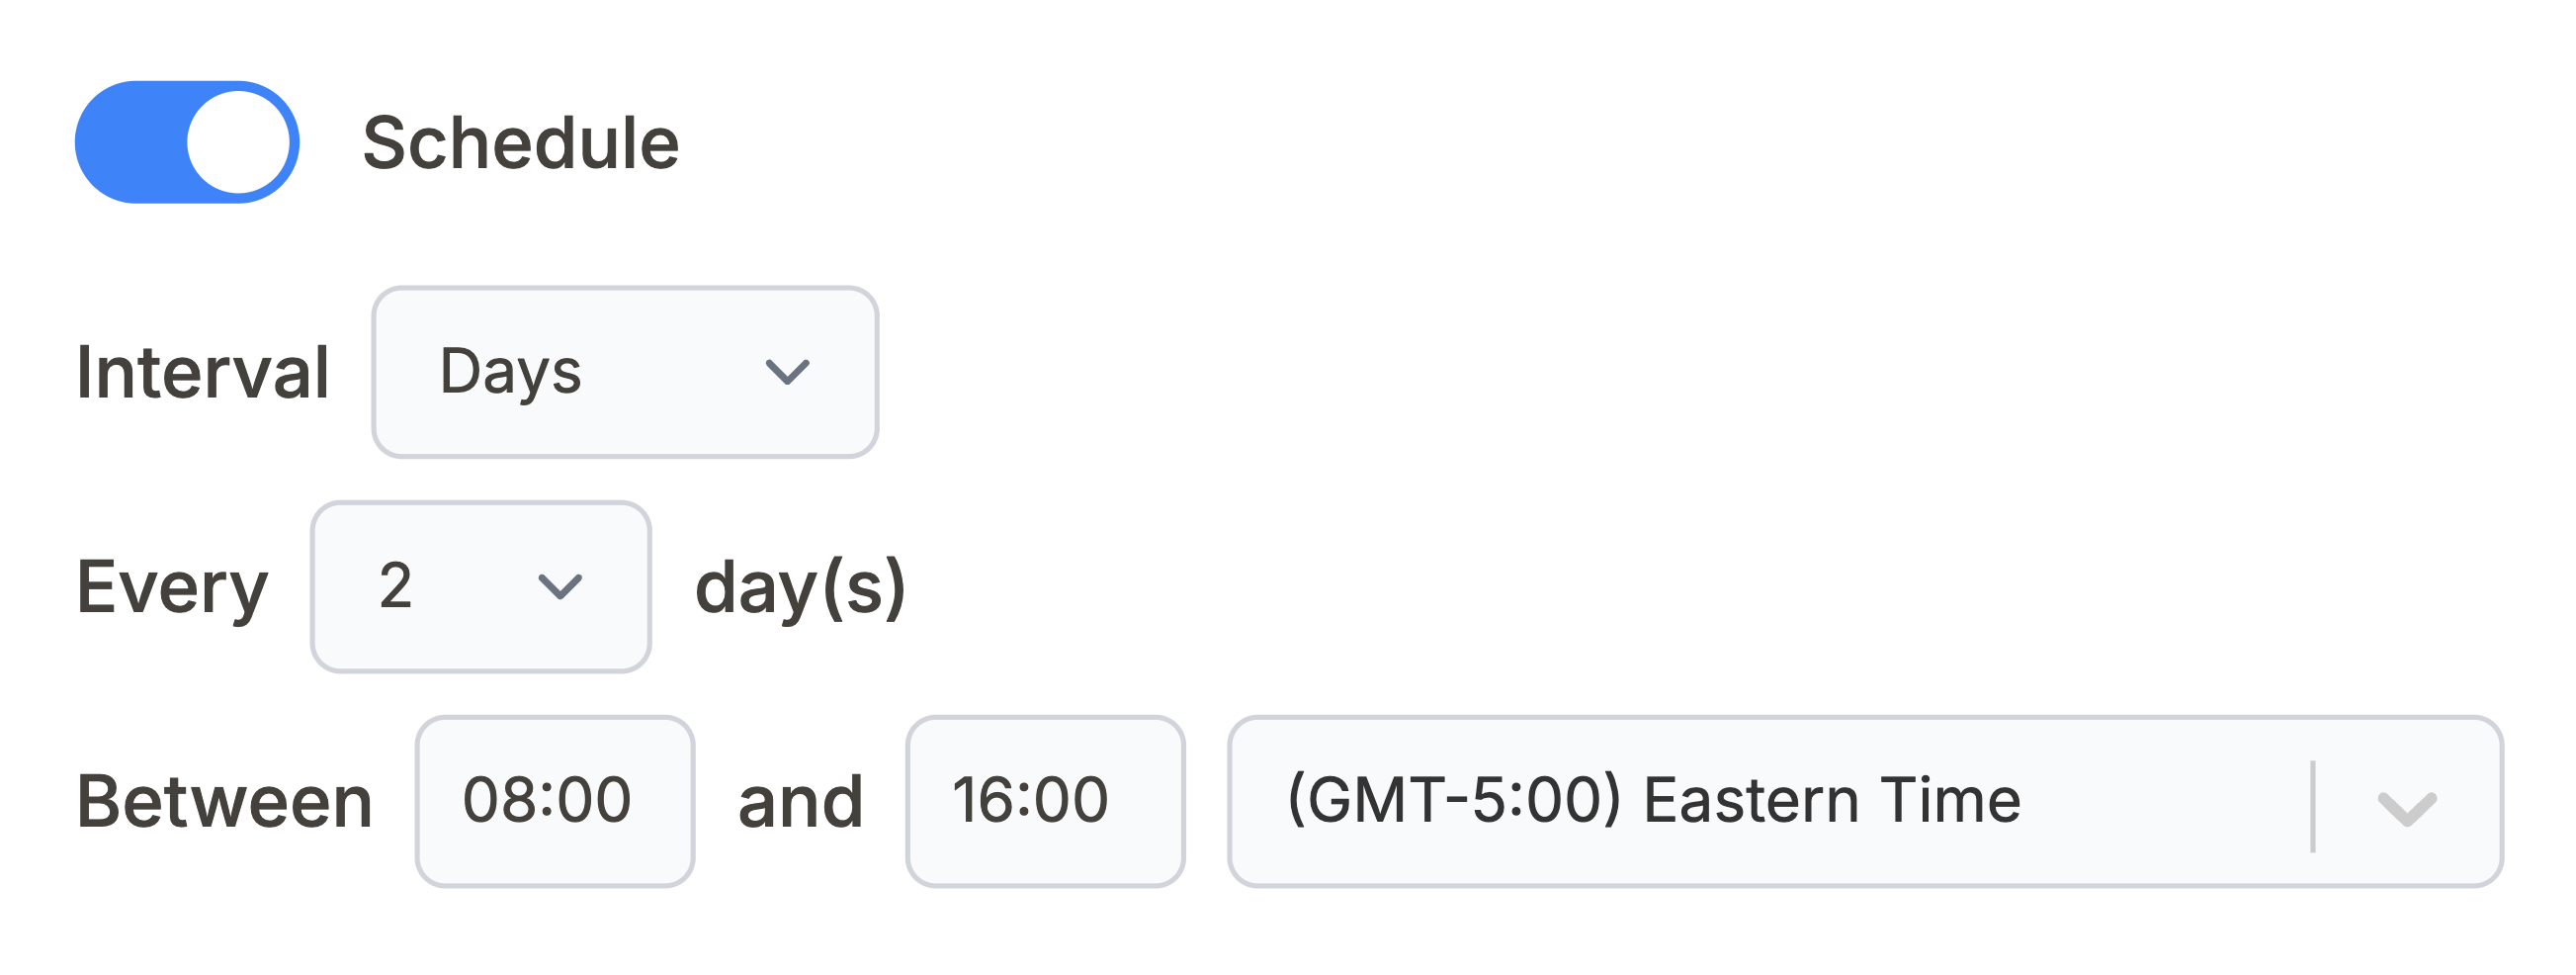
What Gravity Forms data can you sync with Notion?
Use these Gravity Forms REST API v2
endpoints directly in Note API Connector. Replace {your-site} with your WordPress
domain in every URL. Start with the All Forms endpoint to get your form IDs, then substitute
them for {form_id} in the entry and detail endpoints. Each endpoint can be mapped
to a separate Notion database.
A list of all Gravity Forms on your WordPress site with title, description, submission count, date created, and status. Start here to get your form IDs before calling submission or field endpoints.
https://{your-site}/wp-json/gf/v2/forms
All entries submitted for a specific form, including all field values, submission date, IP address, and entry status. This is the main endpoint for syncing form response data into Notion. Replace {form_id} with the numeric form ID returned by the All Forms endpoint.
https://{your-site}/wp-json/gf/v2/forms/{form_id}/entries
Every entry across all forms on your WordPress site with form ID, field values, and timestamps. Use this to build a single master submissions database in Notion that consolidates responses from multiple forms.
https://{your-site}/wp-json/gf/v2/entries
Full definition of a specific form including all field labels, types, required status, choices, and validation rules. Use this to understand a form's structure before mapping its entry fields to Notion properties. Replace {form_id} with your form ID.
https://{your-site}/wp-json/gf/v2/forms/{form_id}
Full details of a specific form entry with every submitted field value, submission date, source URL, and metadata. Useful for syncing individual entries or building a detail view in Notion. Replace {entry_id} with the numeric entry ID.
https://{your-site}/wp-json/gf/v2/entries/{entry_id}
Aggregated field-level statistics for a form, showing how often each choice was selected across all entries. Useful for building a survey results summary or form analytics view in Notion. Replace {form_id} with your form ID.
https://{your-site}/wp-json/gf/v2/forms/{form_id}/results
See how it works
Why sync Gravity Forms with Notion?
Always up to date
Scheduled sync runs automatically. Your Notion database reflects the latest Gravity Forms entries without any manual exports or CSV downloads.
No coding required
Point, click, and map fields. Connect Gravity Forms to Notion in minutes without any programming or WordPress development knowledge.
Custom schedule
Choose hourly, daily, or custom intervals. You control exactly when Notion pulls fresh entries from your Gravity Forms WordPress site.
Conclusion
With Note API Connector, setting up a complete Gravity Forms Notion integration takes minutes, not days. Every new form entry syncs automatically into Notion on your chosen schedule, with no code, no third-party automation tools, and no manual export.
Whether you are building a lead tracking database from contact form responses, logging event registrations, syncing order submissions into a Notion table, or giving your team a live view of survey results, connecting Gravity Forms to Notion turns every WordPress form into a structured, searchable Notion database that stays current automatically.
Frequently Asked Questions
Yes. Gravity Forms includes a built-in REST API (v2) available in all paid plans. It exposes forms, entries, and field data and is accessible at https://{your-site}/wp-json/gf/v2/ once you enable it in your WordPress admin. Note API Connector connects to this API using Basic Auth credentials to pull Gravity Forms data into Notion.
In your WordPress admin, go to Forms > Settings > REST API, enable the API, and generate a Consumer Key and Consumer Secret. In Note API Connector, connect your Notion workspace, click Create Request, paste a Gravity Forms endpoint URL (substituting your WordPress domain), and enter your Consumer Key as the Username and Consumer Secret as the Password in the Authorization > Basic tab. Map the response fields to Notion properties and enable Auto Schedule. The full setup takes under 5 minutes.
Yes. Enable Auto Schedule in Note API Connector and choose your refresh interval: hourly, daily, or custom. New Gravity Forms entries will sync into Notion automatically on that schedule with no manual action required.
The API base URL uses your own WordPress domain. Replace {your-site} with your actual domain in all endpoint URLs - for example, https://yourwebsite.com/wp-json/gf/v2/forms. This is different from SaaS form tools that have a single shared API domain.
Call the All Forms endpoint (https://{your-site}/wp-json/gf/v2/forms) first - each form in the response includes its numeric ID. You can also find the form ID in your WordPress admin by going to Forms, hovering over a form name, and looking at the ID in the URL shown in the browser status bar.
No. You must enable it manually. Go to your WordPress admin, navigate to Forms > Settings > REST API, and toggle the API on. Then create an API key pair with at least Read permissions to get the Consumer Key and Consumer Secret needed for authentication.
Gravity Forms follows the same credential pattern used by WooCommerce - a public key (Consumer Key) and a private key (Consumer Secret) that are paired together. You enter the Consumer Key as the Username and Consumer Secret as the Password in Note API Connector's Basic Auth tab. NAC handles the base64 encoding automatically.
No. Note API Connector is a no-code tool. You paste your Gravity Forms API endpoint URL, enter your Consumer Key and Consumer Secret in the Basic Auth fields, select your Notion database, and map fields visually. No programming knowledge is needed.