How to Import and Sync Shopify Data into Notion
Want to get your Shopify data into Notion without writing code? This tutorial shows you how to connect Shopify’s API to Notion using Note API Connector so you can track orders, products, inventory, and customers in one place.
You will generate a Shopify Admin access token, run REST API requests, map the response, and send the results to a Notion database. By the end, you will have a repeatable import that you can schedule to keep Notion in sync.
TL;DR
- Getting started with Note API Connector to link your Notion workspace.
- Generate a Shopify Admin Access Token to securely access store data.
- Import Shopify Data into Notion using REST Admin API requests.
- Import Shopify Products into your Notion database.
- Import Shopify Product Variants with JSONata transformation.
- Link Shopify Product Variants to Products in Notion using Relations.
- Import and Sync Shopify Orders with transformations for cleaner data.
- Automate Shopify Data Updates with Note API Connector’s scheduling feature.
- Conclusion – recap of benefits and next steps.
- Frequently Asked Questions covering setup, coding, automation, and security.
Quick start with Note API Connector
Link your Notion workspace to Note API Connector so you can import Shopify data into a Notion database without code.
👉 Follow the official setup guide to get started in minutes.
Generate a Shopify Admin Access Token
To connect Shopify with Notion, we need to retrieve merchant data securely using Shopify’s API. Shopify provides API keys that allow external tools, like Note API Connector to access your Shopify account and pull relevant data into Notion.
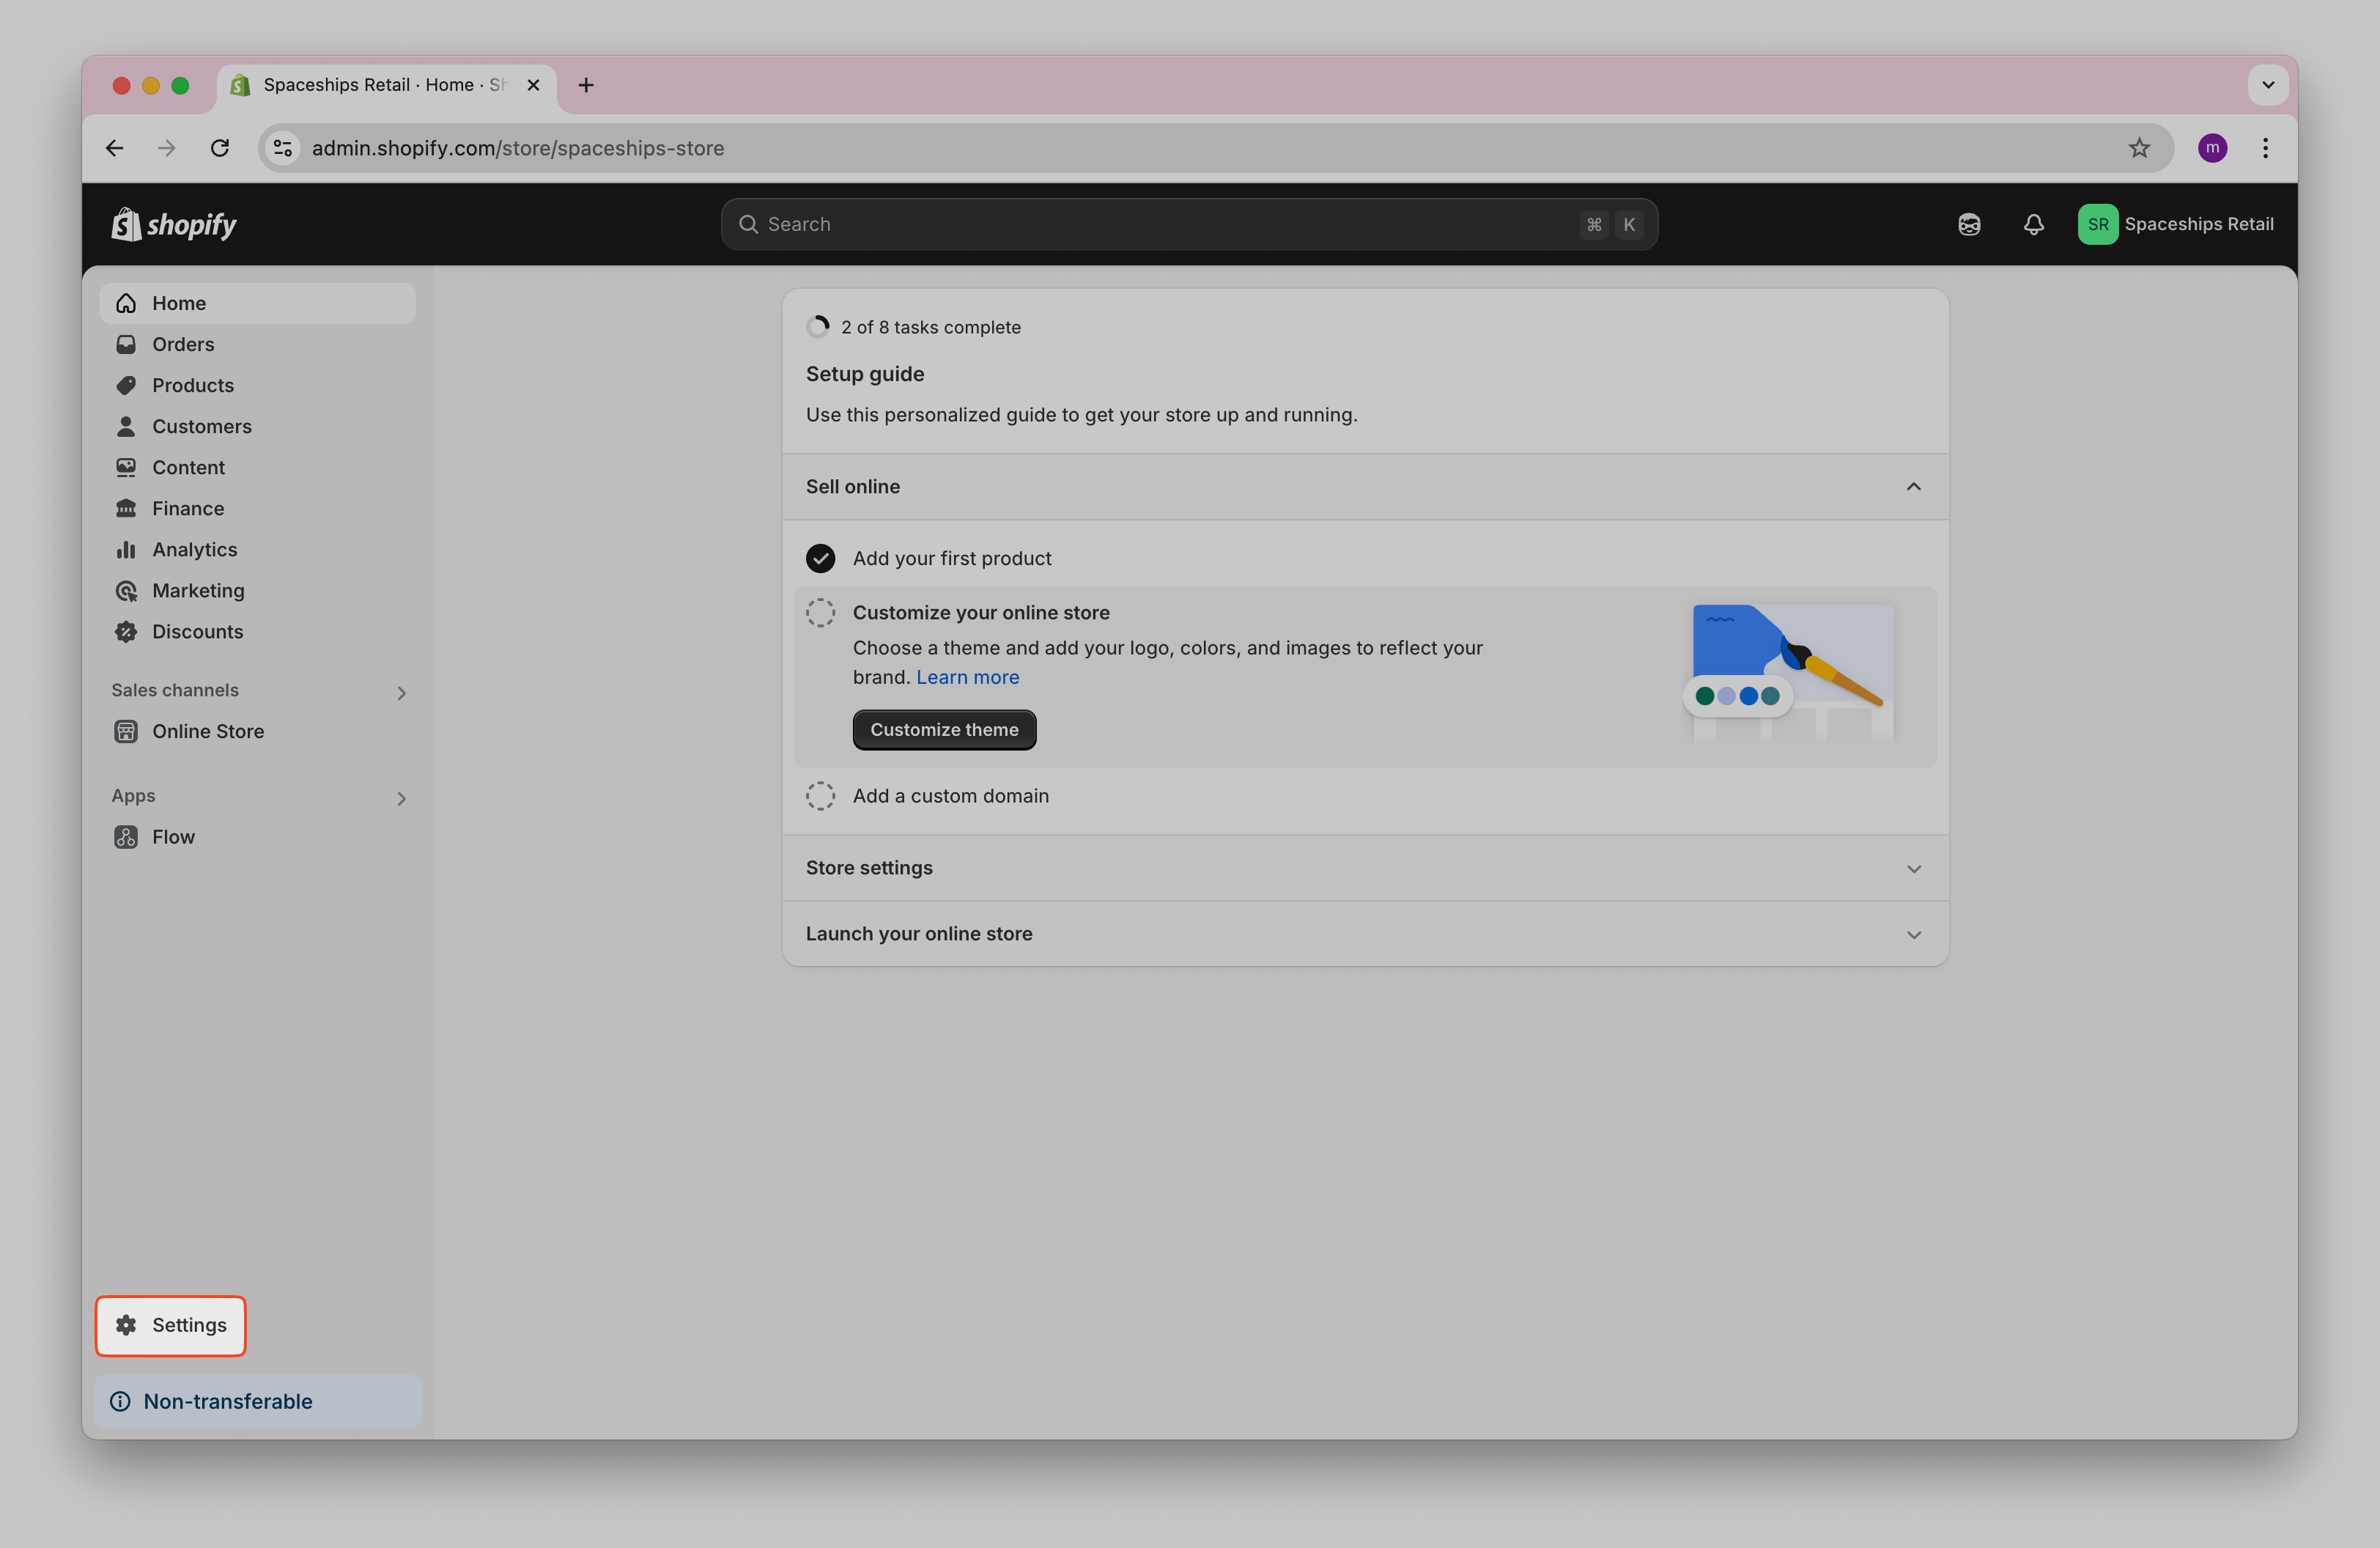
Log in to your Shopify Store and go to Settings .
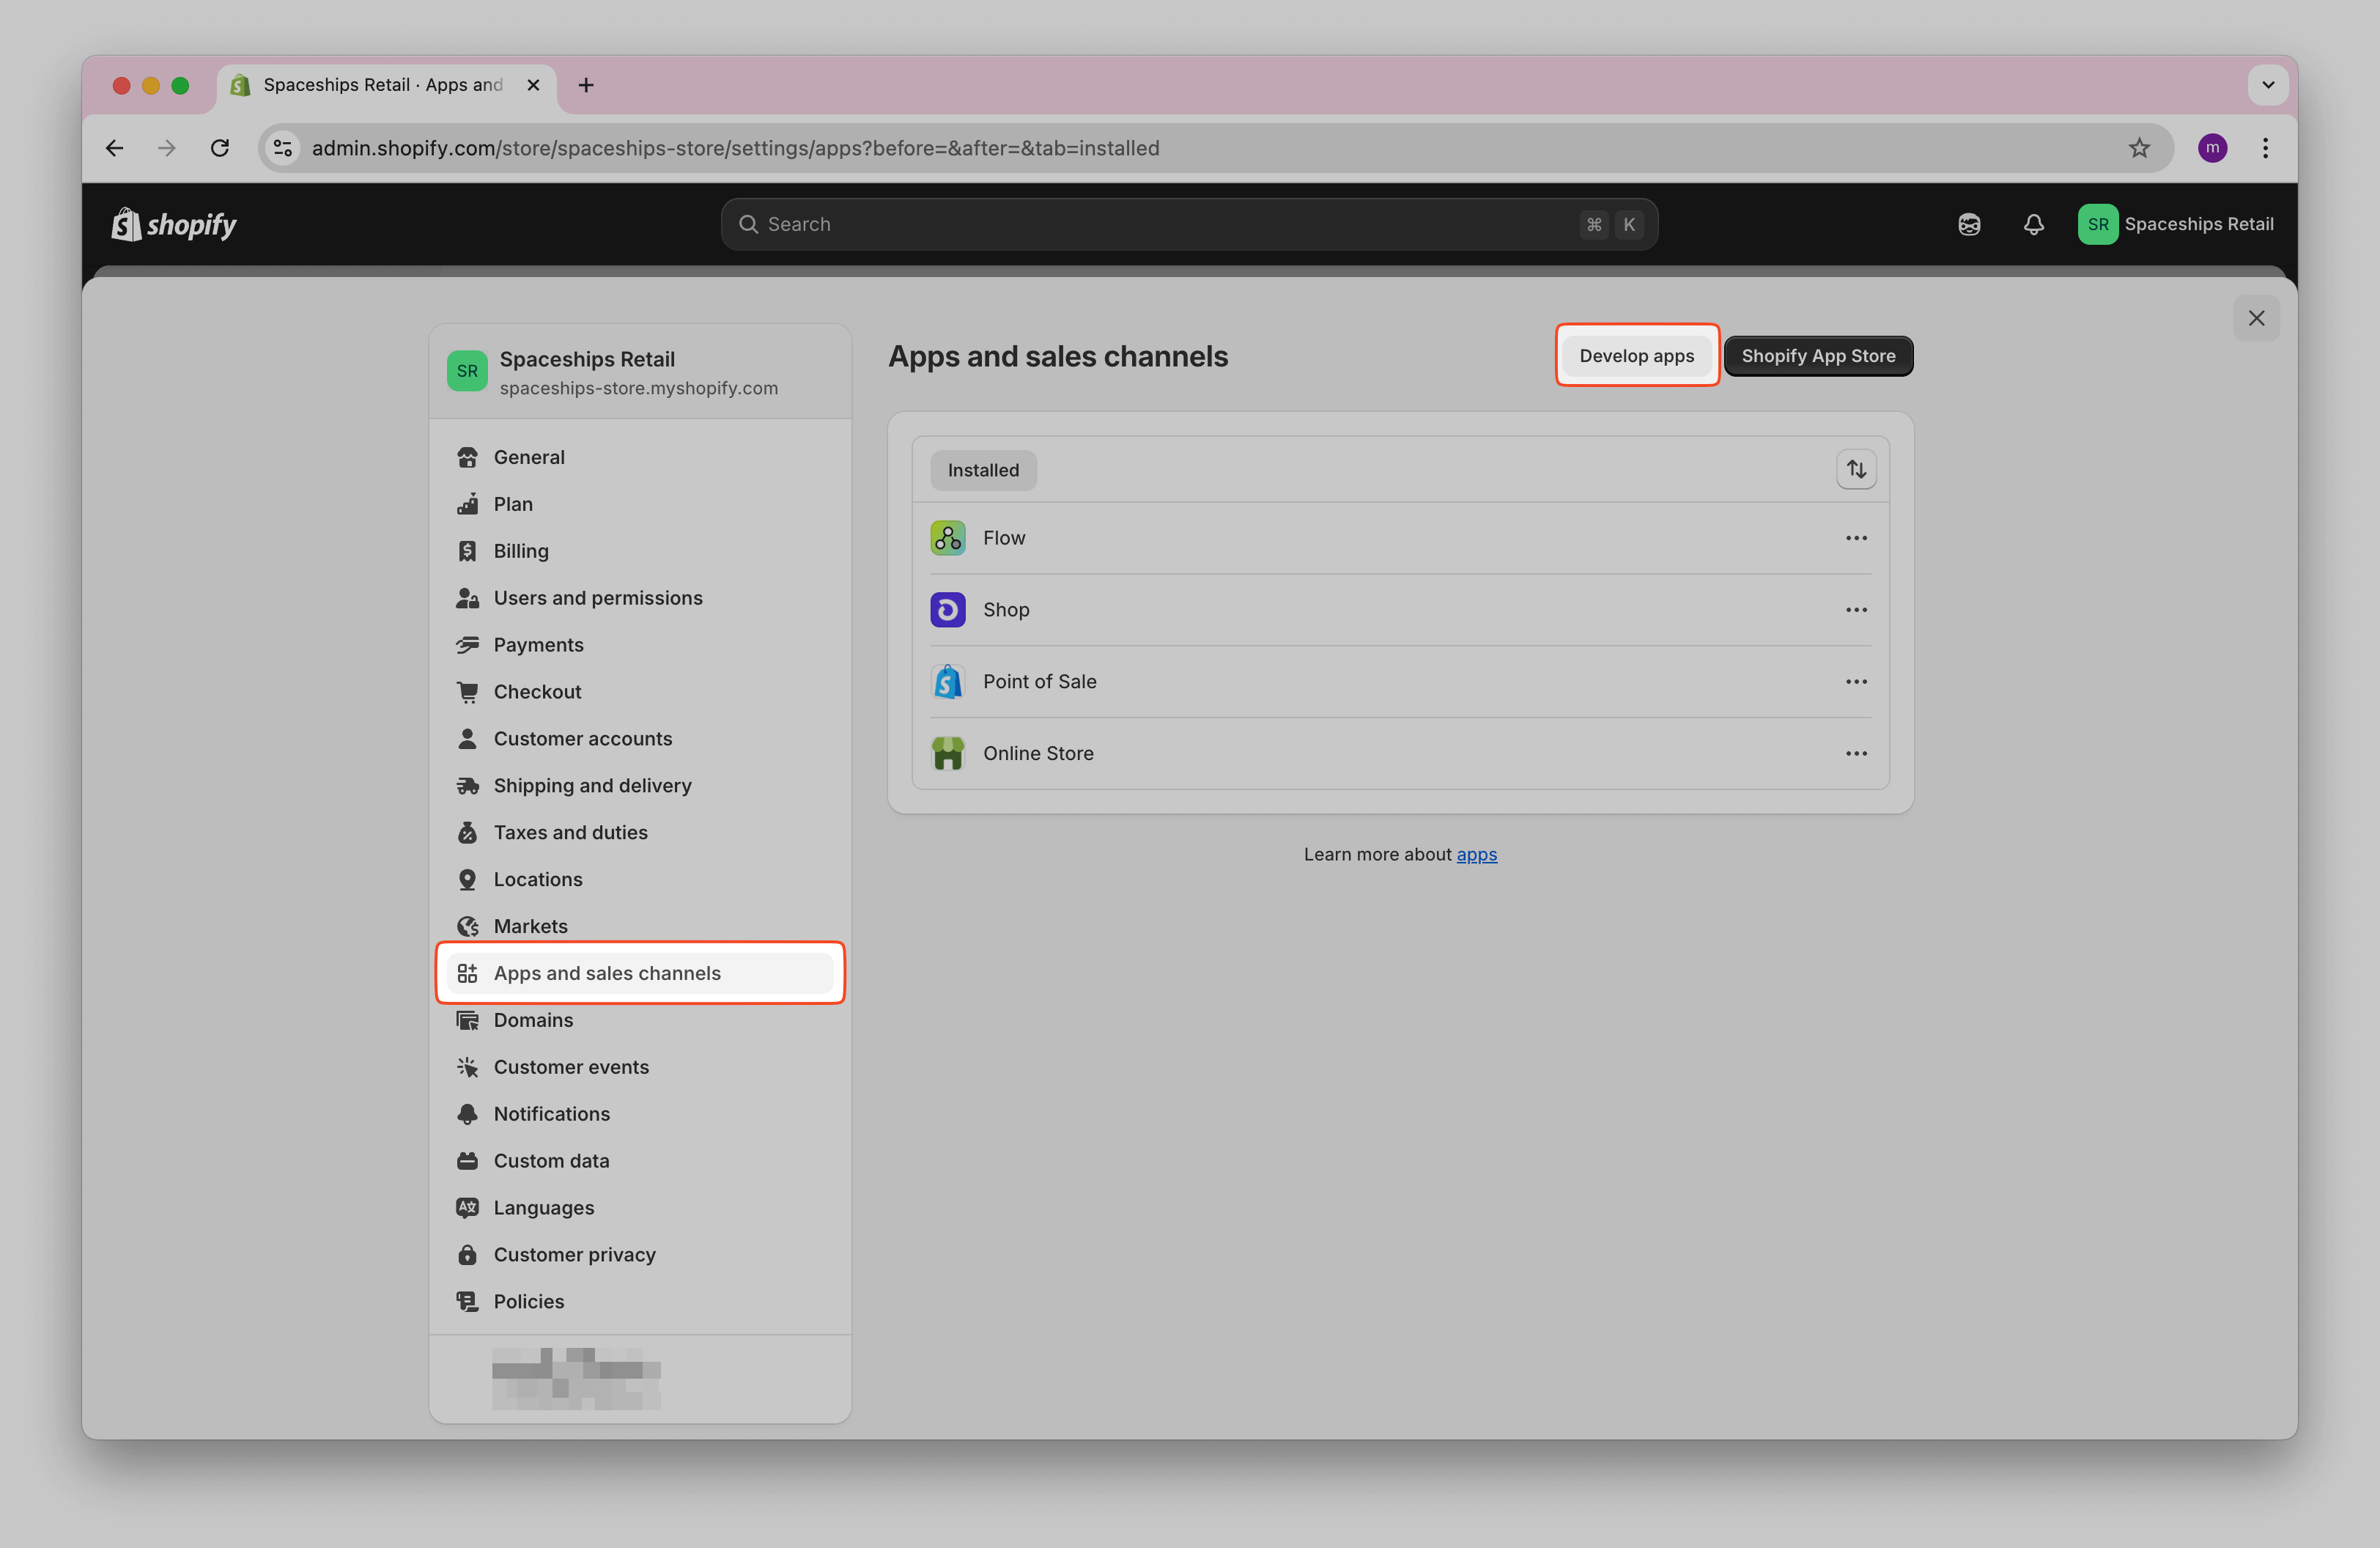
Click Apps and Sales Channels → Develop apps .
Click Allow custom app development and confirm.
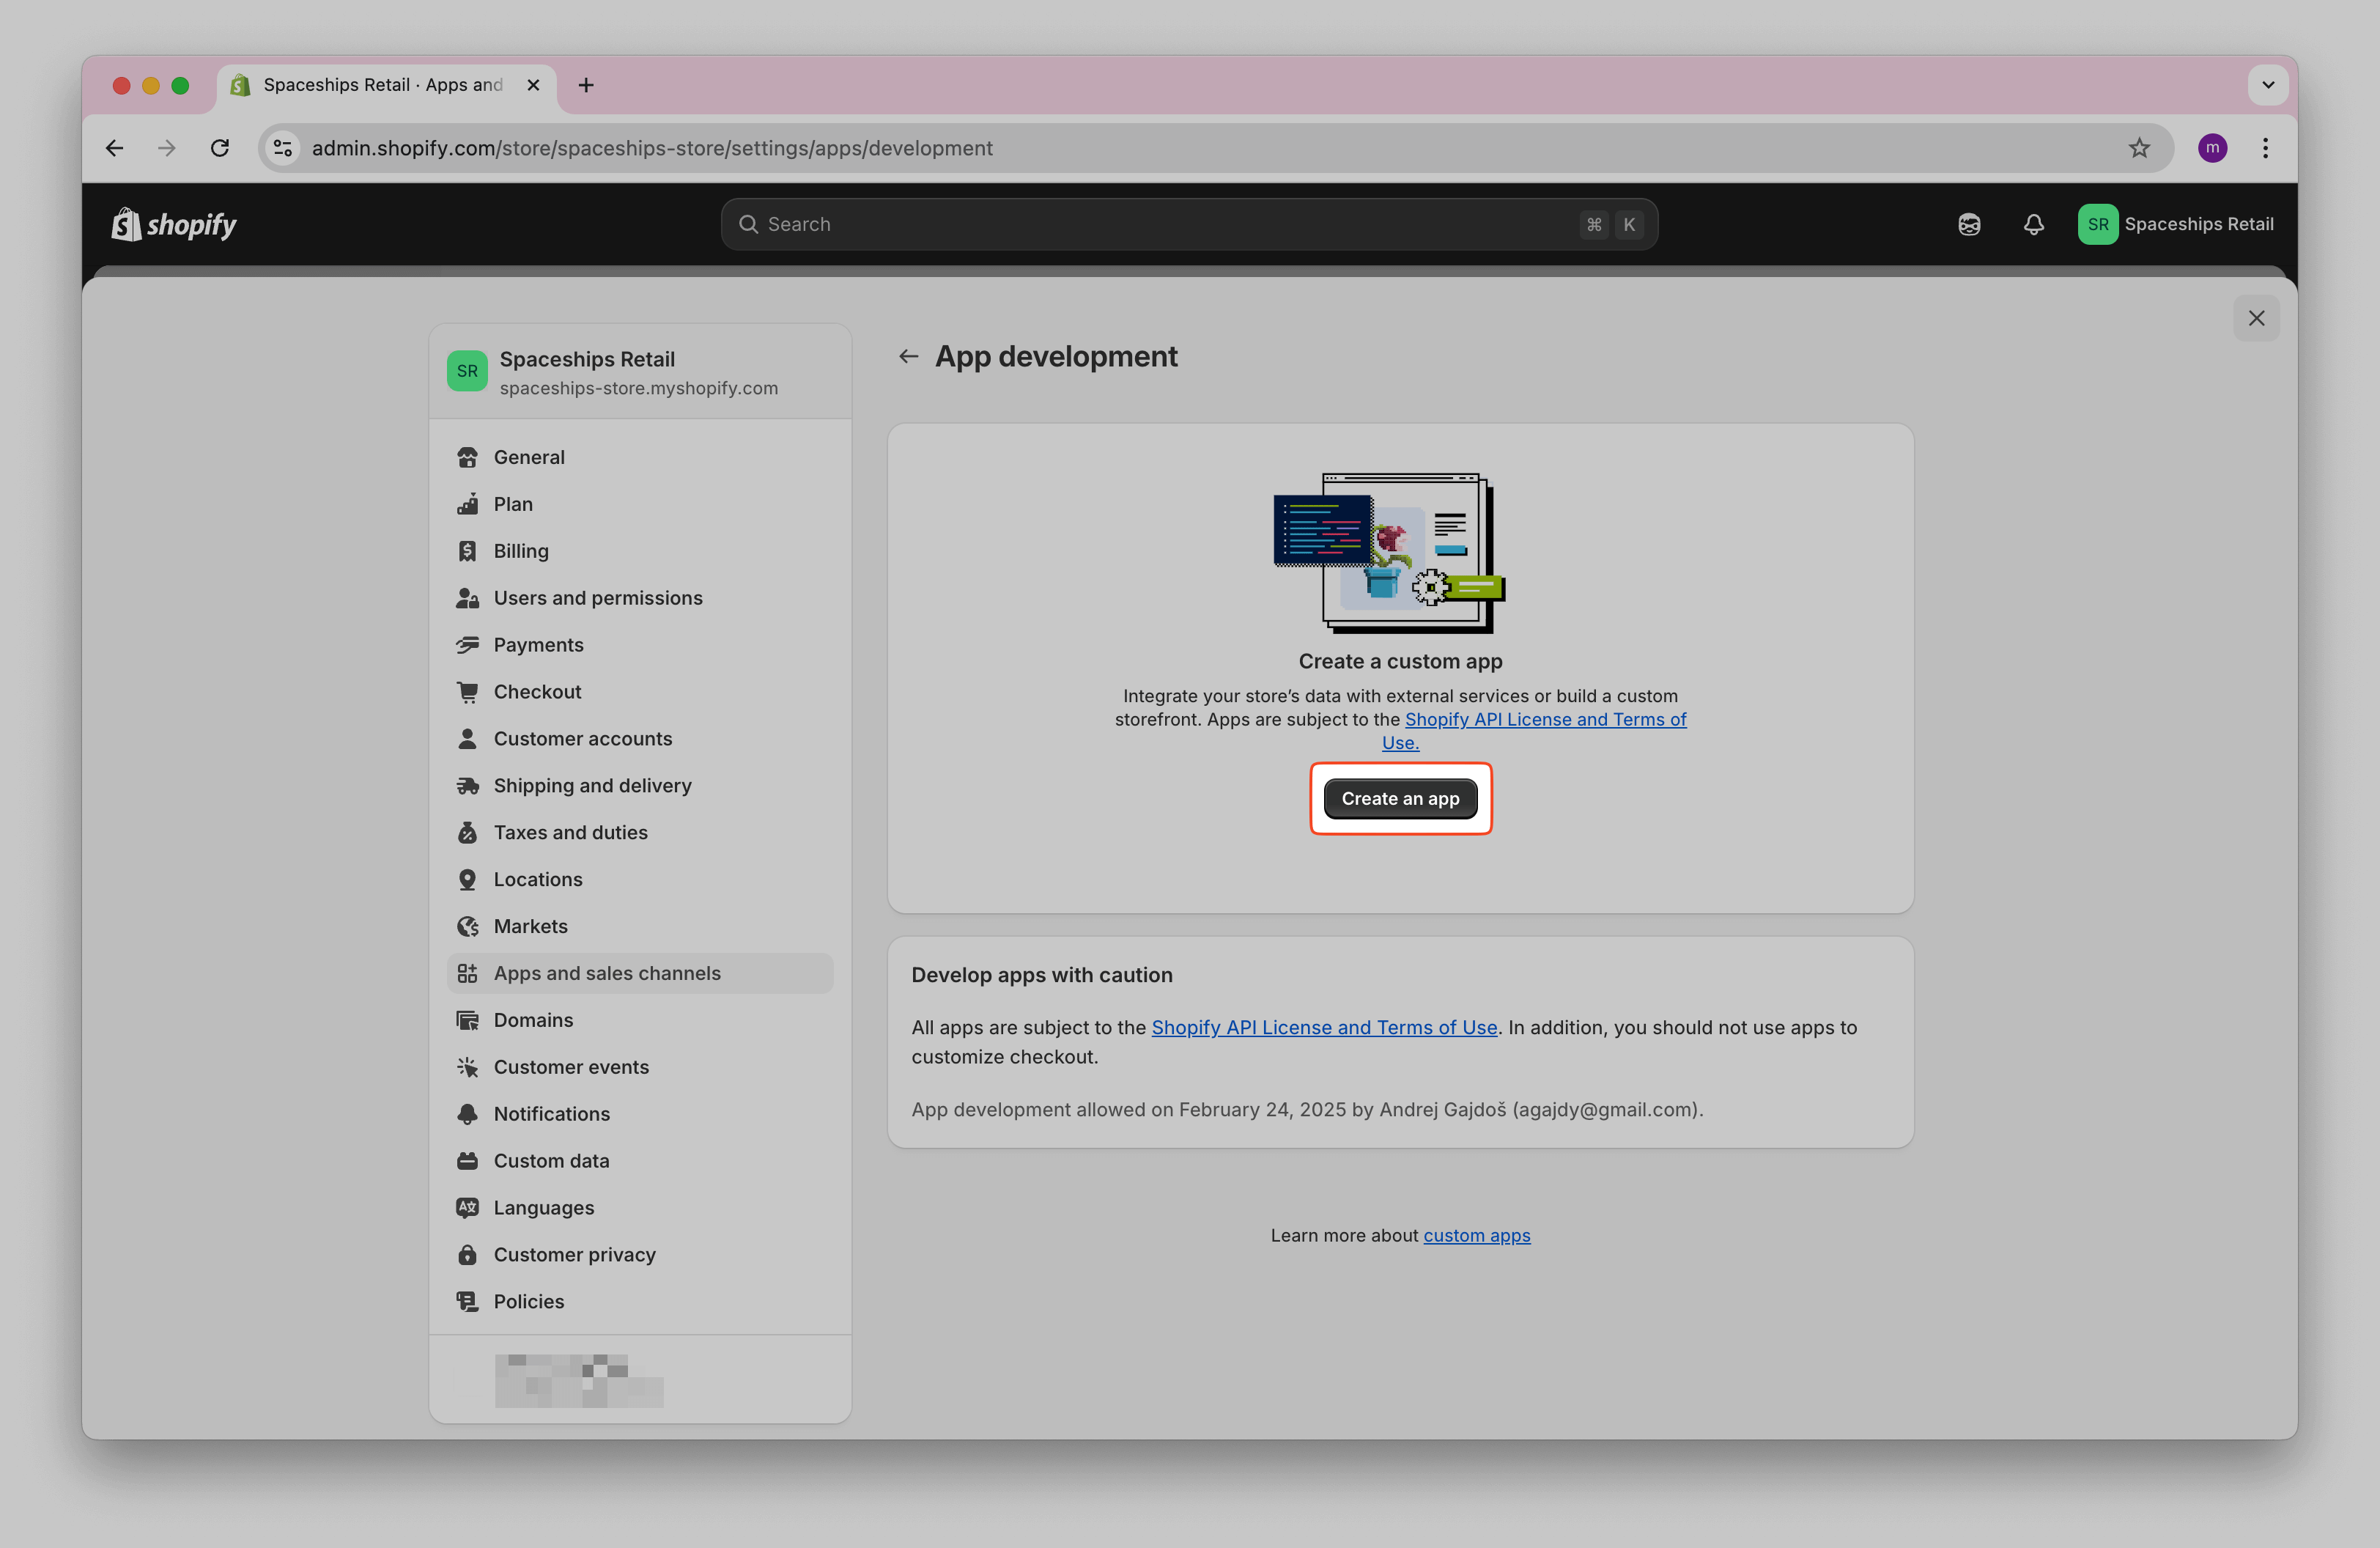
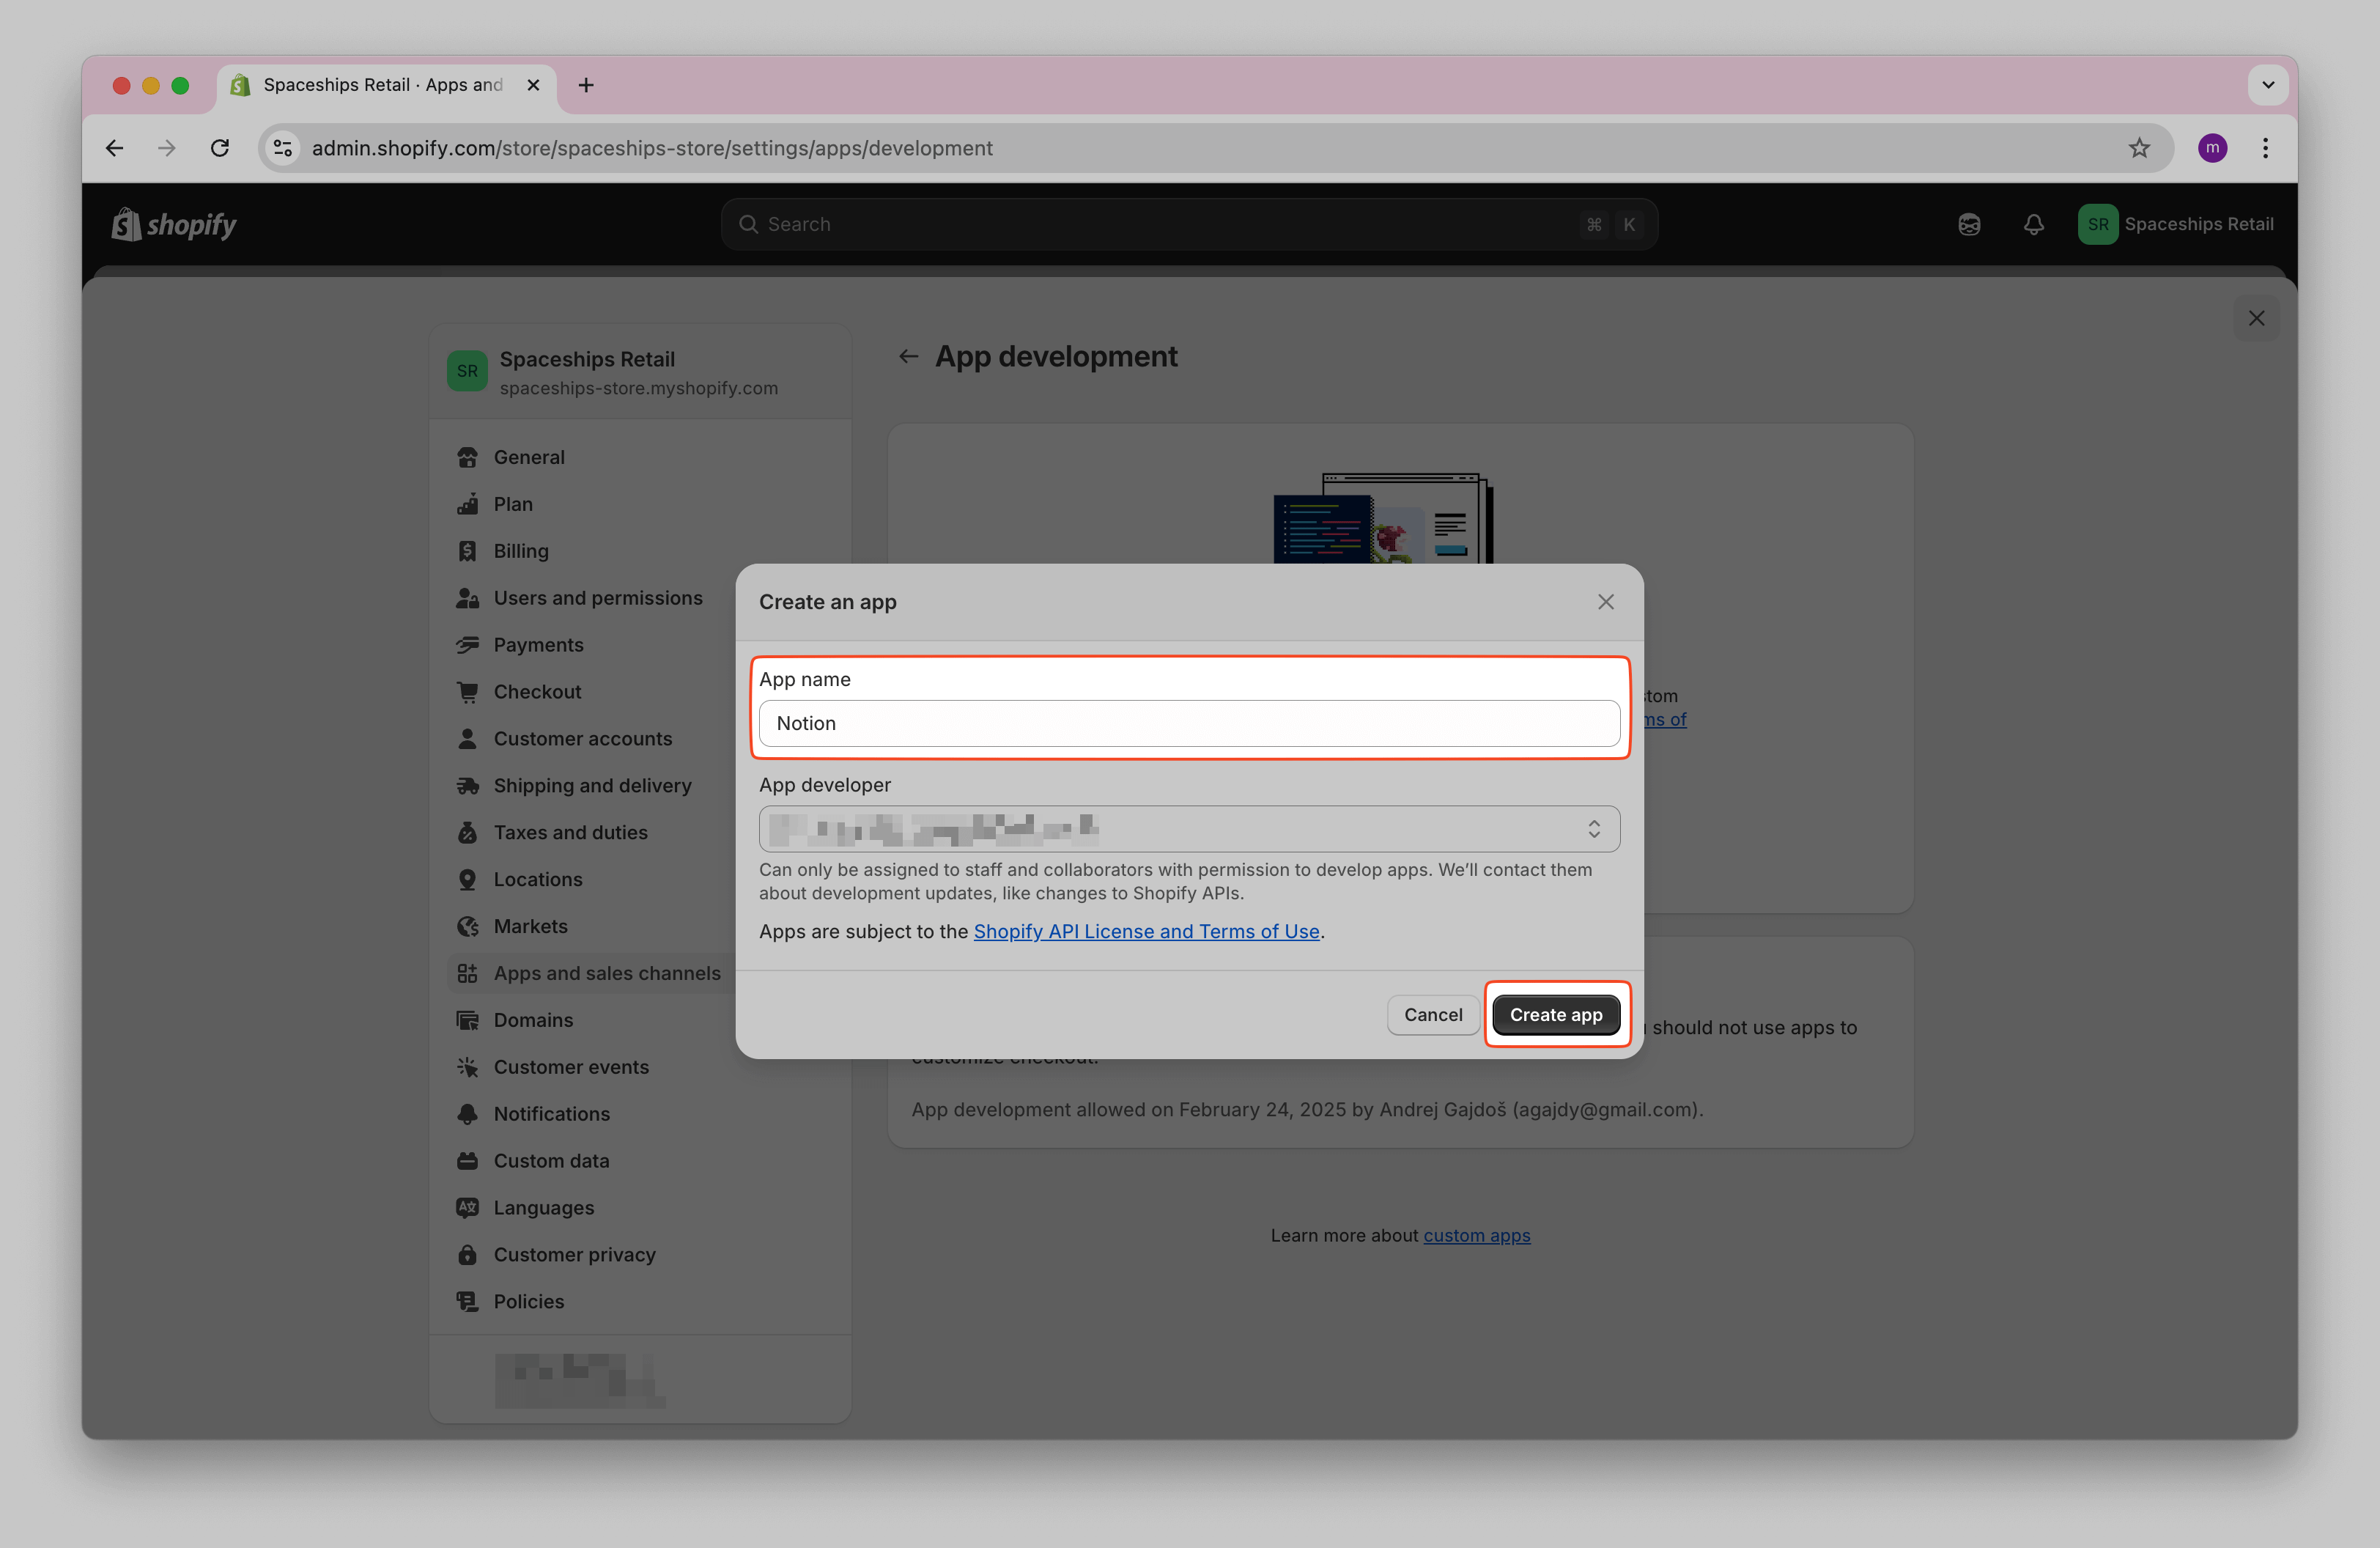
Click Create an app .

Name it (e.g., Note API Connector Notion), then click Create app .

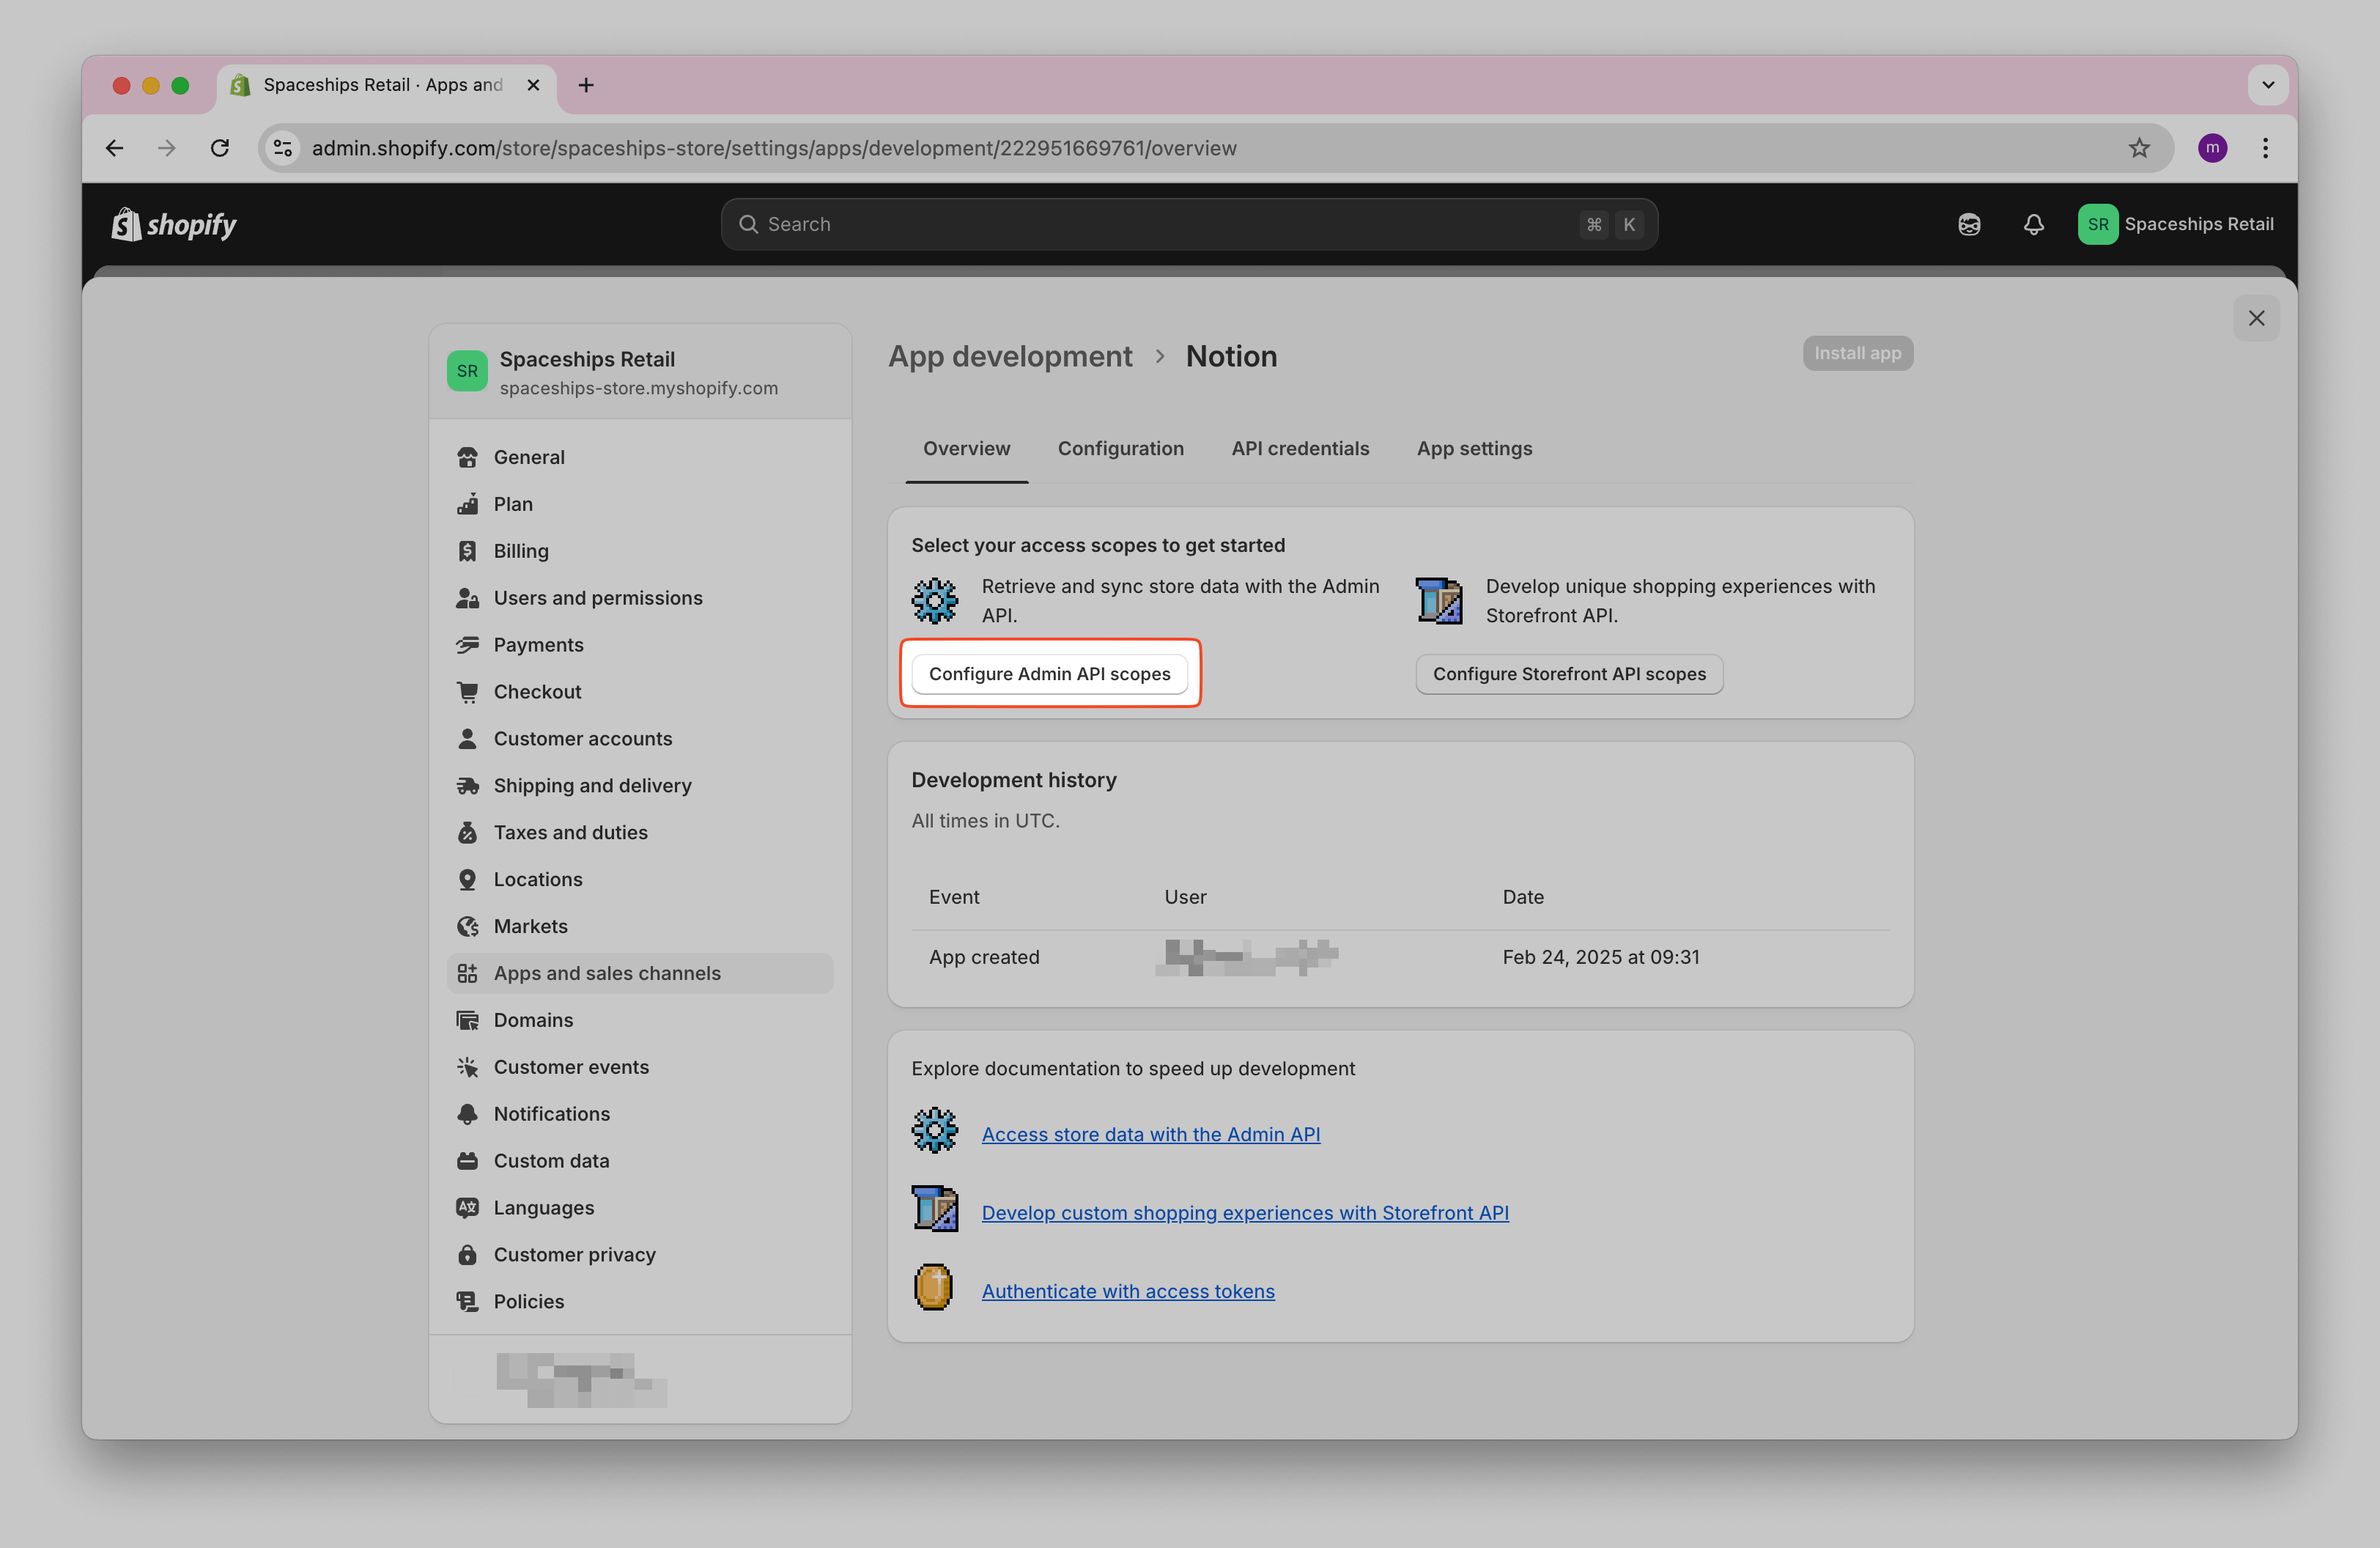
In the app overview, click Configure Admin API scopes .
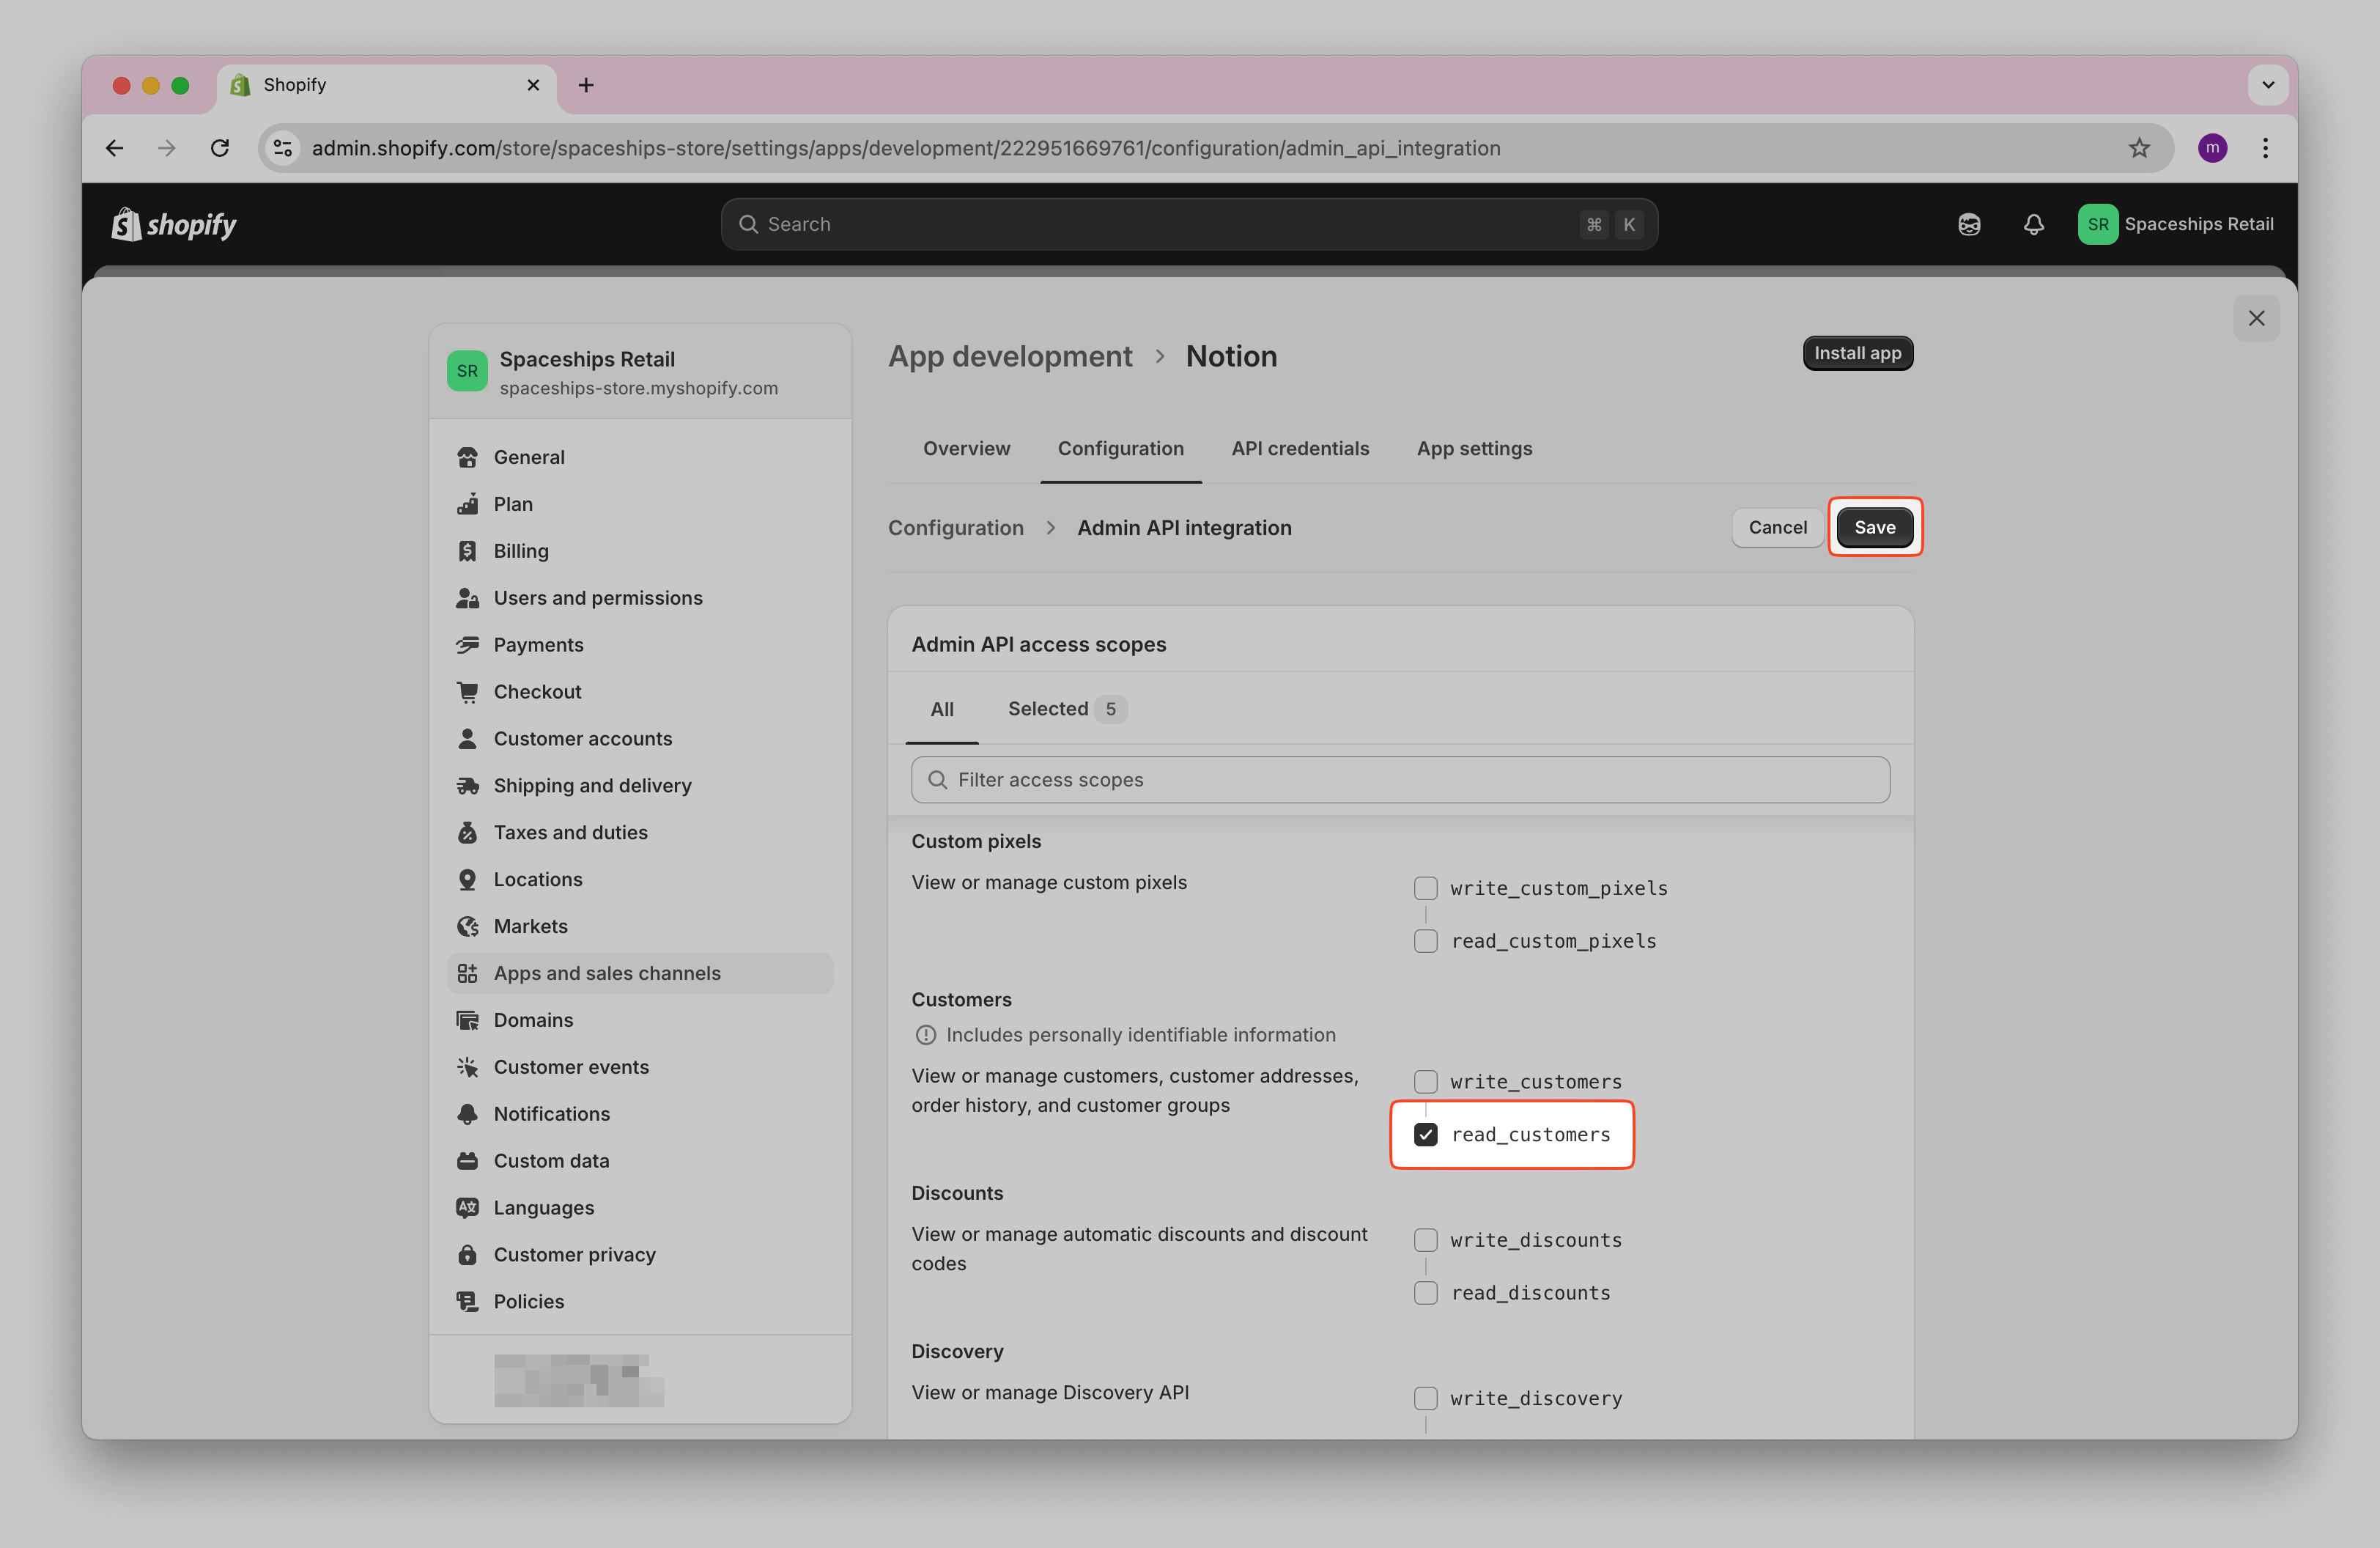
Now, you can choose which data the integration should have access to. For this tutorial, we only need read
access for order, products and customers:
read_orders
,
read_products
, and
read_customers
. If you also plan to sync inventory levels, add read_inventory. Feel free to select the data
you need, you can always adjust these settings later. When you are done, click
Save
.
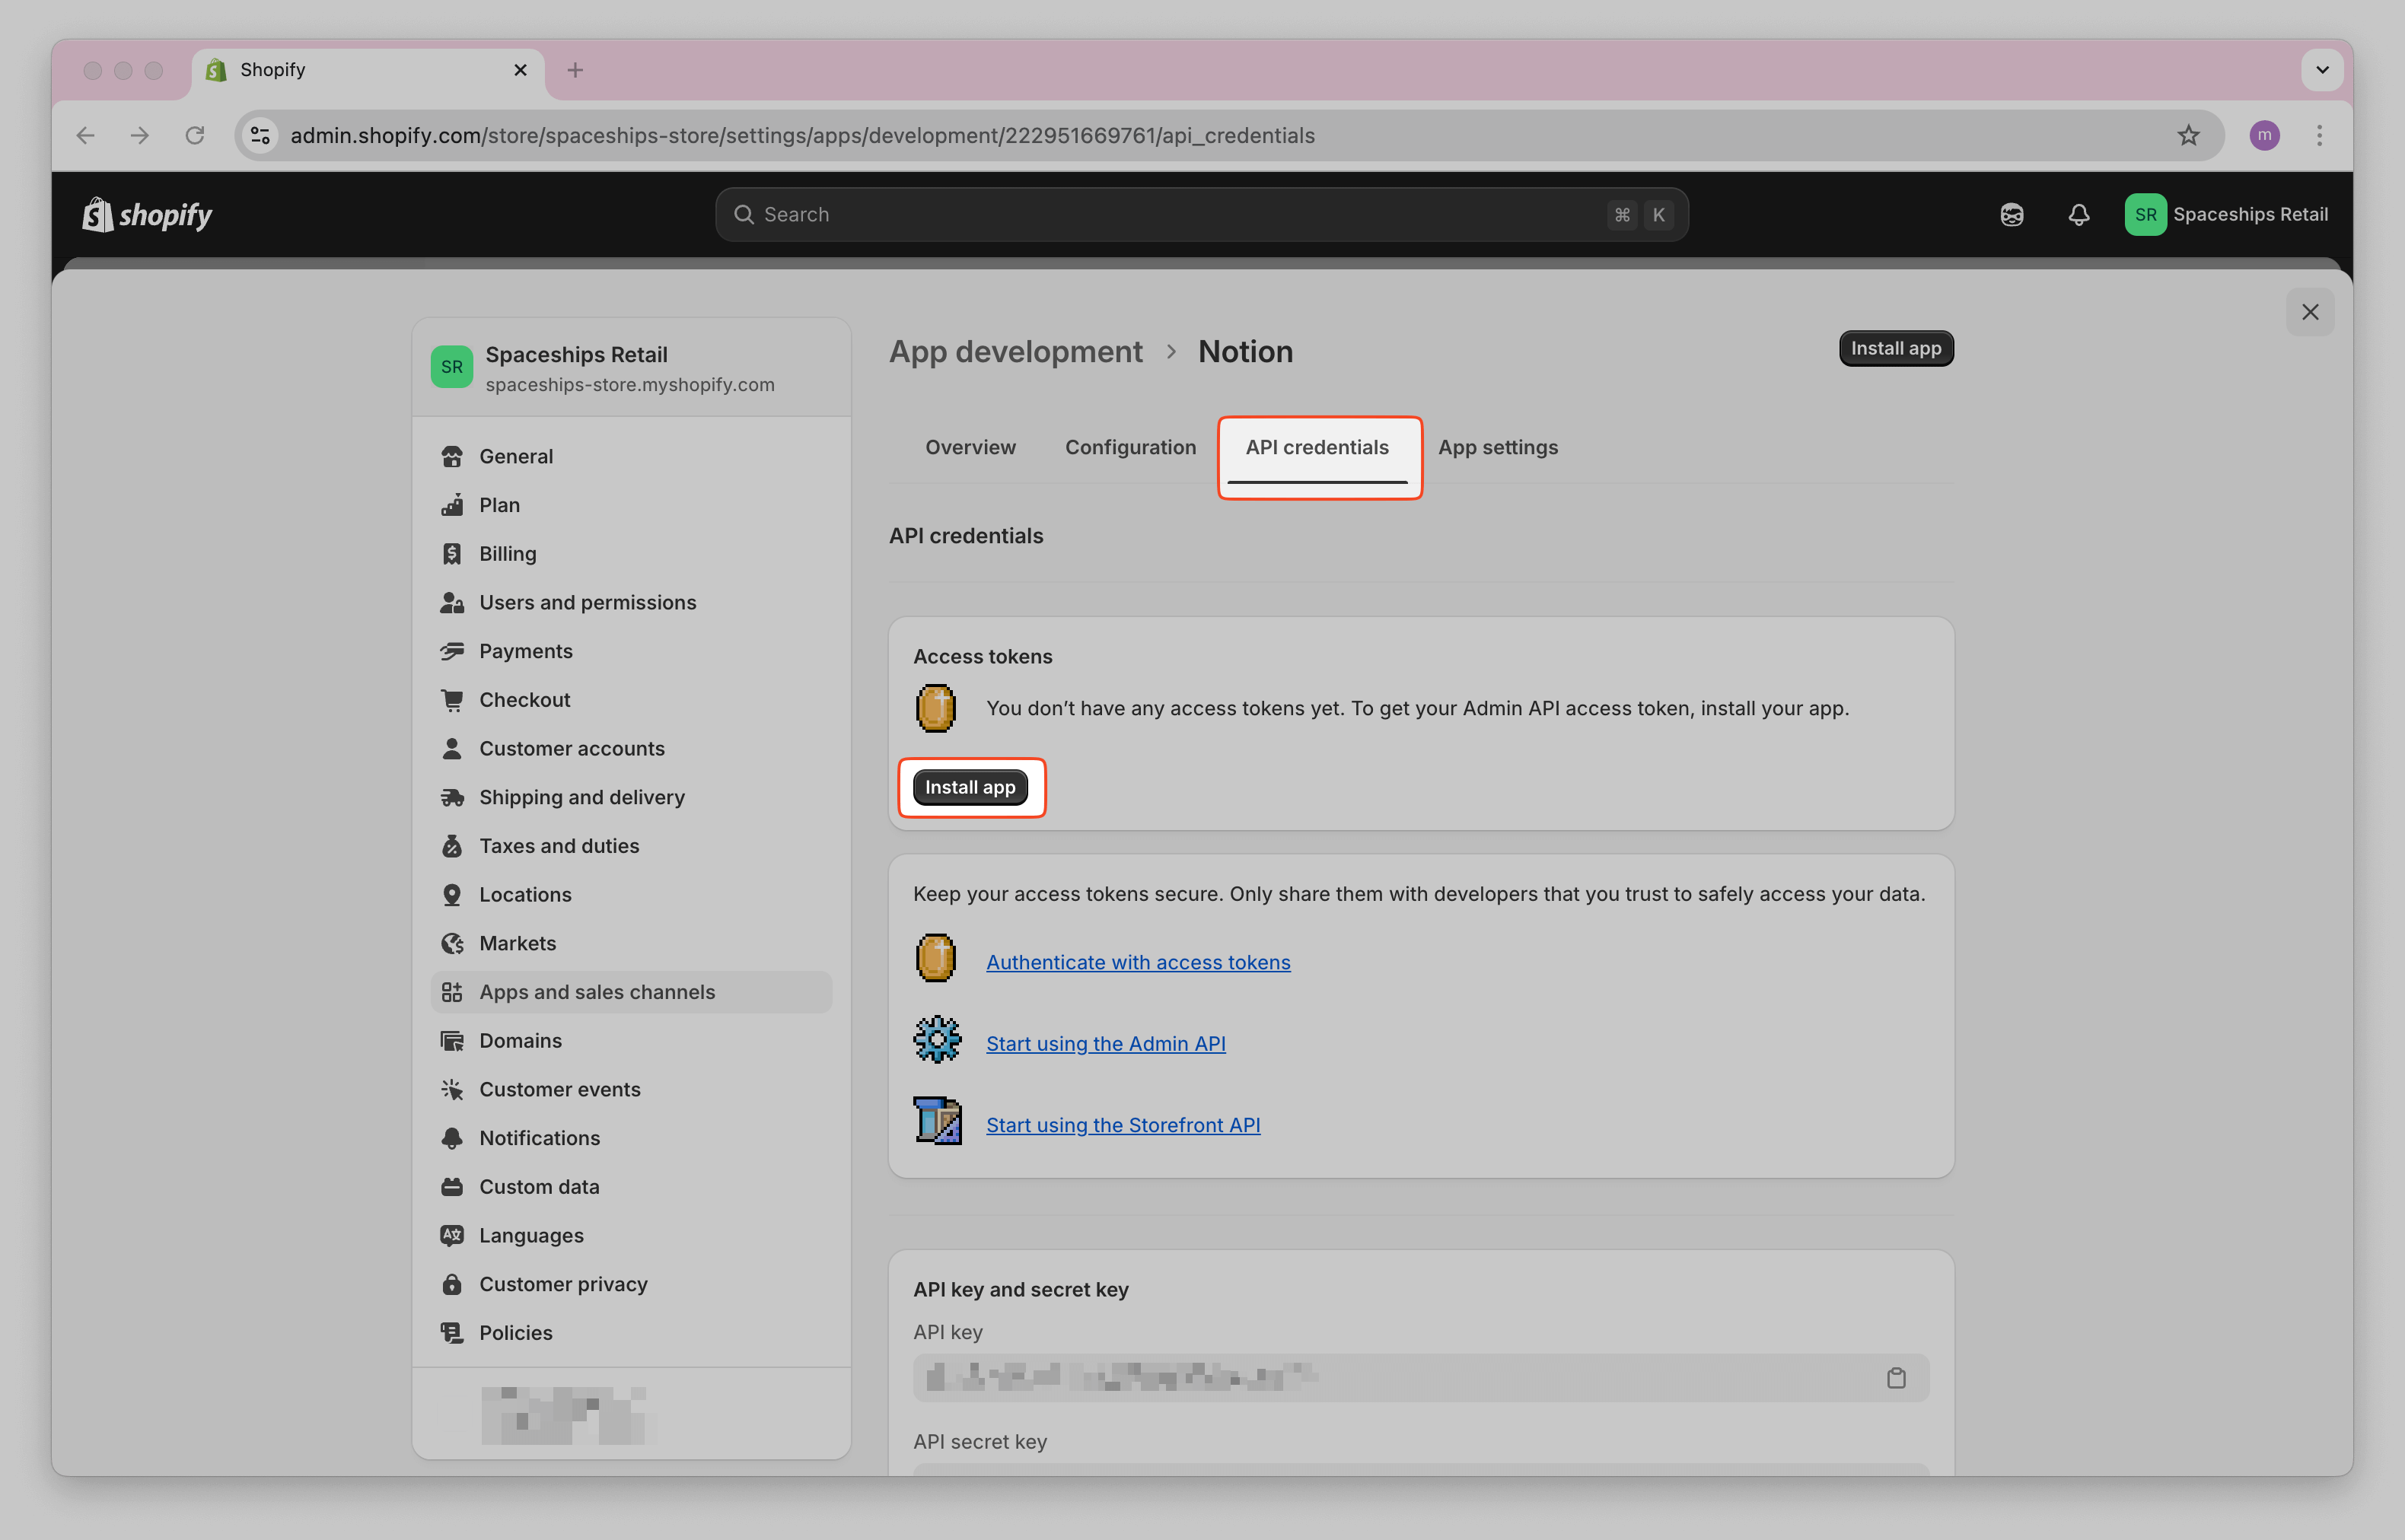
Go to API Credentials and click Install app .
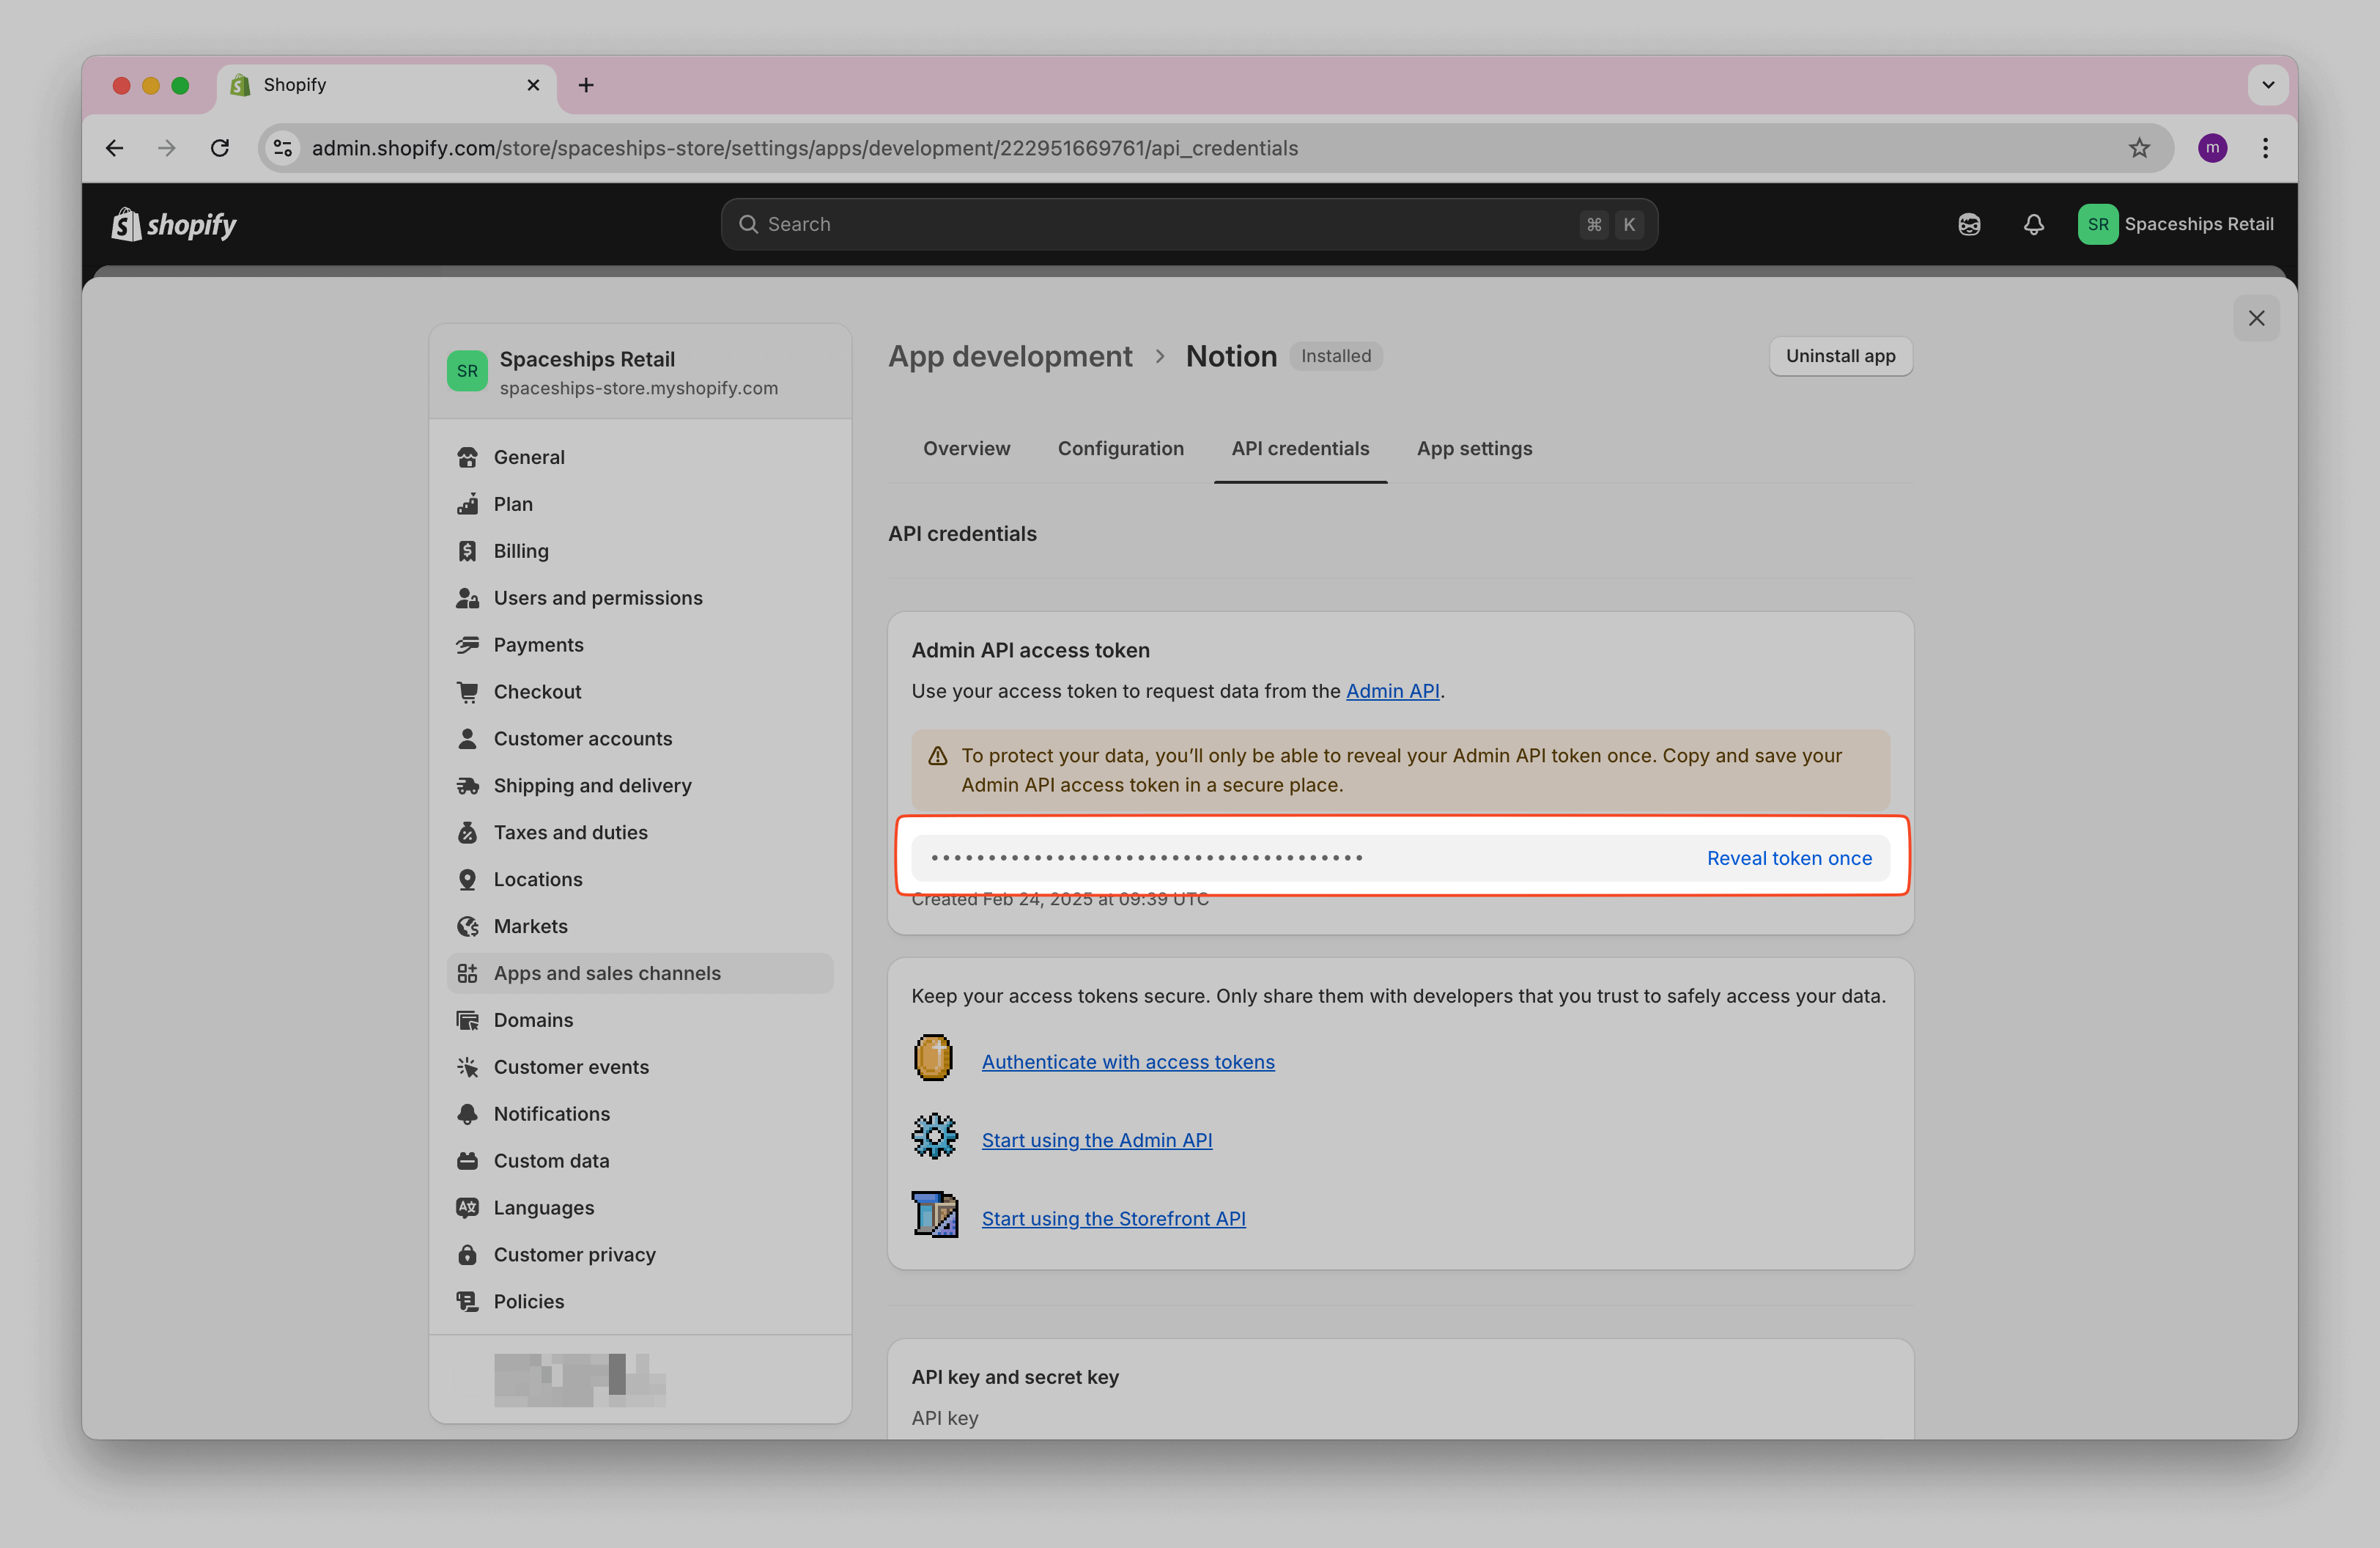
Click Reveal token once . Copy the Admin API access token and store it safely. This token allows you to access your Shopify data via the API. You will paste this into Note API Connector.
Import Shopify Data into Notion
You now have a Shopify Admin token and a connected Notion workspace. Next you will create API requests in Note API Connector that pull orders and products from Shopify and write them into a Notion database.
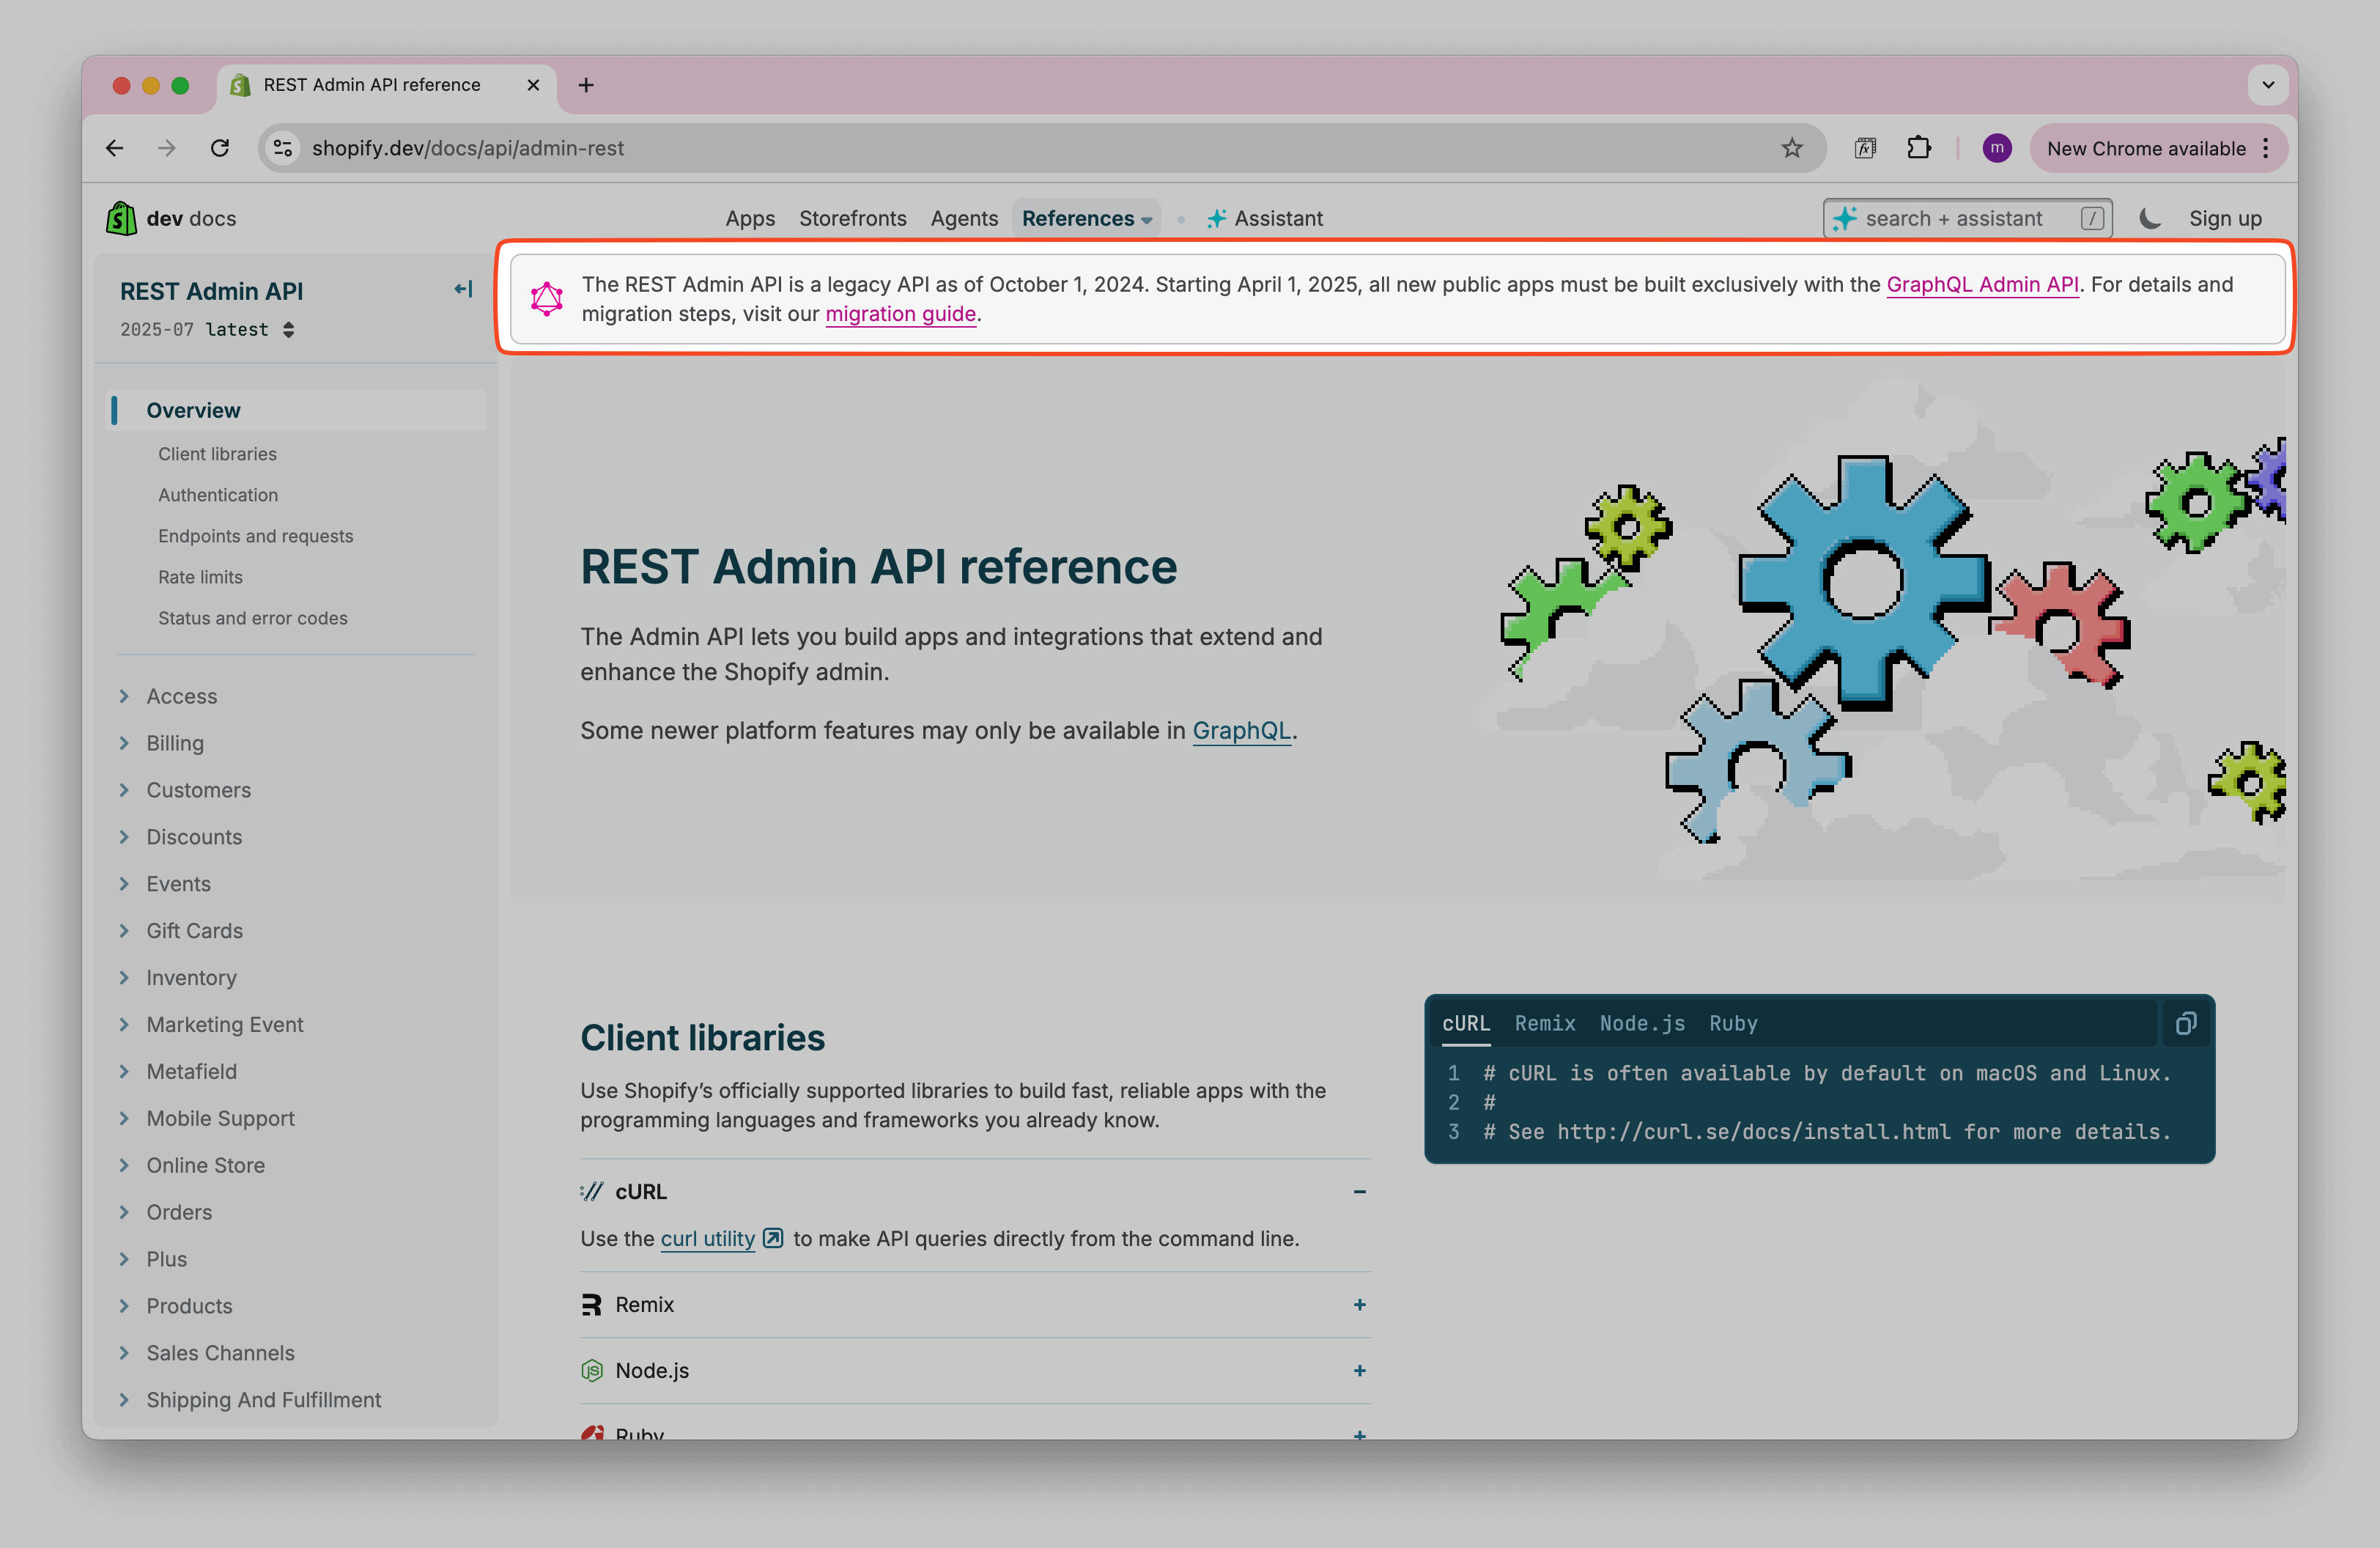
Before making API requests, review Shopify’s API documentation to explore what data you want to import: Shopify Admin REST API .
Shopify recommends using the GraphQL Admin API for public apps. In this tutorial, however, we use the REST Admin API because our goal is a private integration and REST conveniently returns all fields by default. With GraphQL, you must explicitly define fields for every API, which adds extra setup steps. You can switch to GraphQL later if you want to request only specific fields.
Import Shopify Products
You will pull product data from the /products.json endpoint and write it into a Notion database
using Note API Connector.
Step 1: Create the request in Note API Connector
To fetch product data, use the following API endpoint and replace your-development-store with
your Shopify store domain:
https://your-development-store.myshopify.com/admin/api/2025-01/products.json
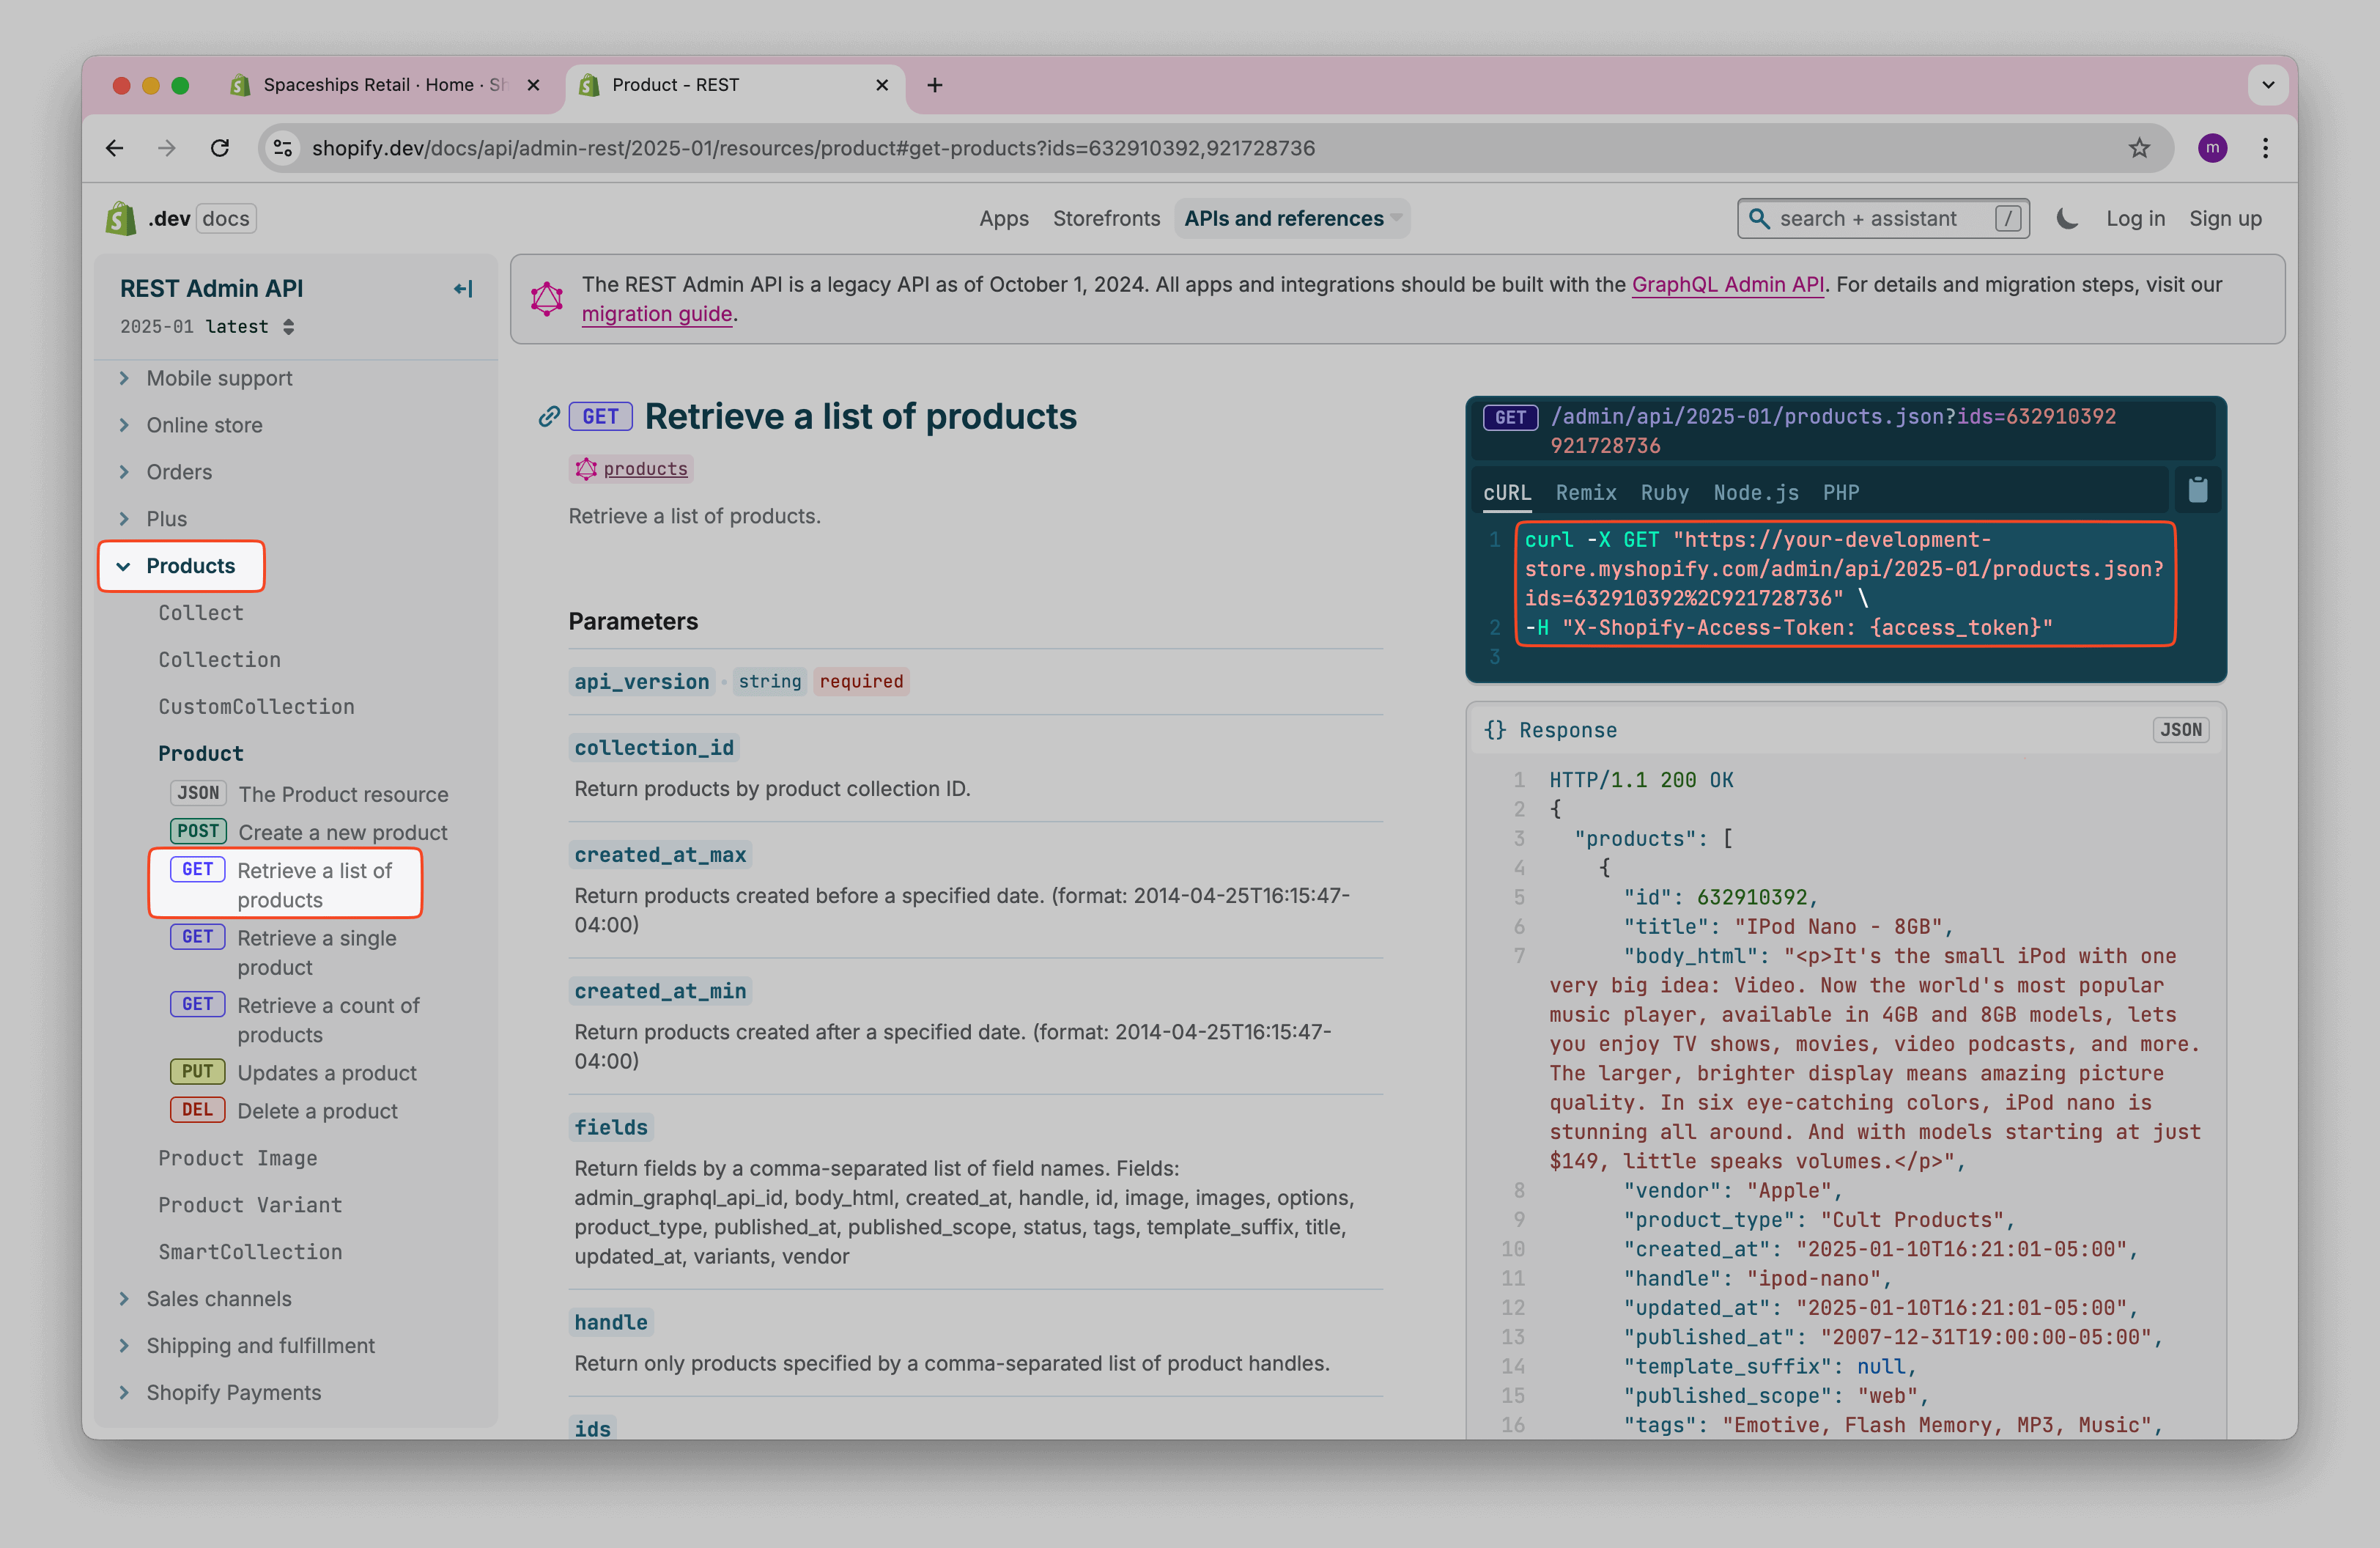
Replace
your-development-store
with your actual store’s domain.
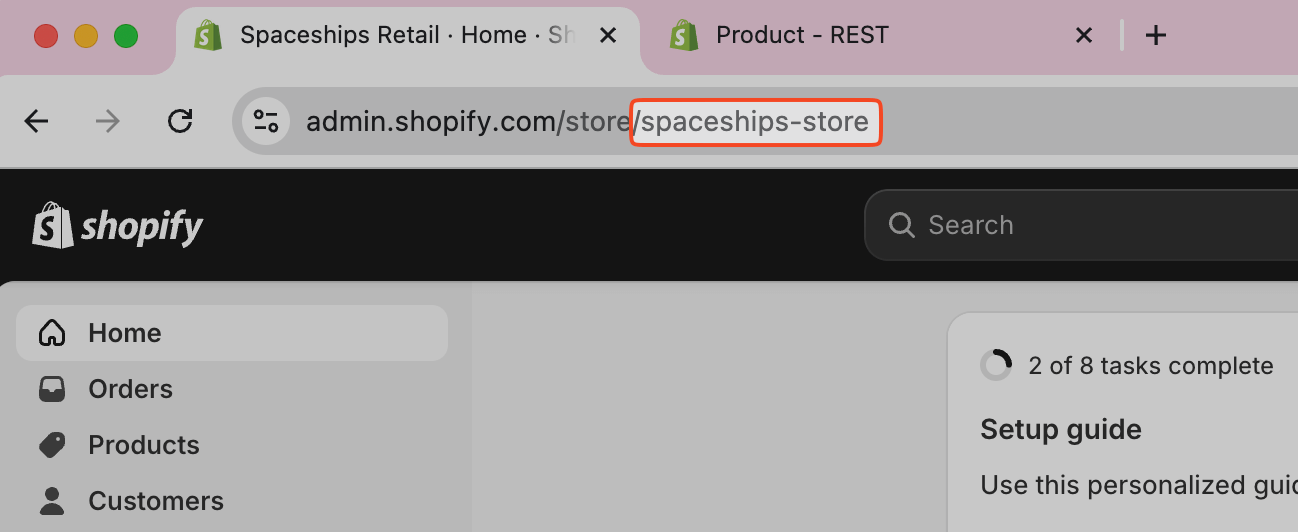
Use the limit query parameter to control how many records are returned per request. If you omit
it, Shopify returns up to 50 items by default; the maximum is 250. For a store
called Spaceships Store, the request would be:
https://spaceships-store.myshopify.com/admin/api/2025-01/products.json?limit=250
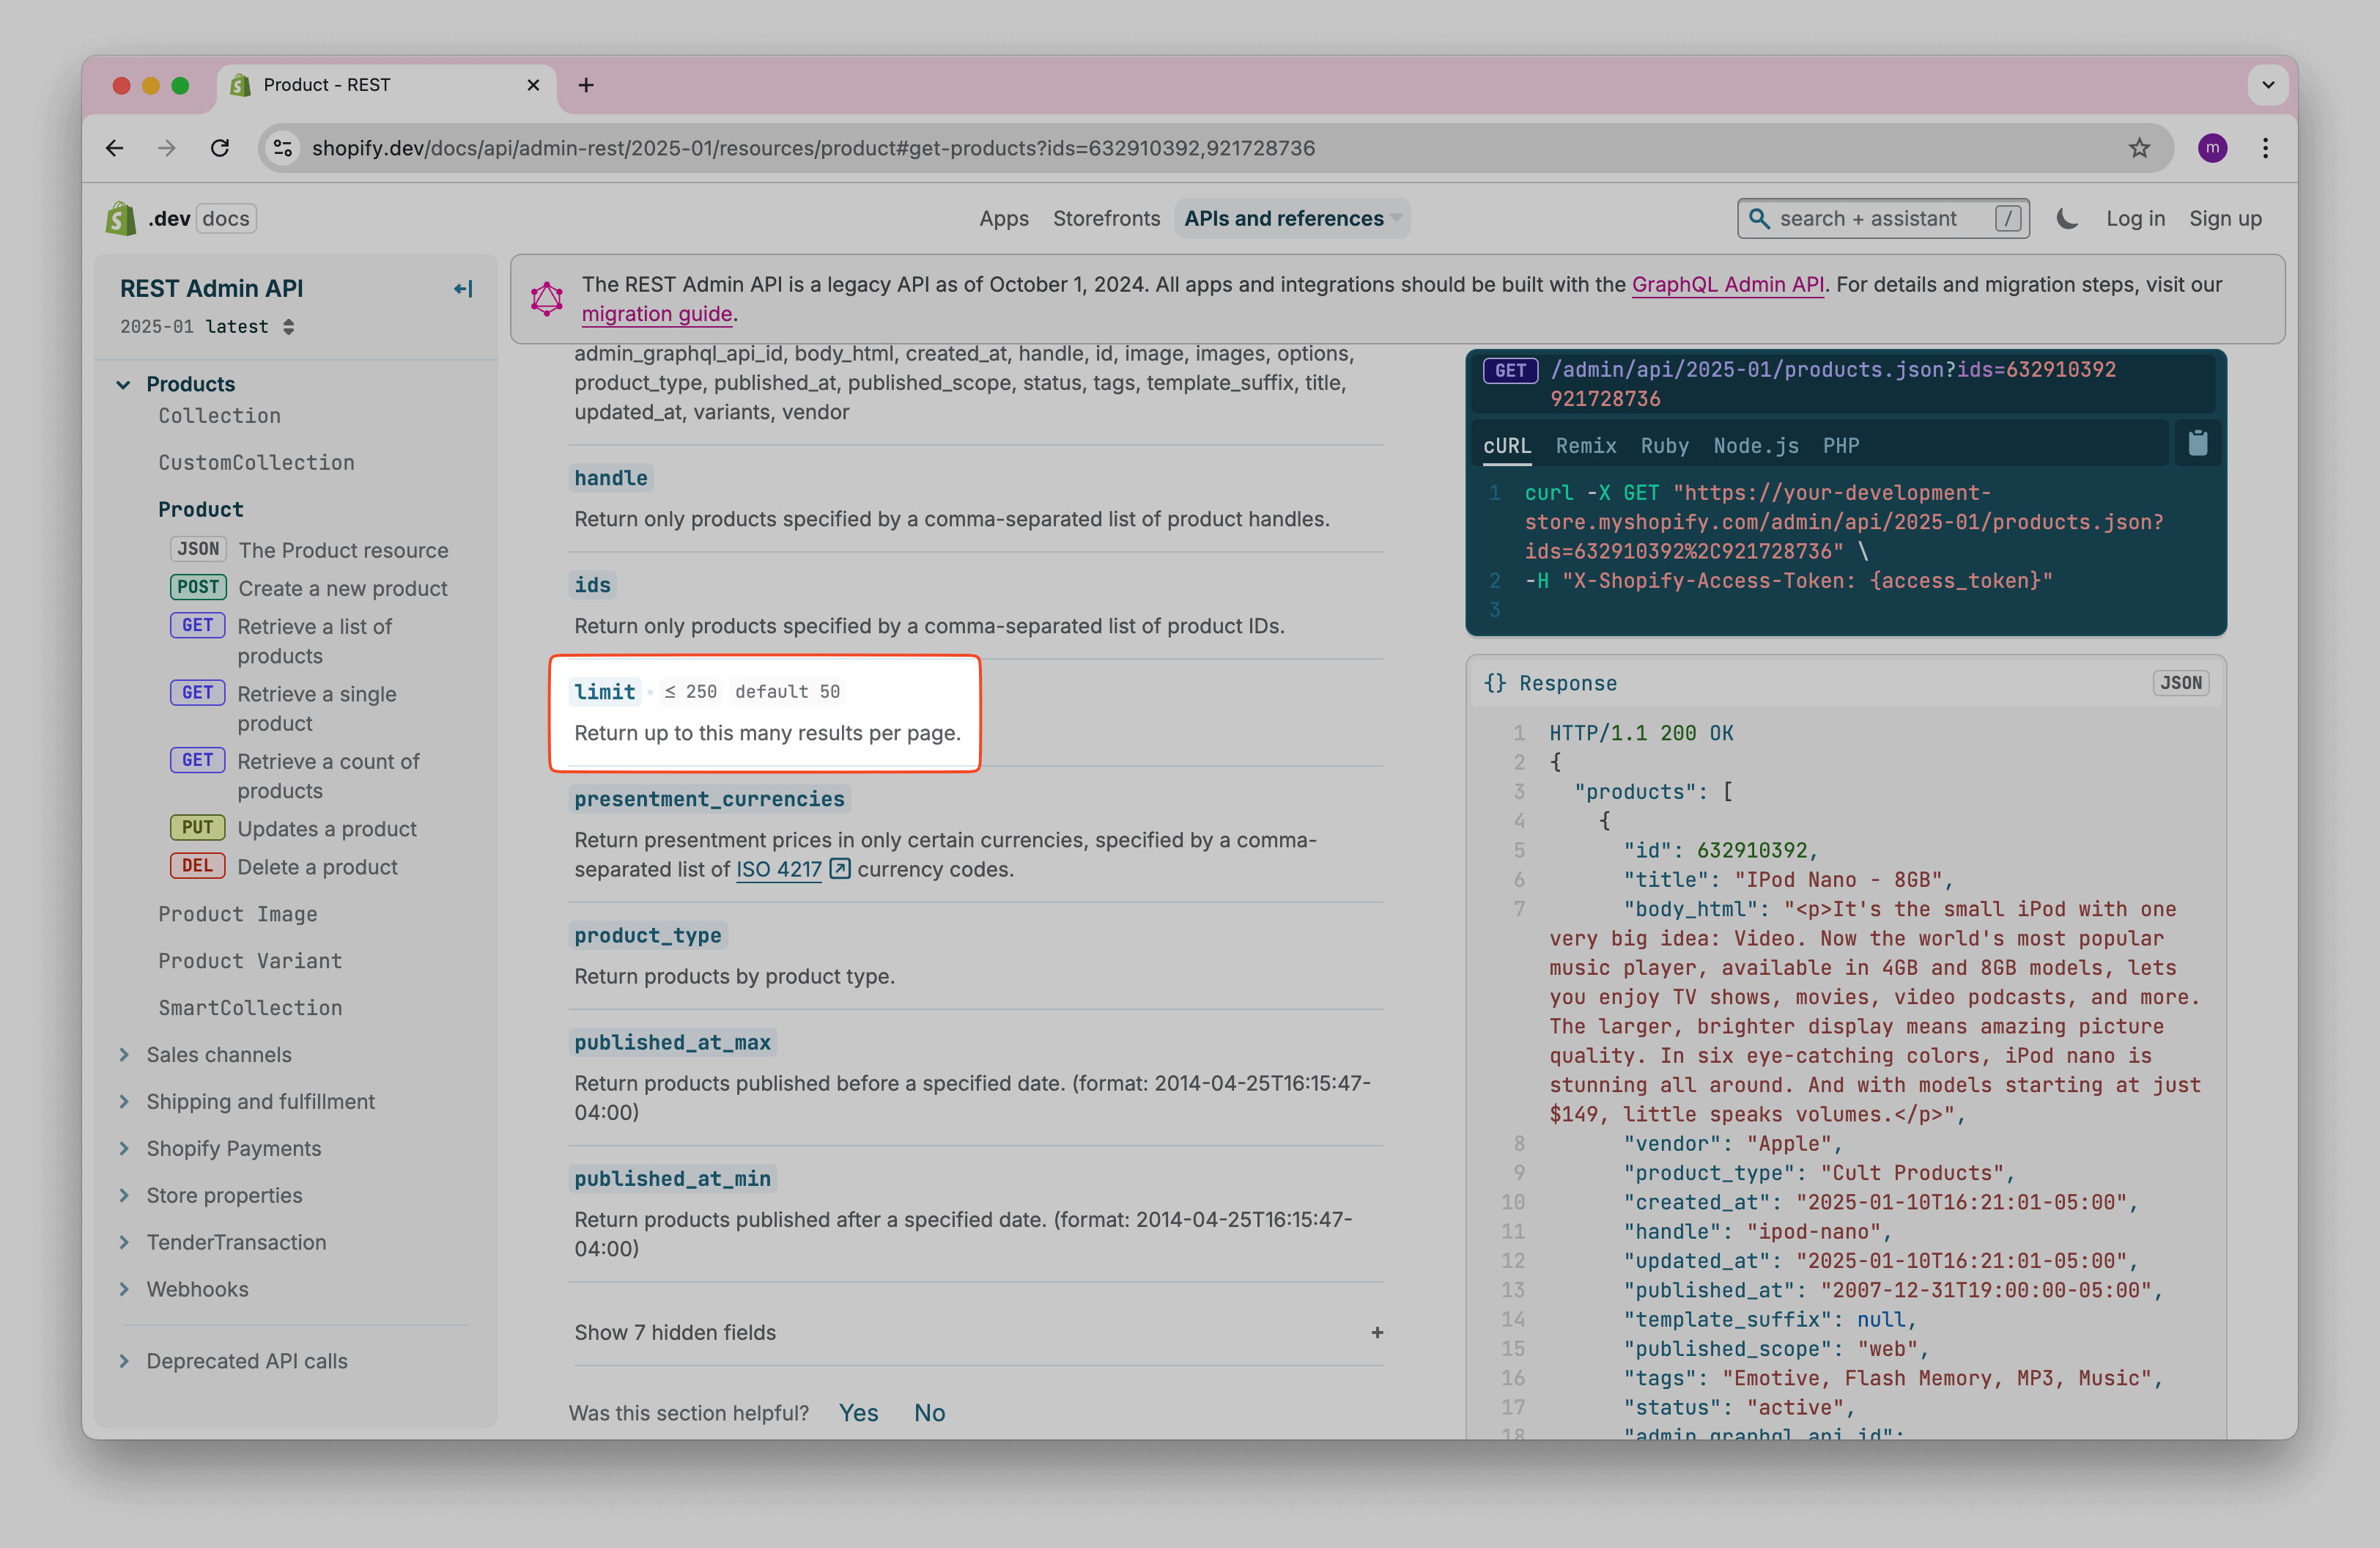
We should have a Notion Database page where we want to import data.
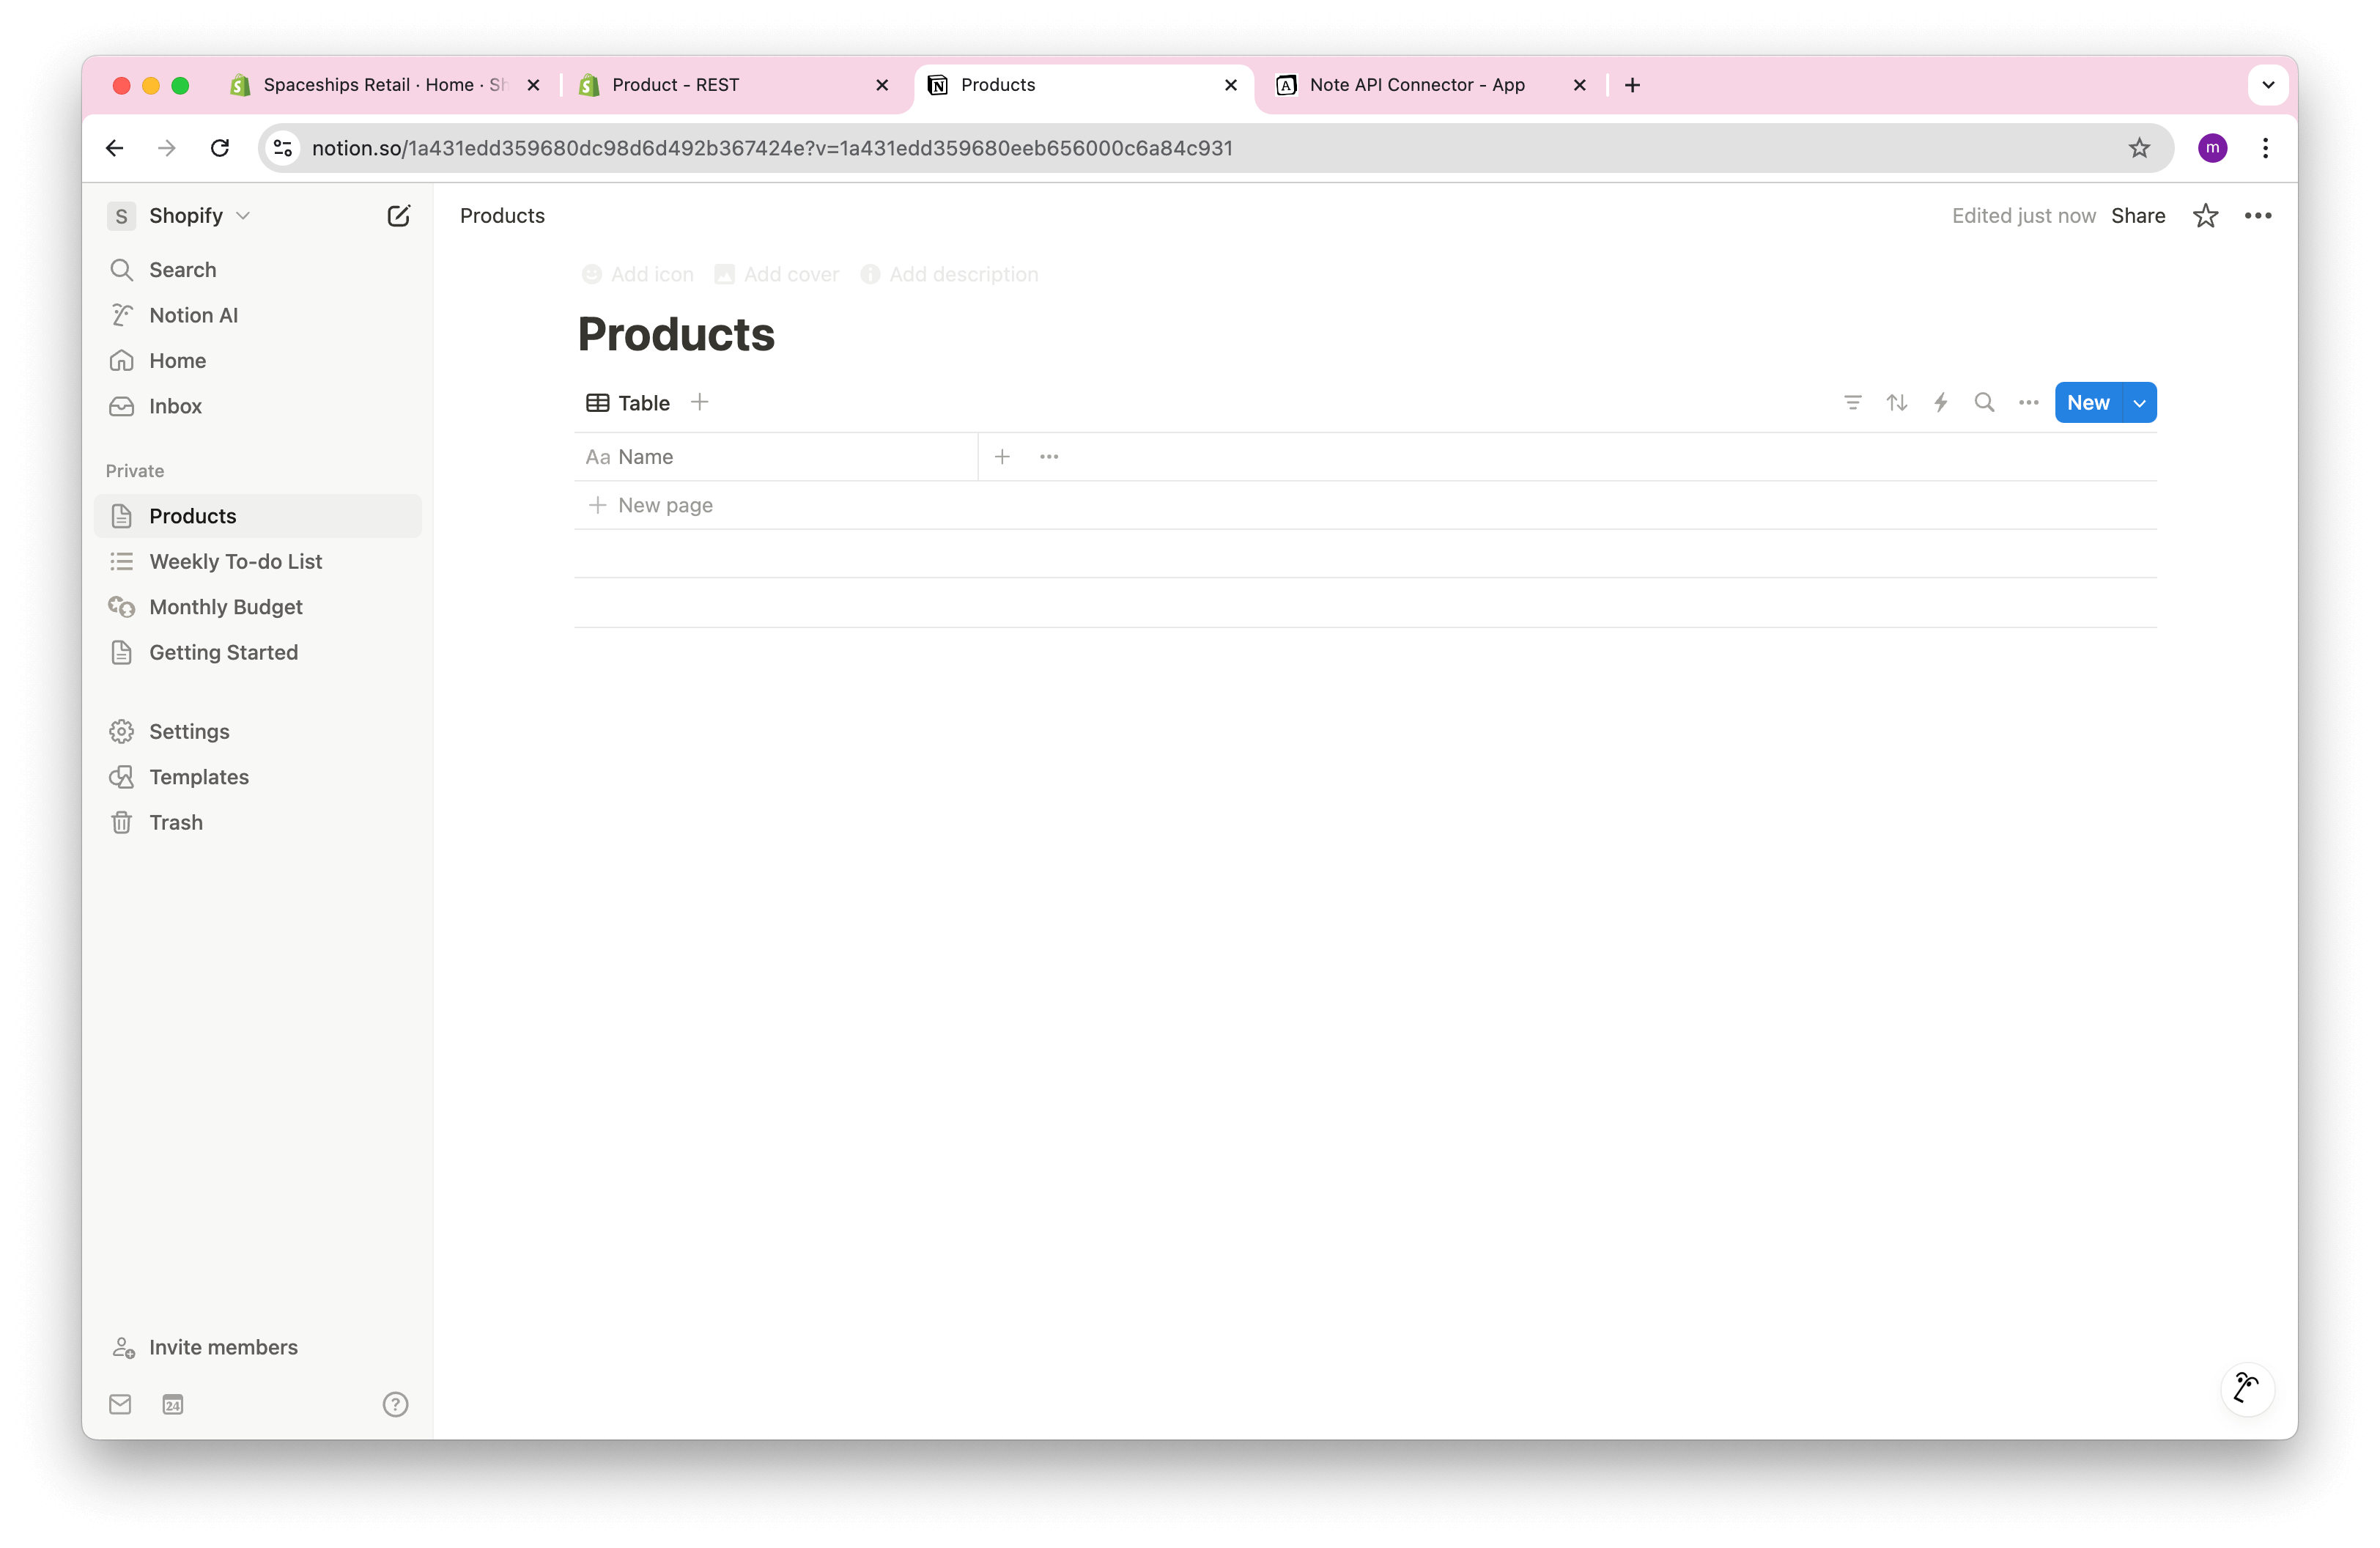
Open Note API Connector and click Create request .
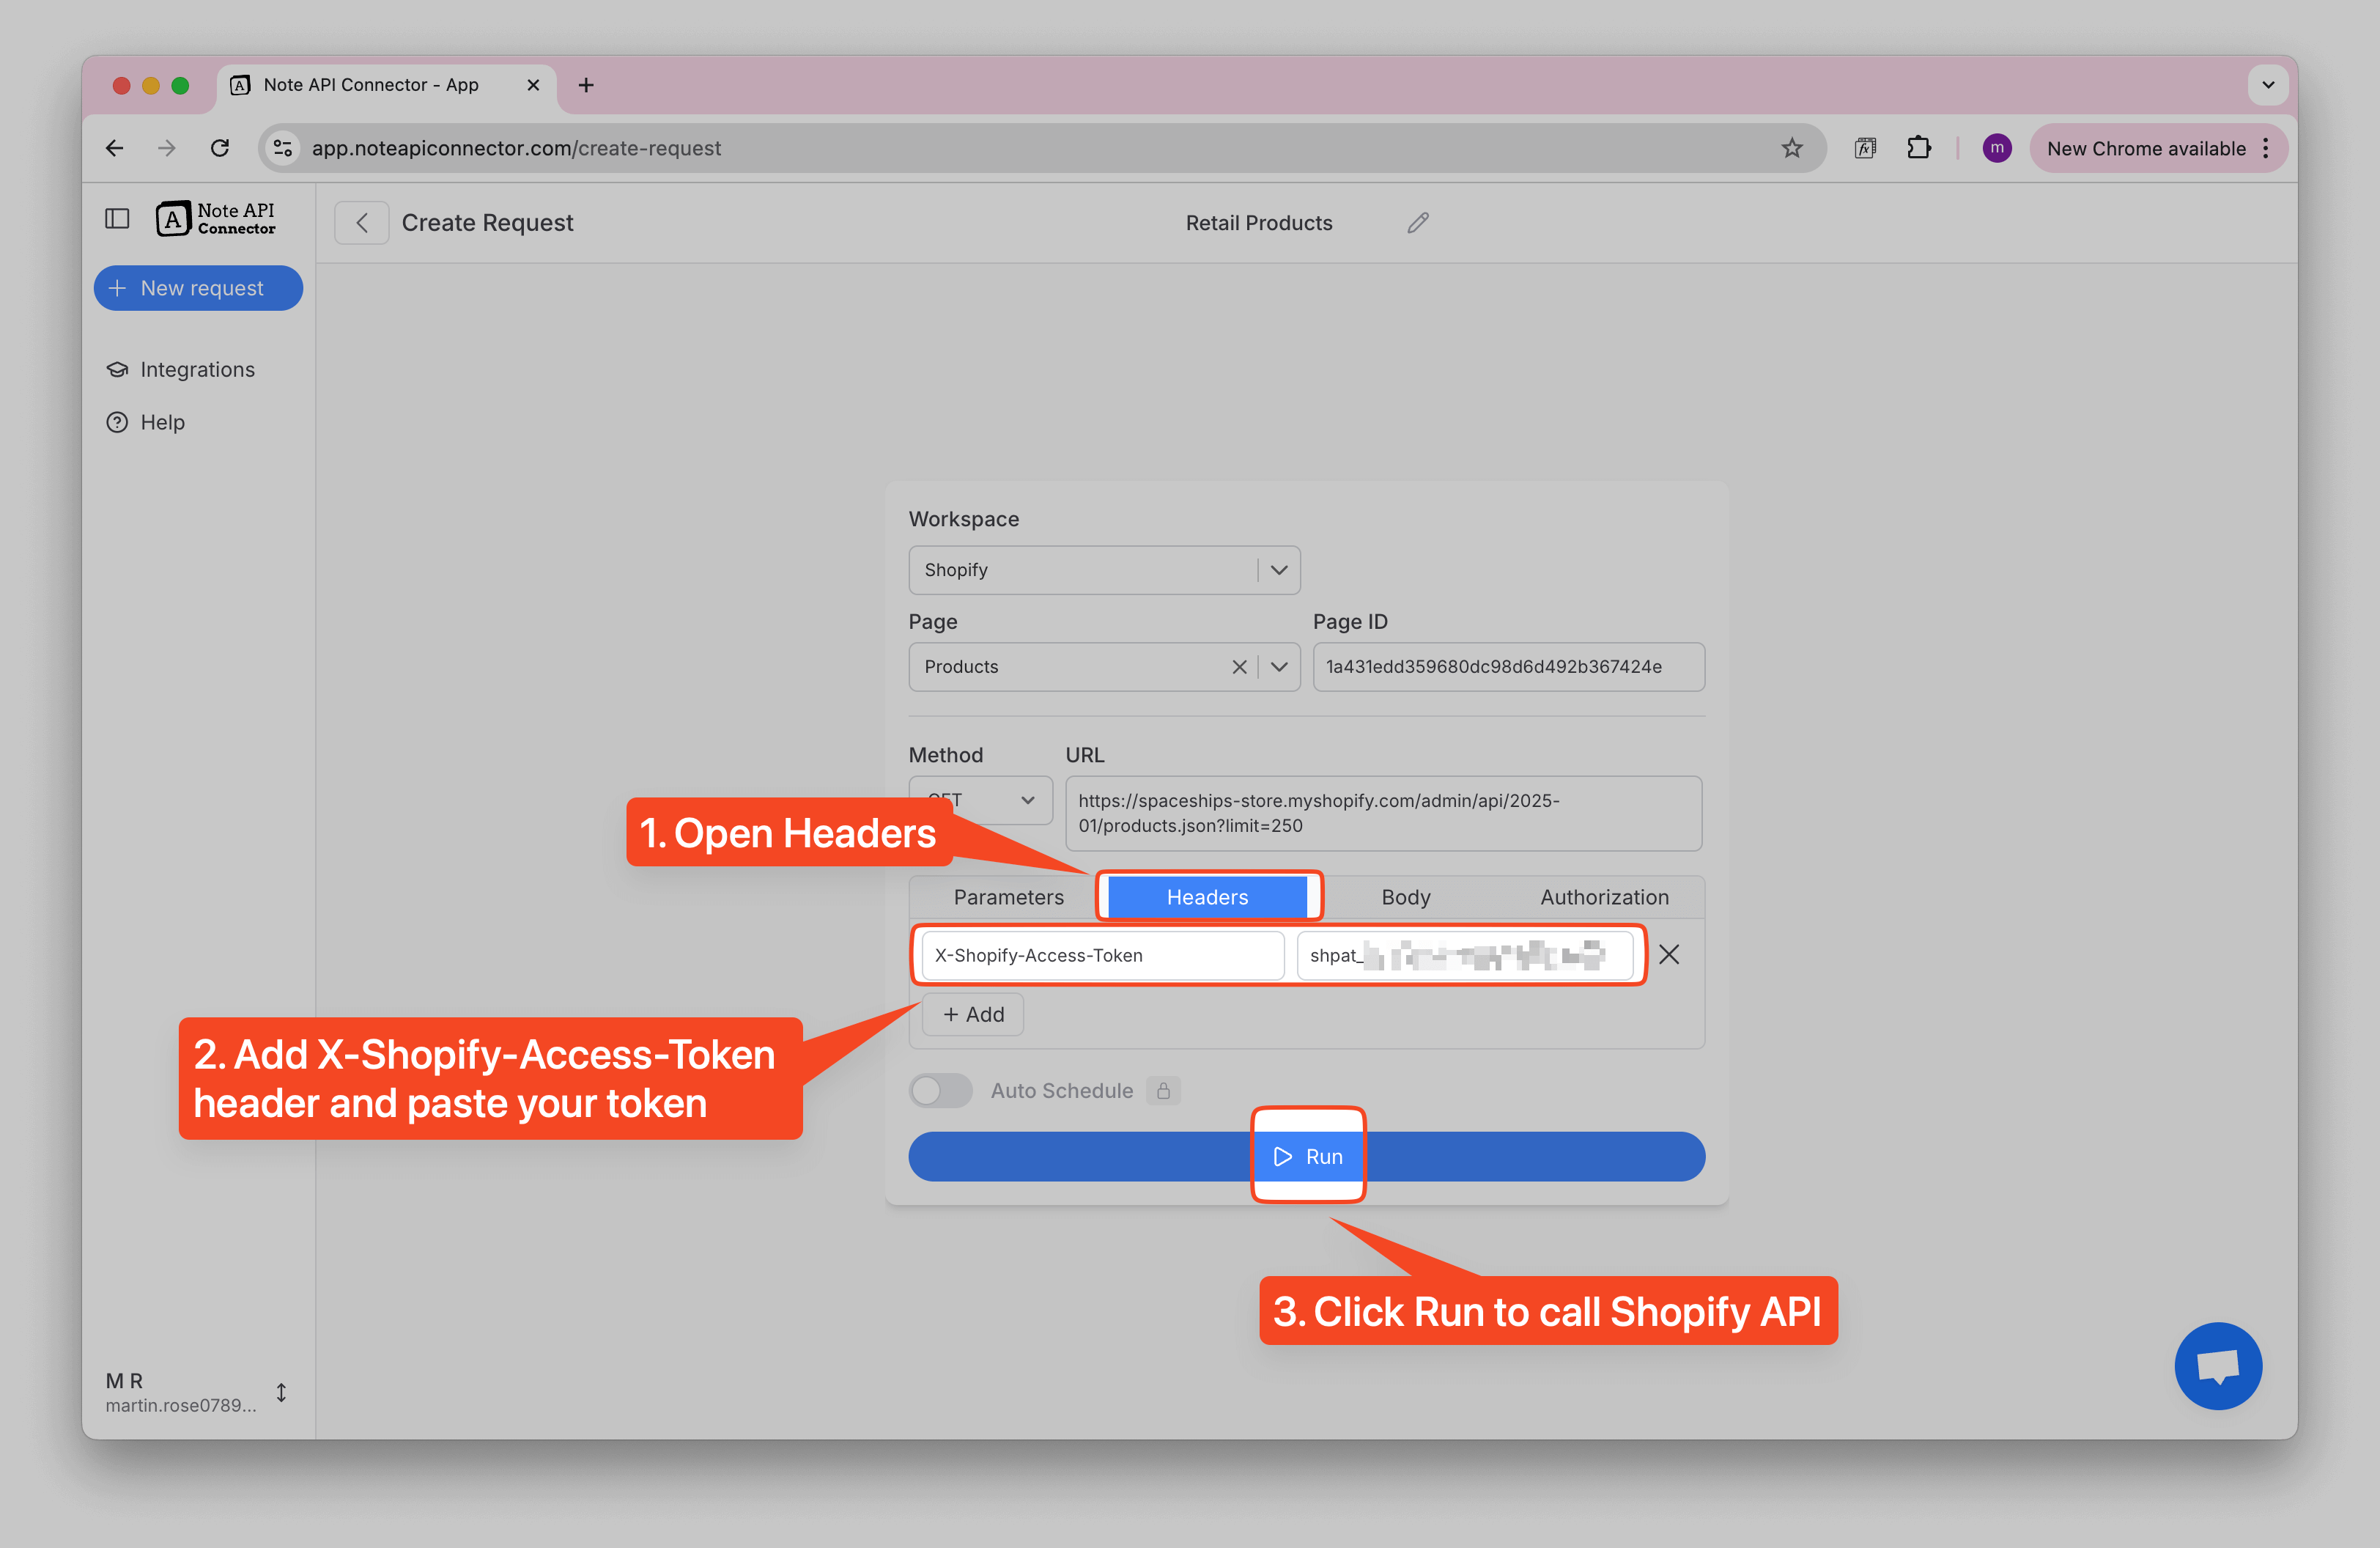
Name your request (e.g., Retail Products). Select the Notion database where you want to import the data. Paste the API URL into the URL field.
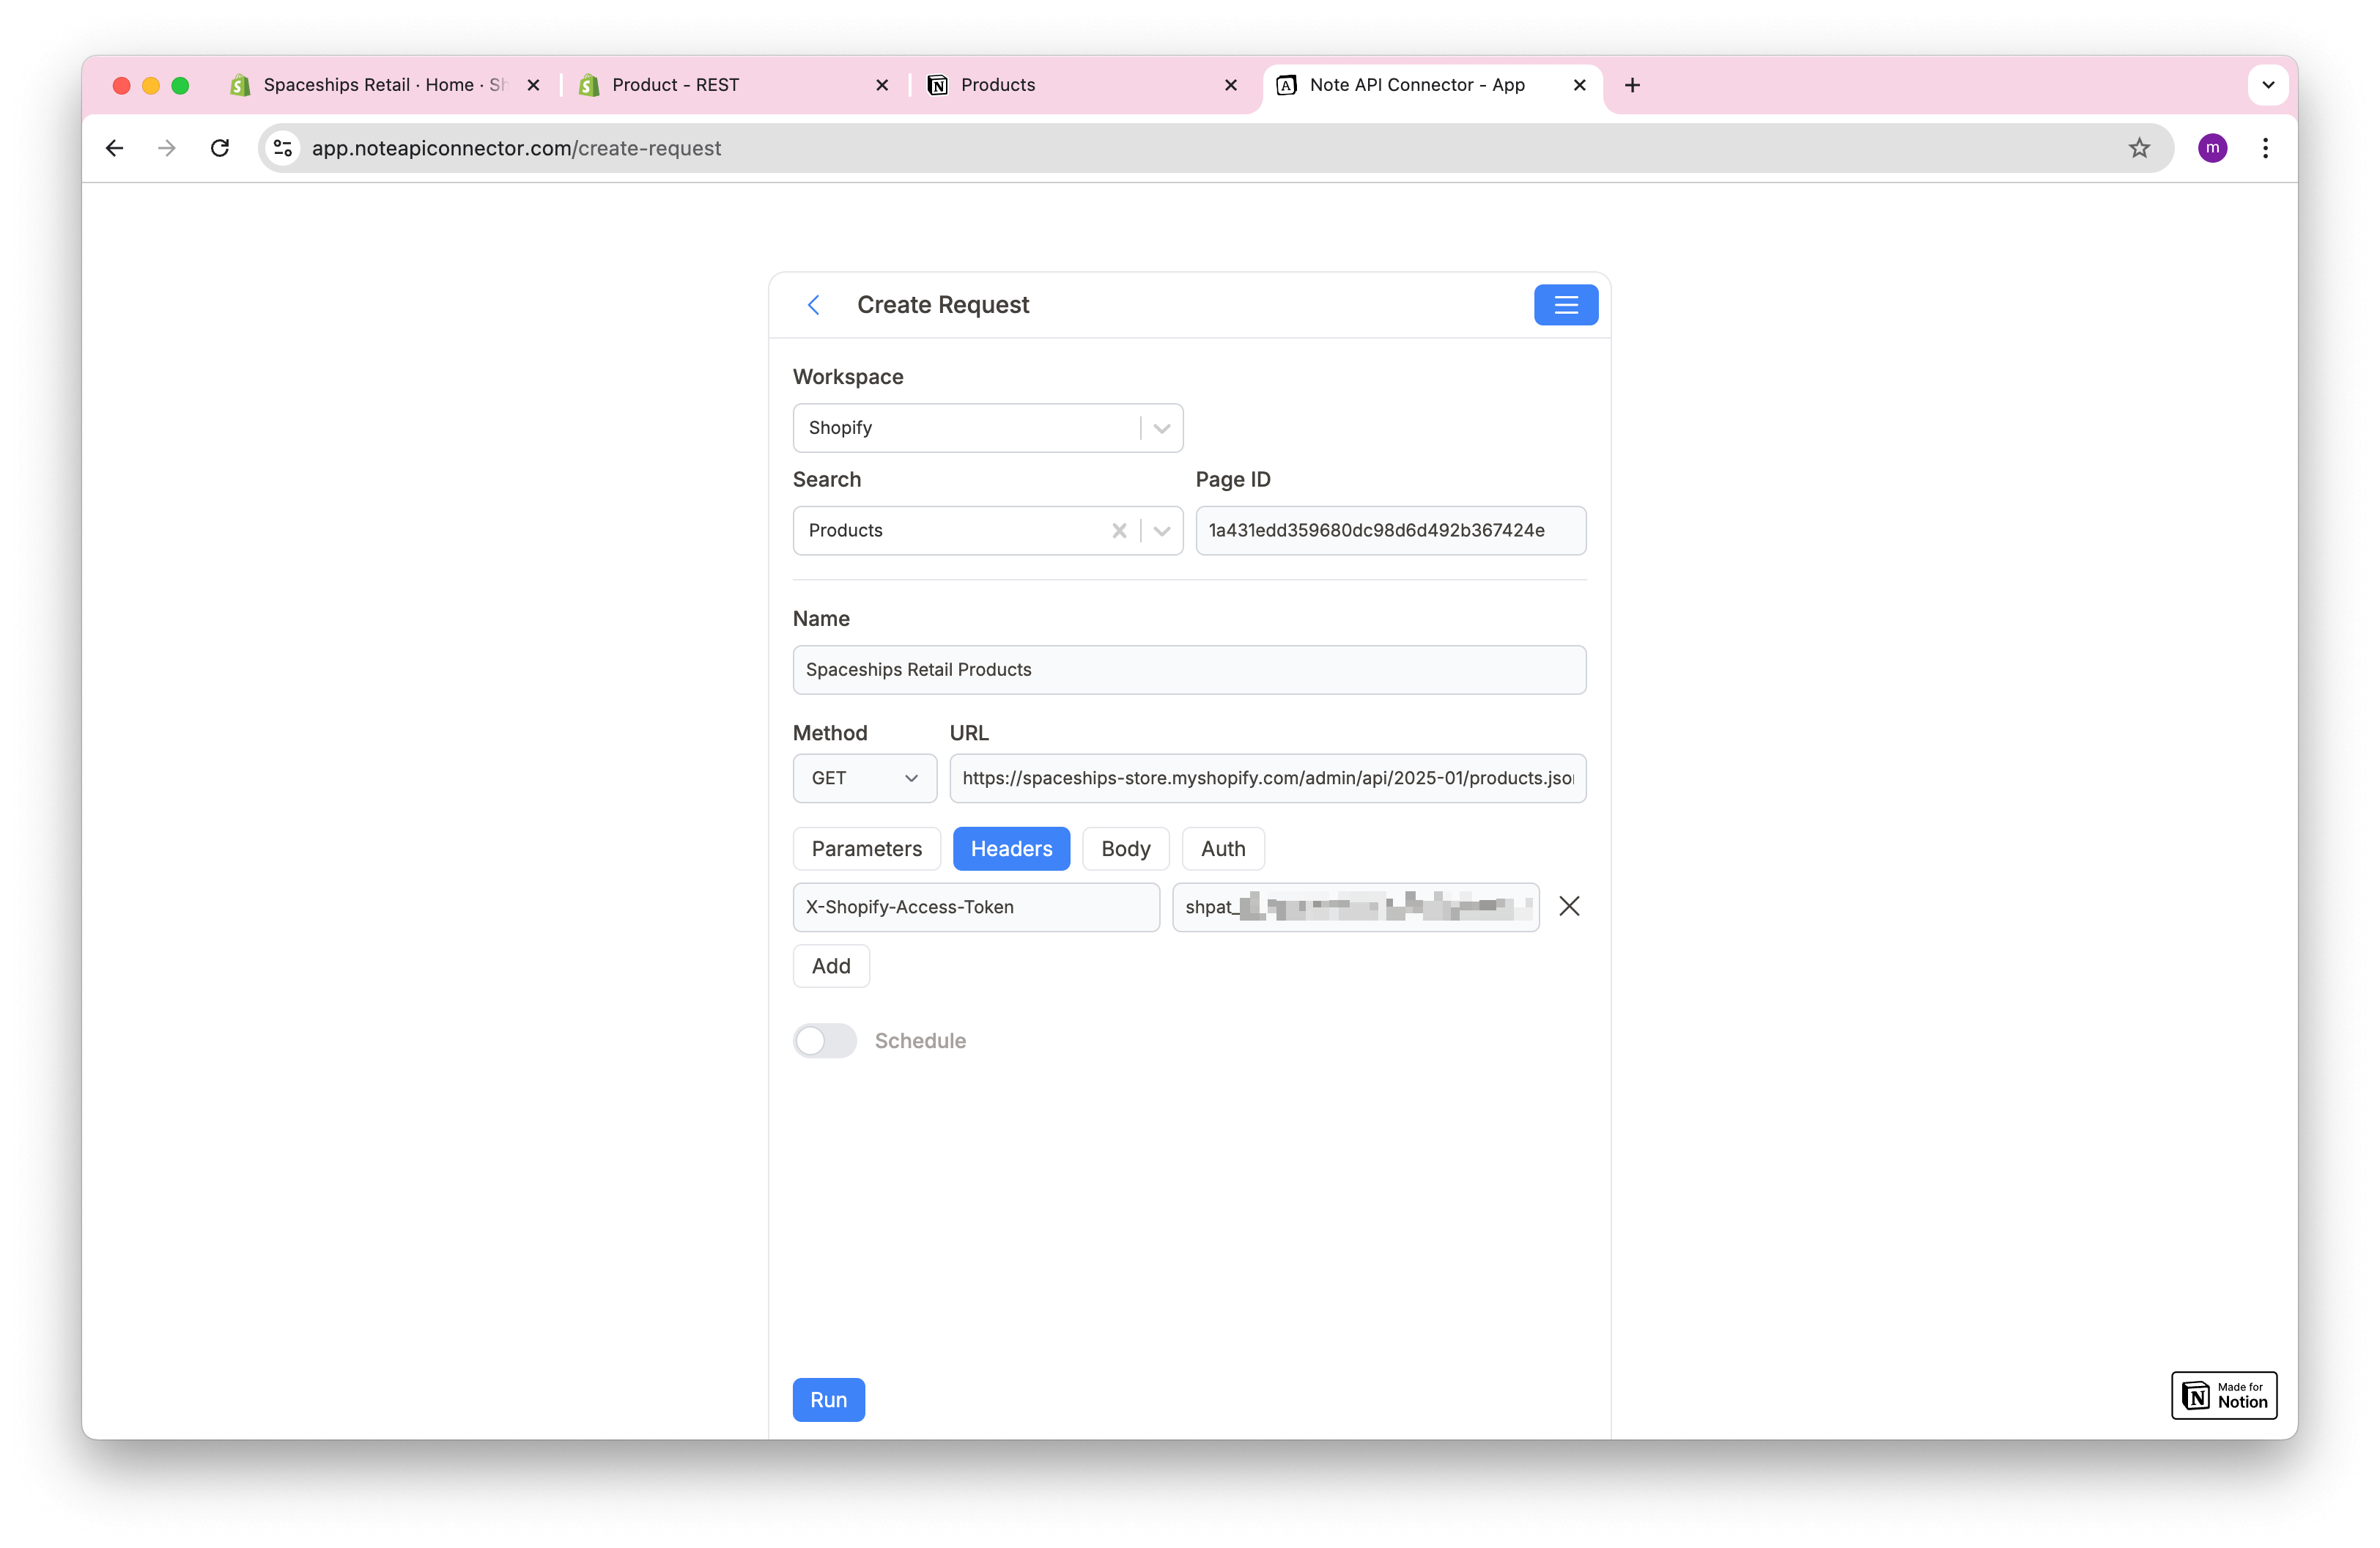
Under Headers, add: X-Shopify-Access-Token: your_token, then click
Run.
Step 2: Preview and map fields
In the
Response Field Mapping
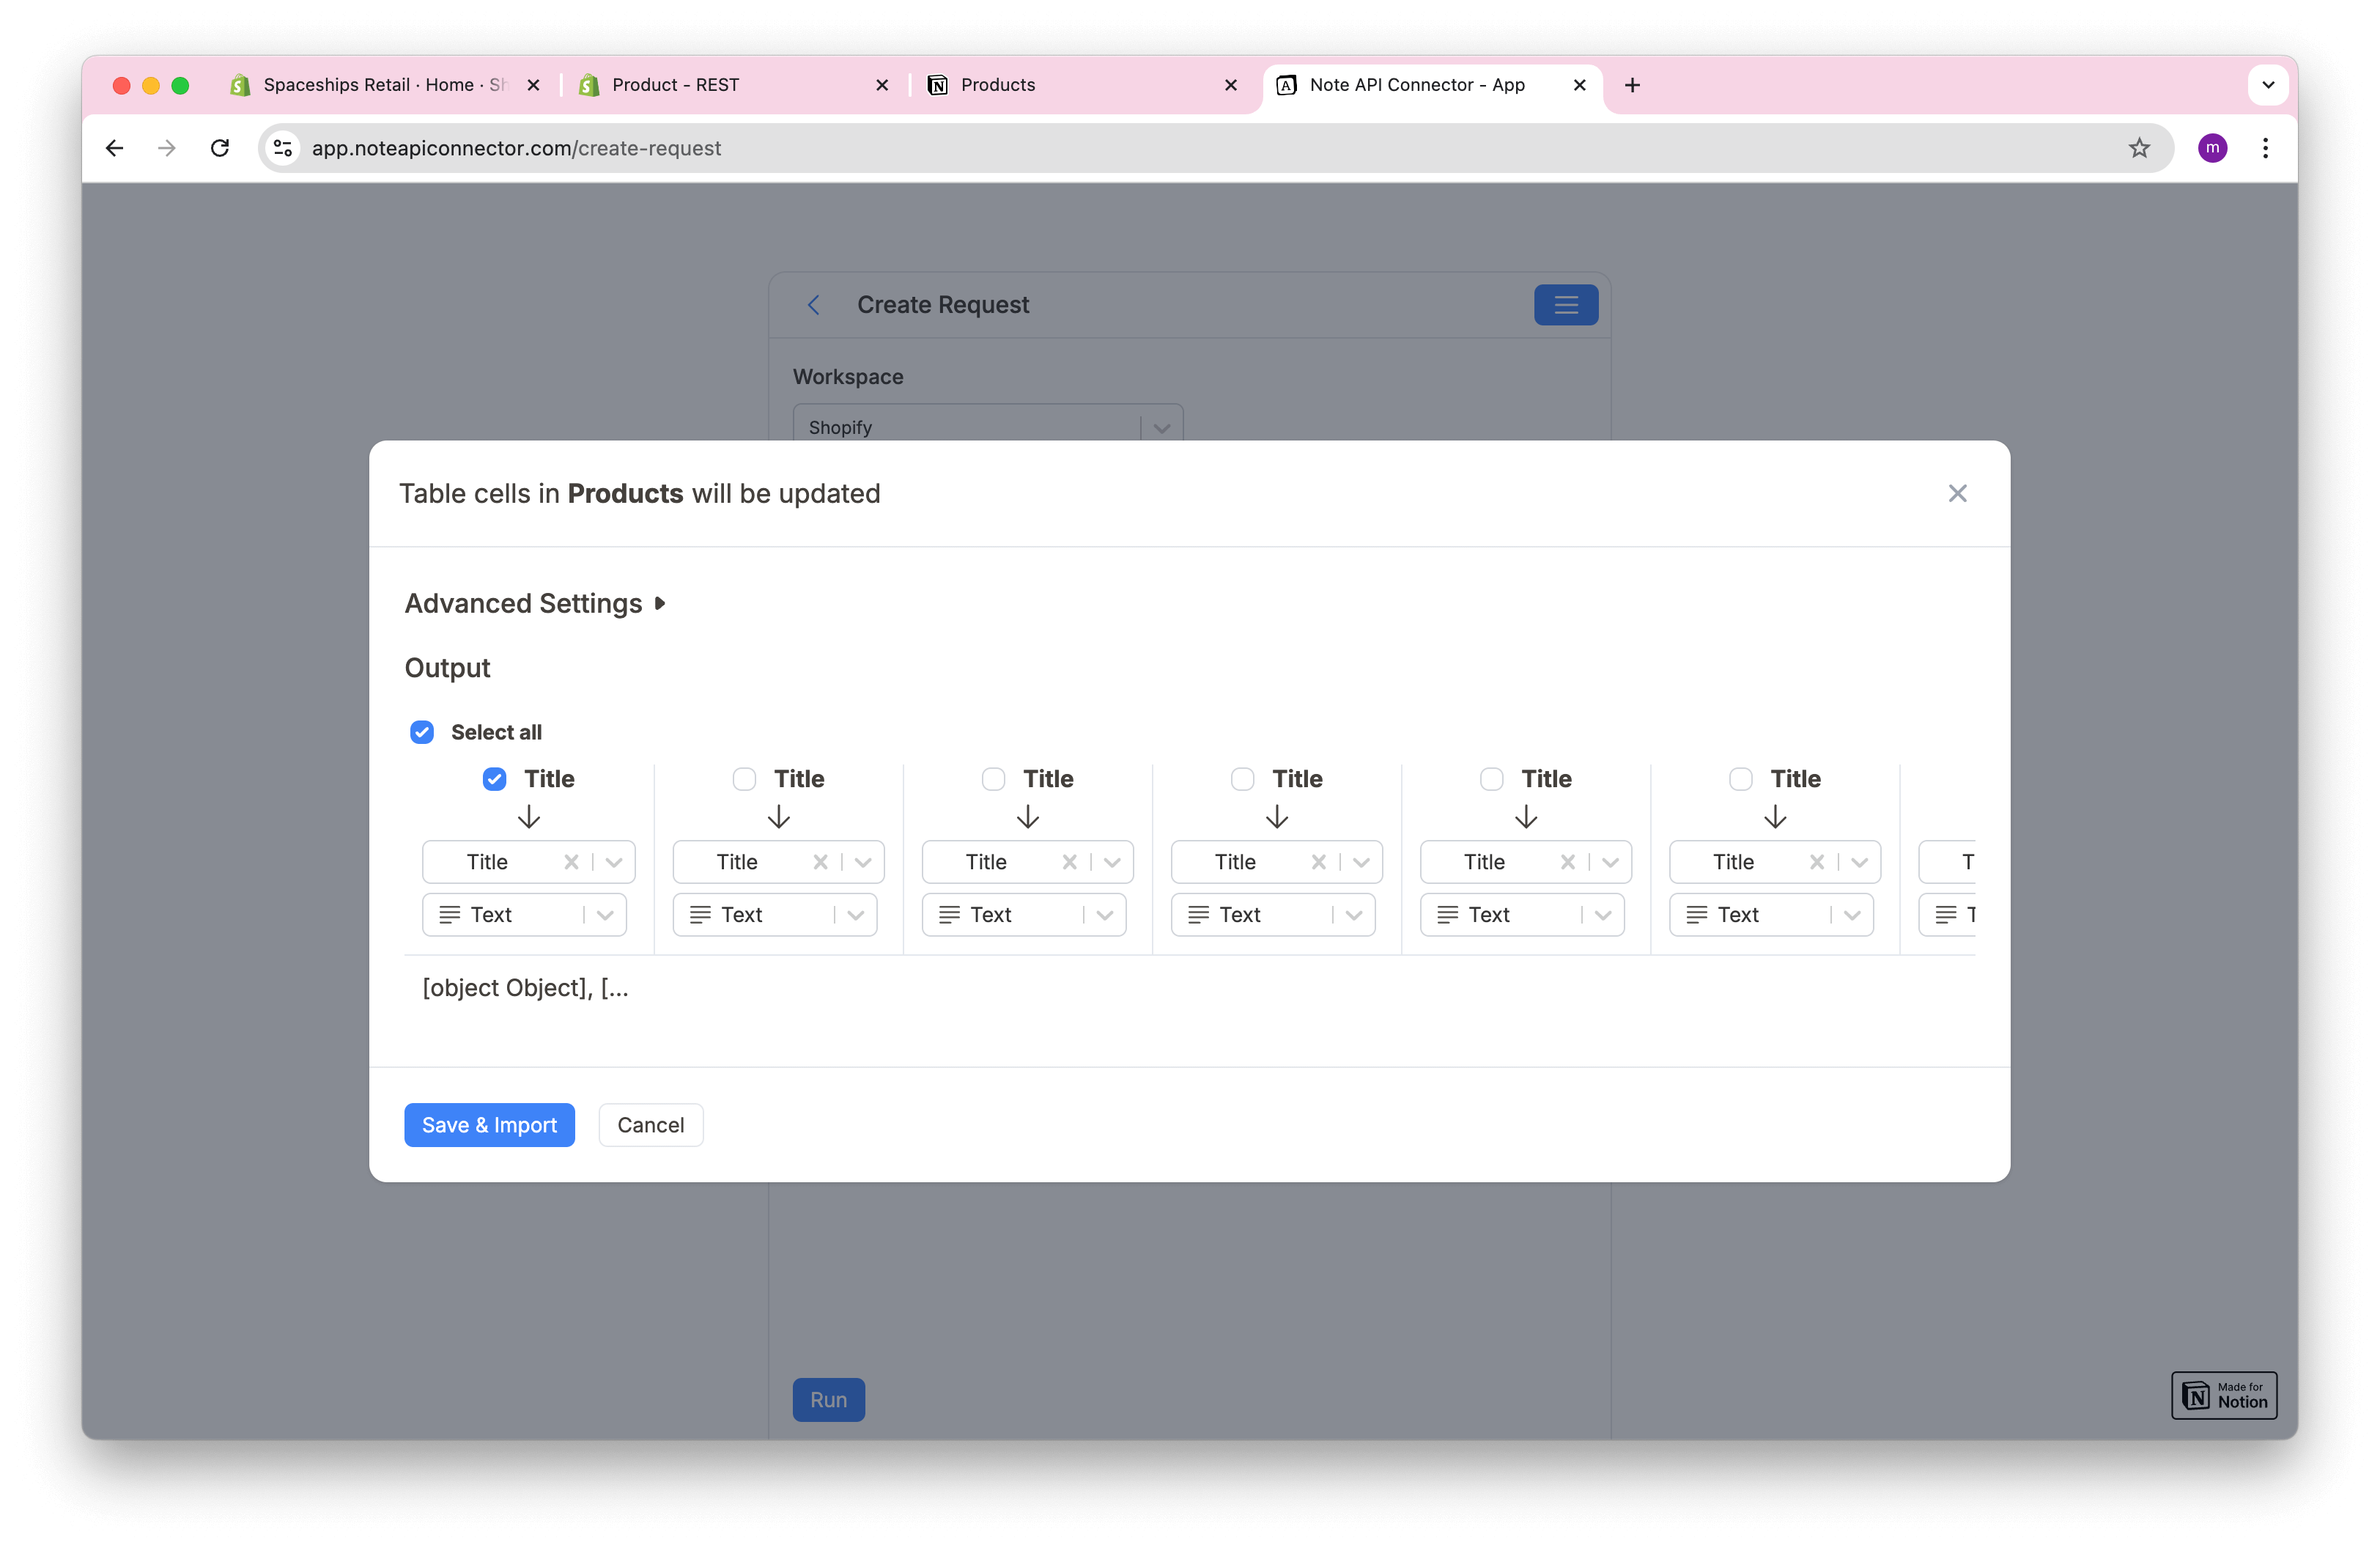
view you will see a preview of your product data. Select the fields you want to import. Some fields, such as
variants and options, are nested so they may show as [object Object].
That simply means the field contains multiple parts.
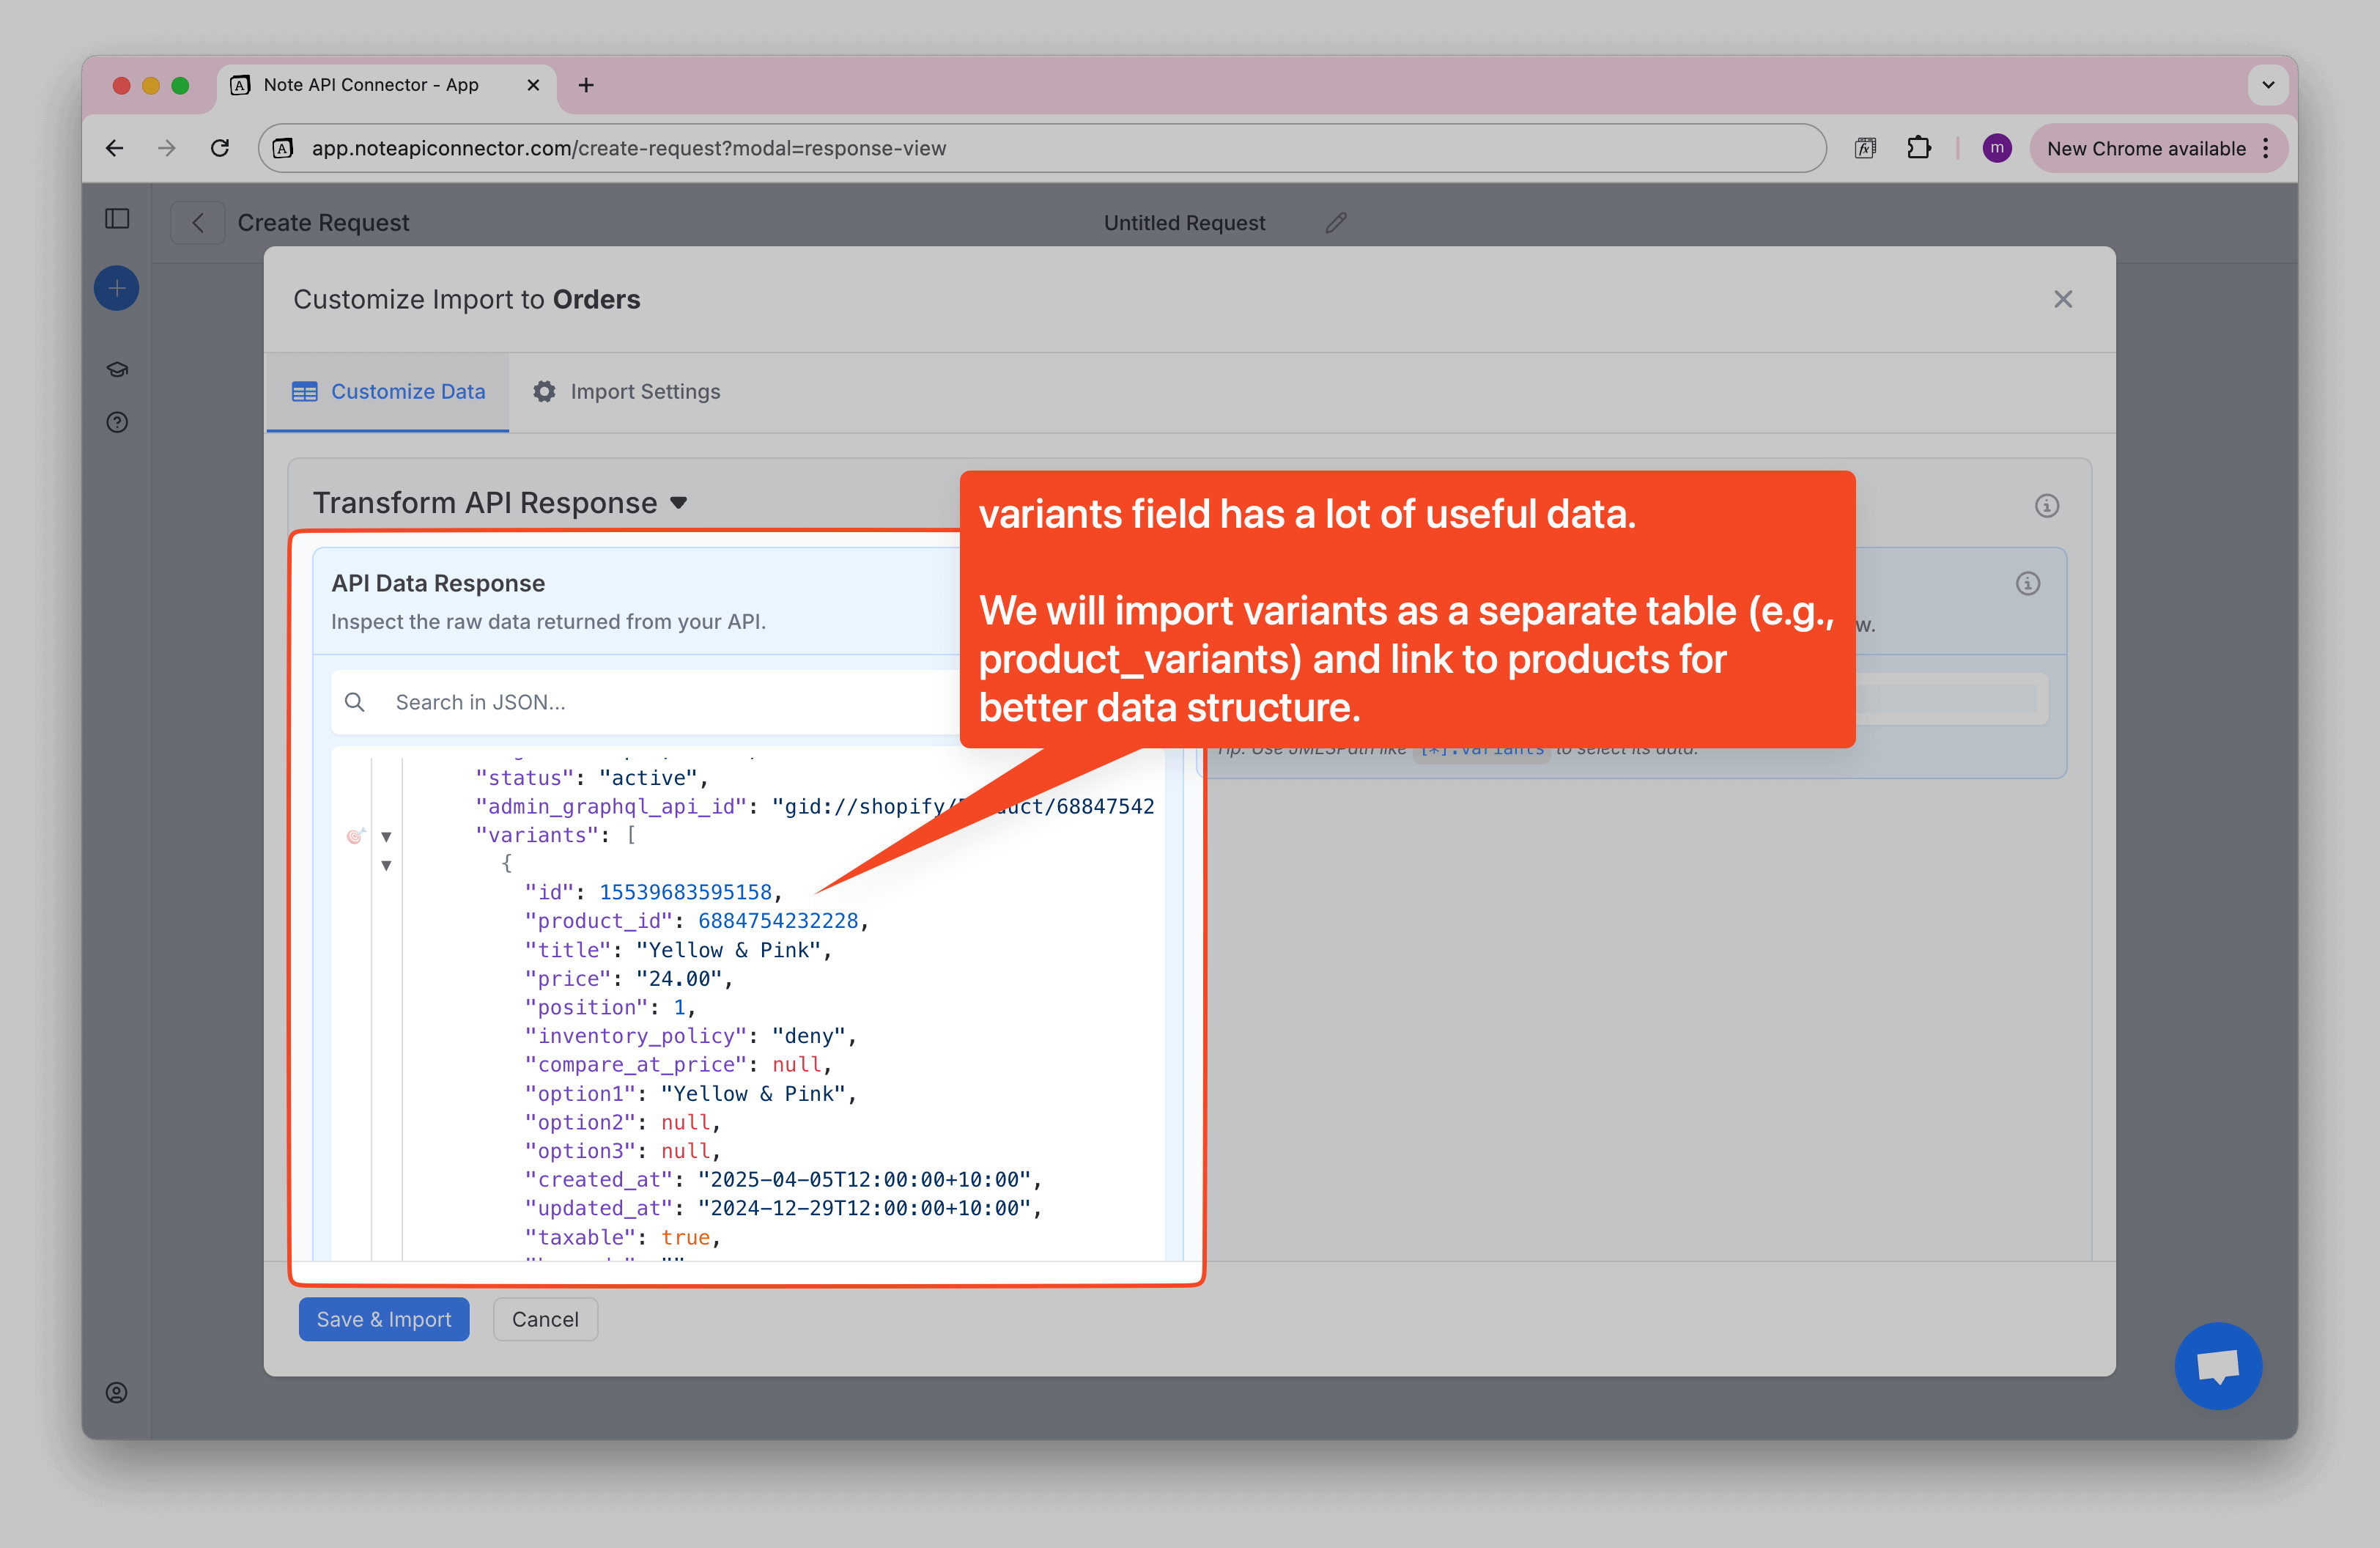
To see what is inside those nested fields, open API Data Response. This expands the full structure so you can decide how to bring it into Notion.
Step 3: Choose how to store variants and options
Recommended: Import product variants into their own Notion database and relate
them to Products. Variants include useful details like SKU, price, and inventory, so keeping them in a
separate table makes your Products database clean and easy to read.
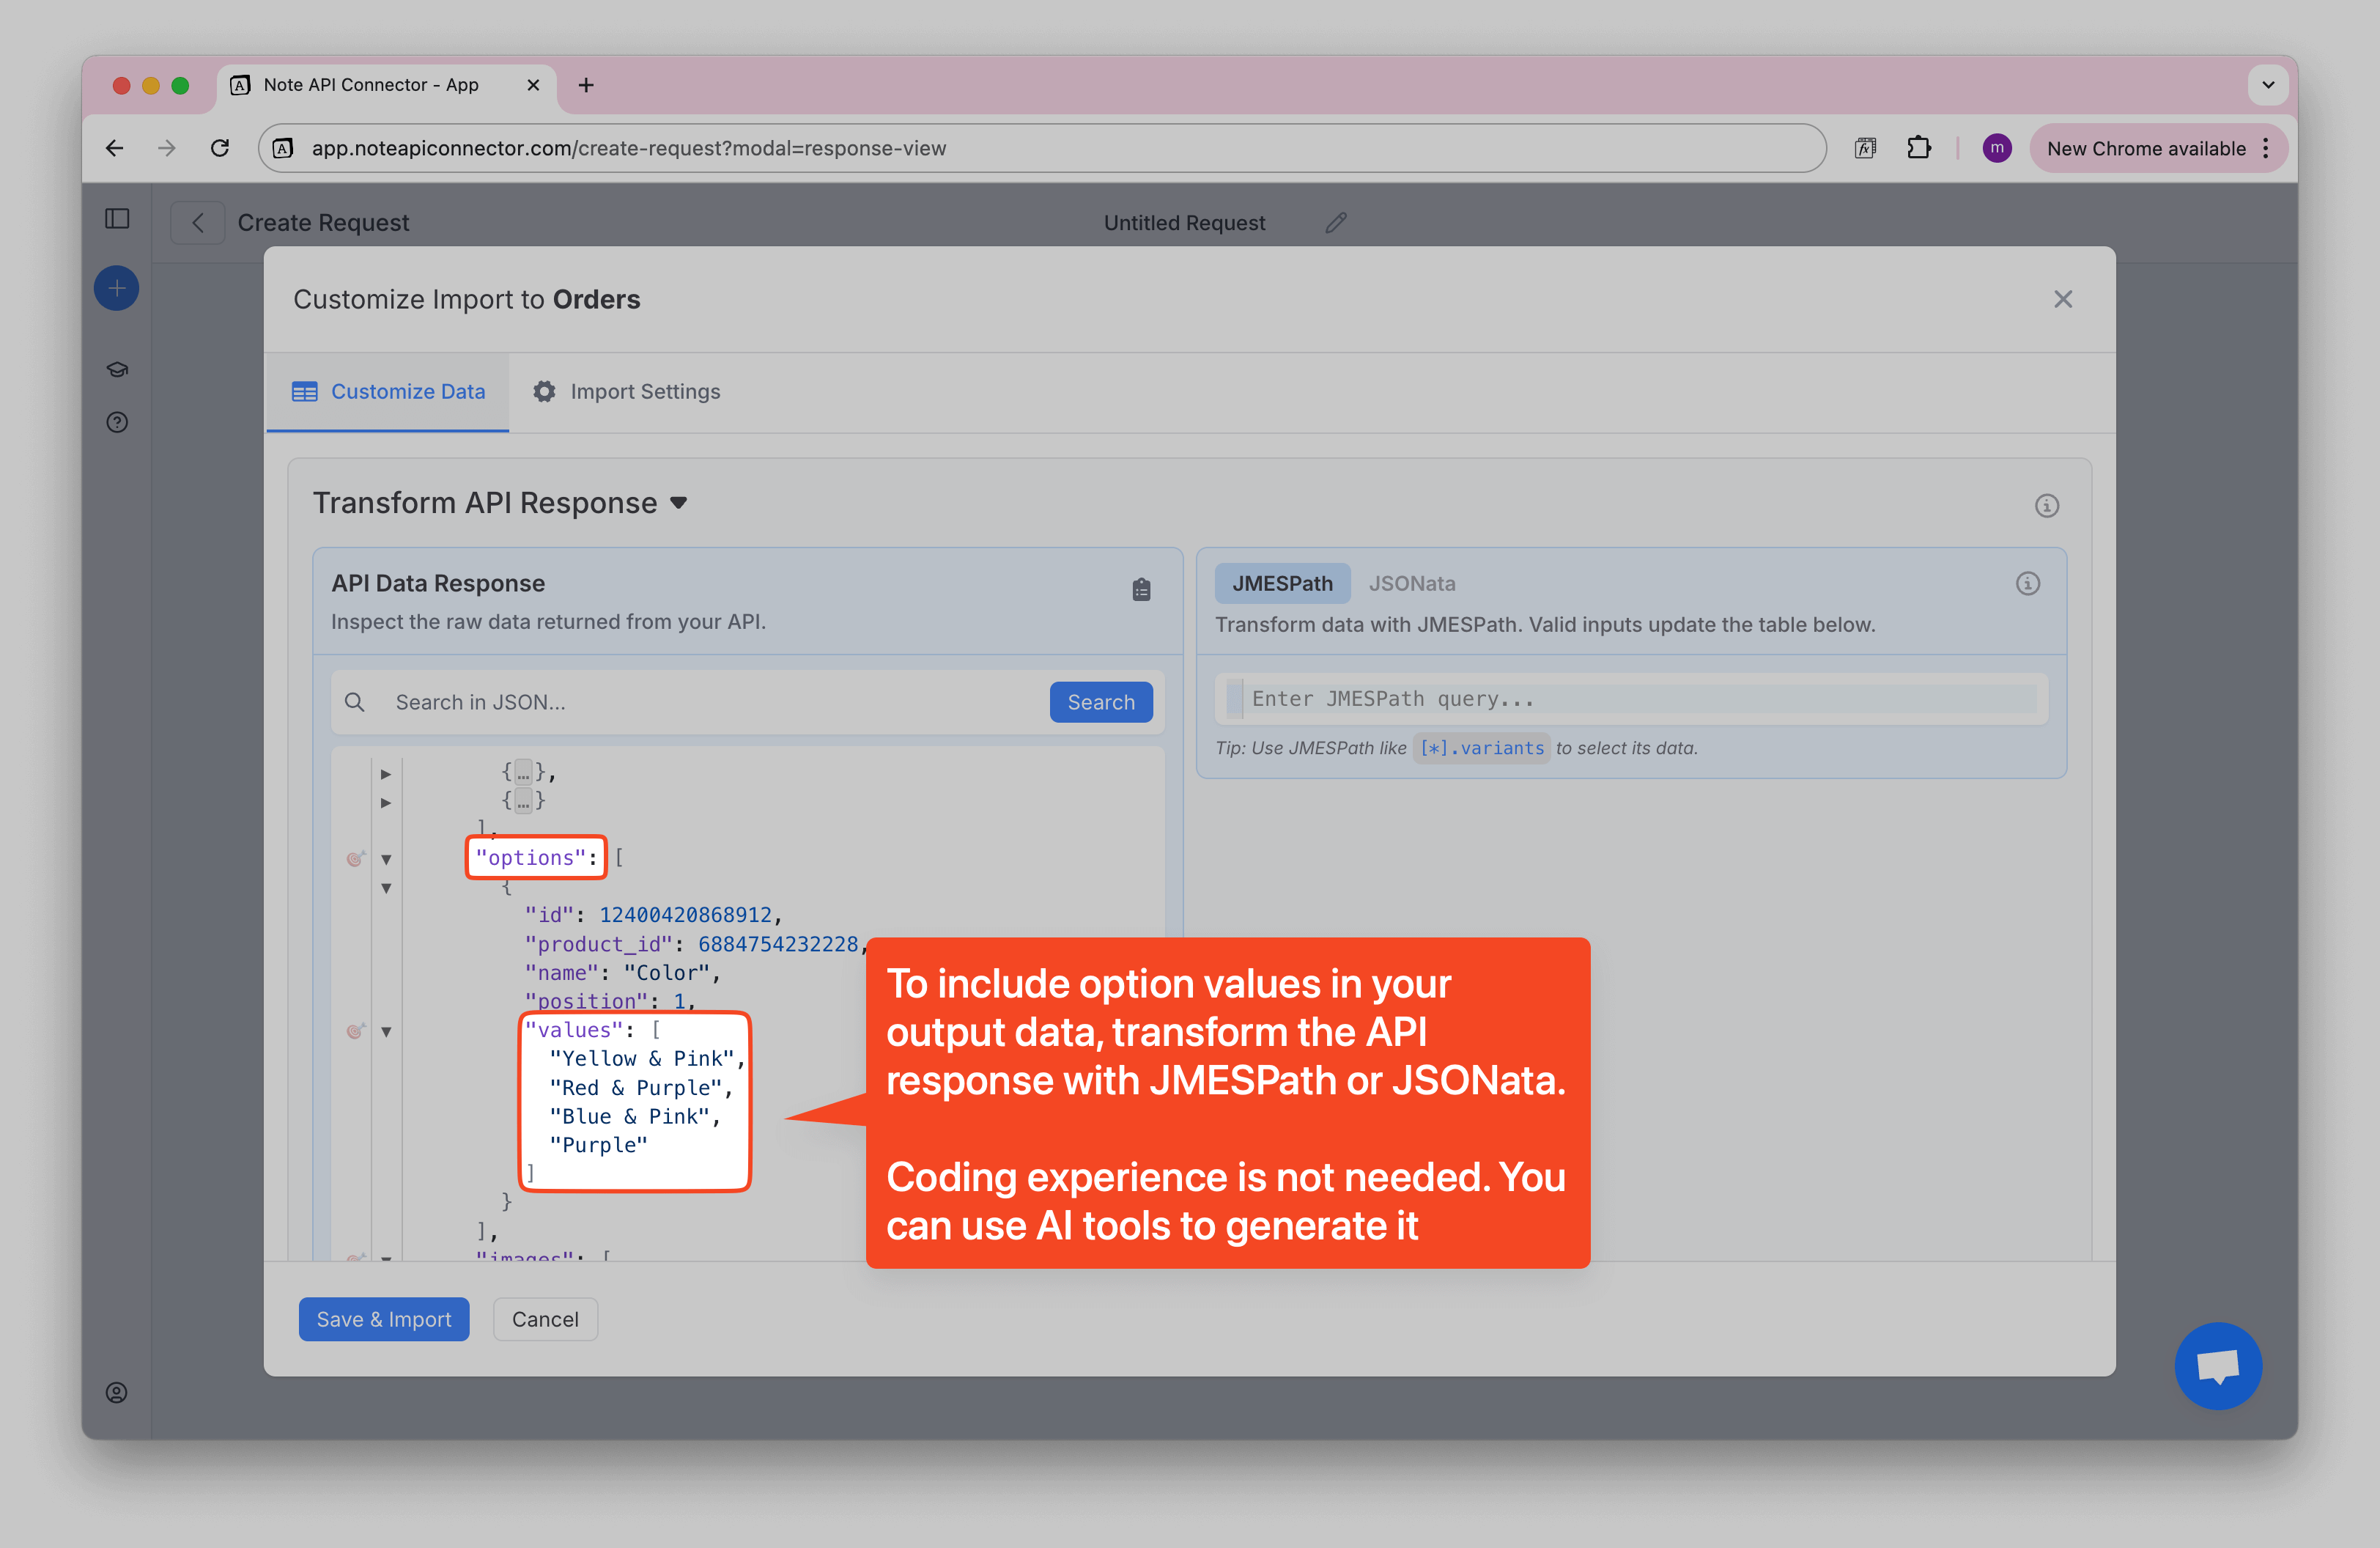
Product options (for example Size or Color) are also nested. You have two choices:
- Import options into a separate database and relate them to Products, or
- Combine multiple option values into one line of text.
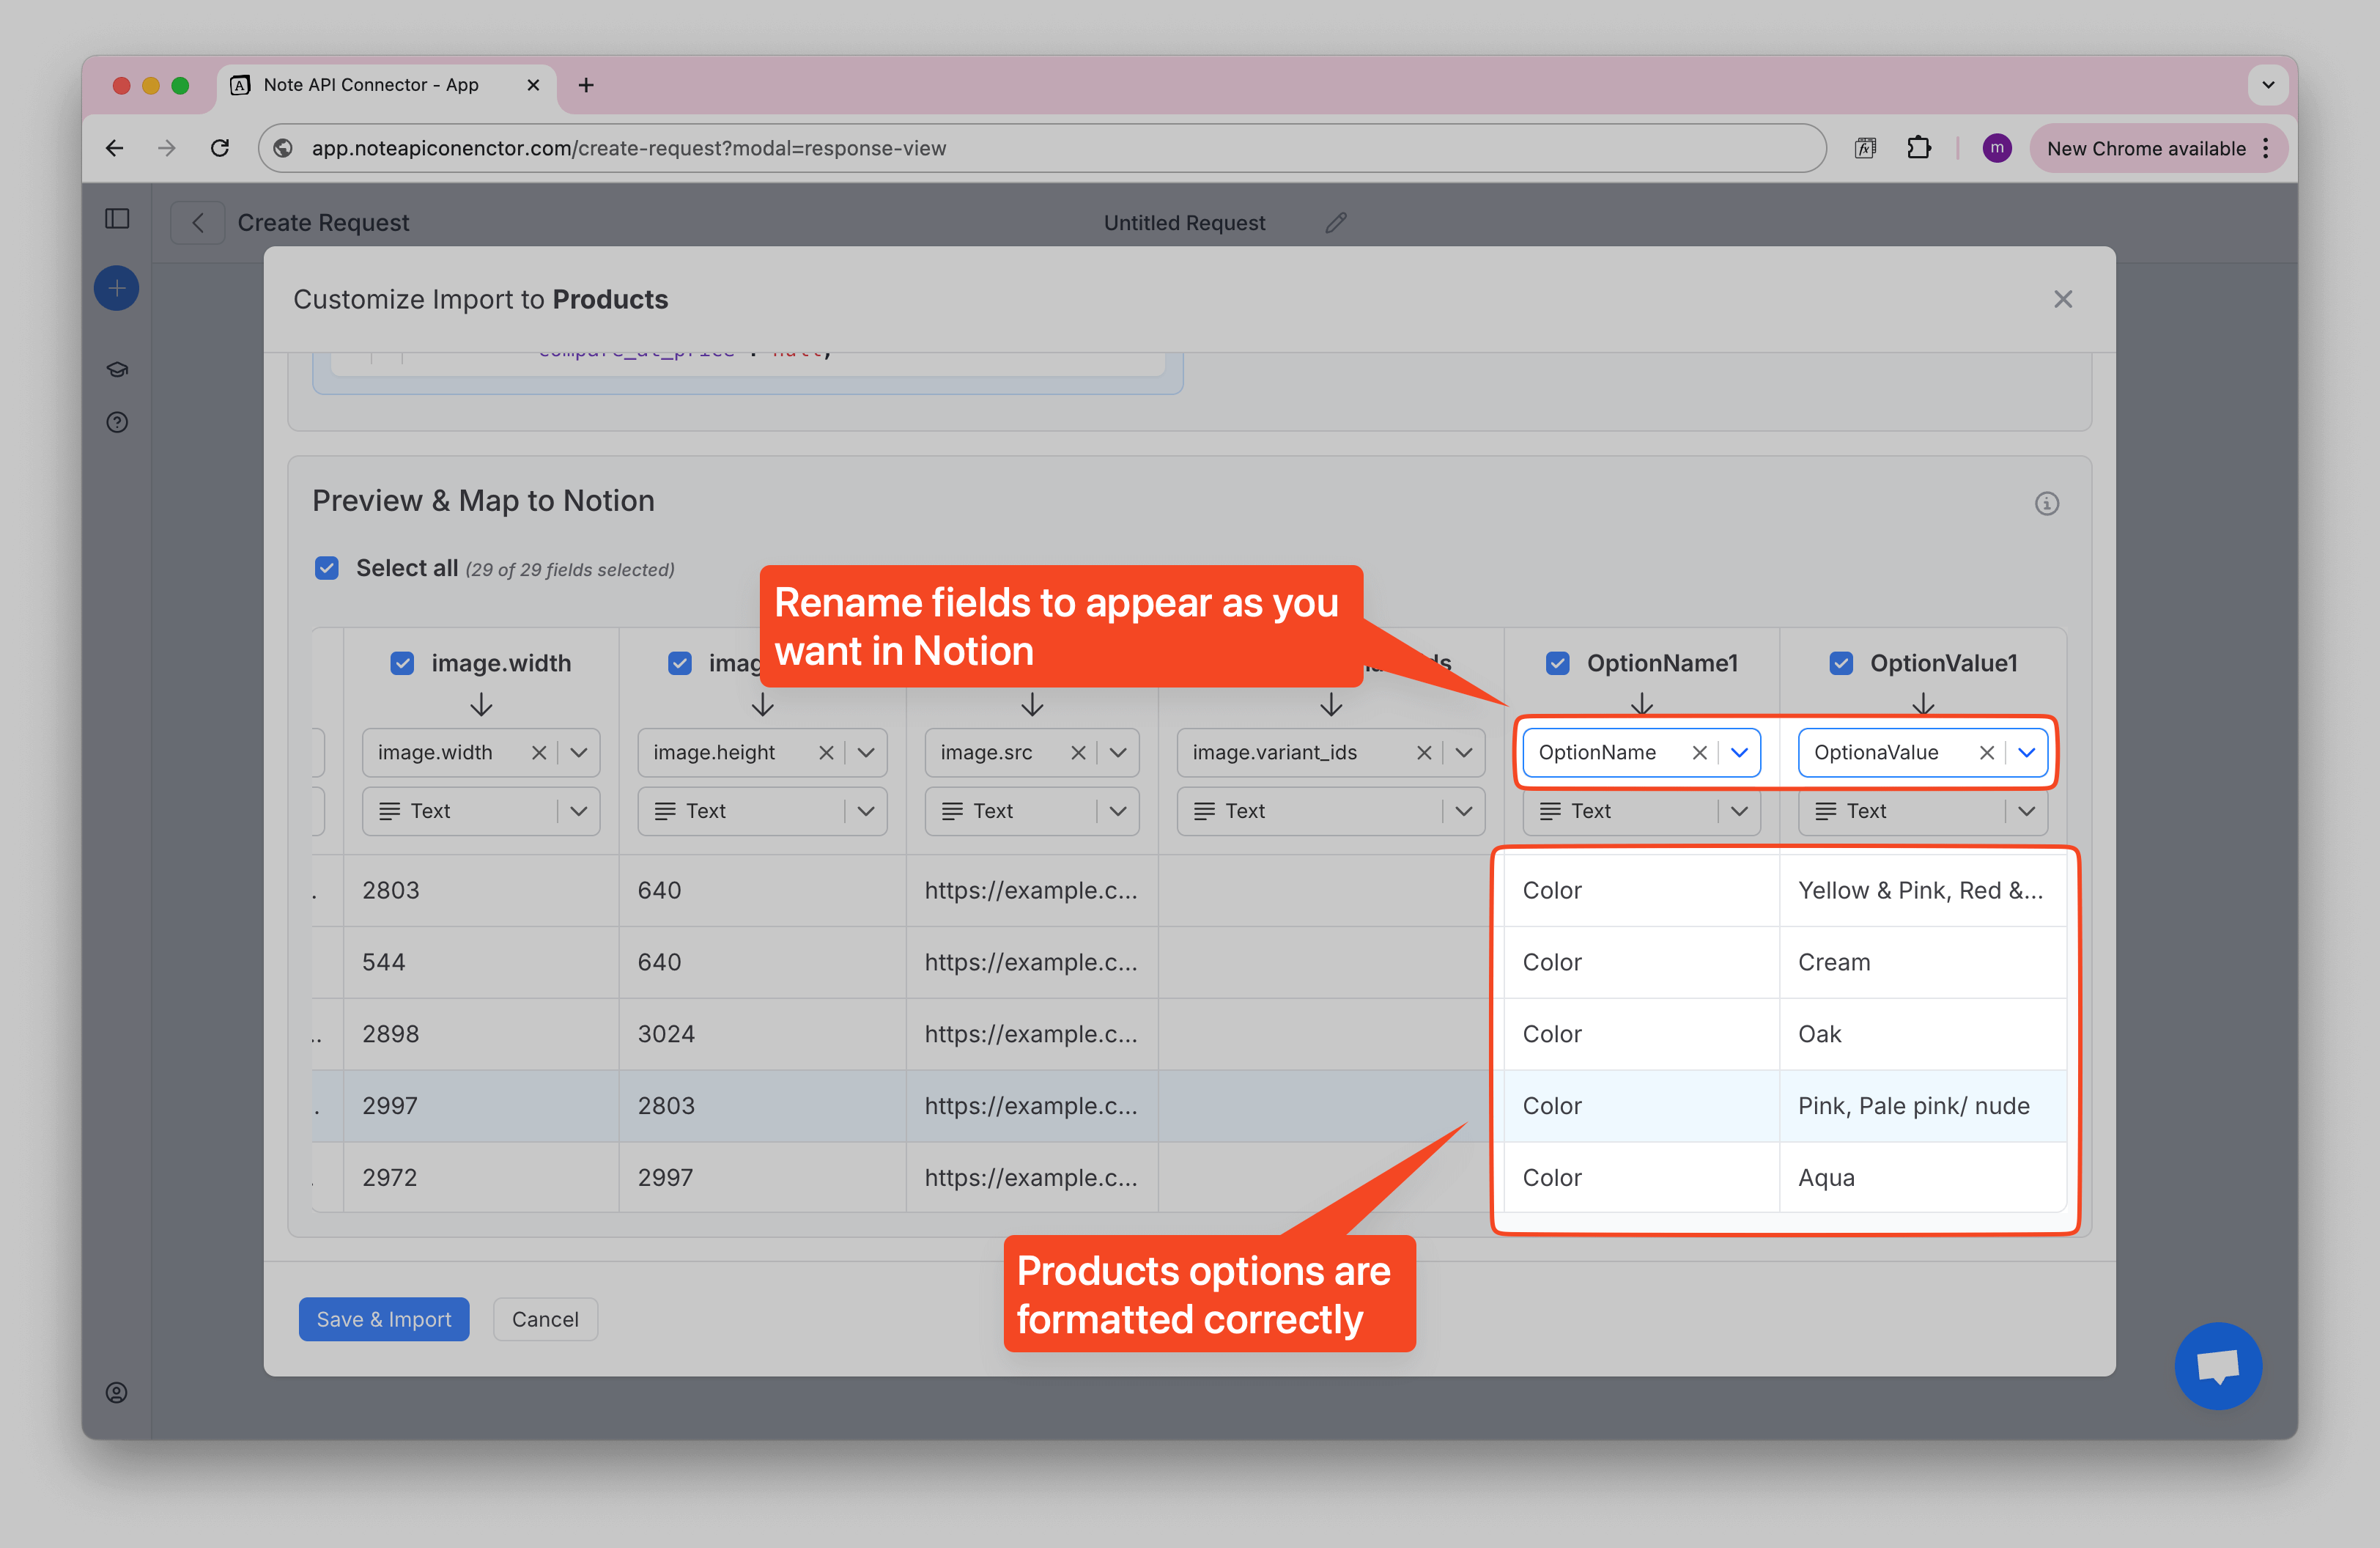
If you prefer the latter option, you can turn each option into a pair of fields like
OptionName1 and OptionValue1. When an option has several values (for example
["Red", "Blue"]), we will join them into one text like Red, Blue.
🙌 No coding experience? No problem. Use your favorite AI tool (e.g., ChatGPT, Claude) to create the JSONata. Click to learn how.
I have API response with Shopify products. Each product has an options list containing
name and values fields. I need a JSONata expression that:
- Removes the
optionsfield from each product - Handle missing data gracefully (some products might have no options)
- Creates numbered field pairs for each option
OptionName1,OptionValue1for the first optionOptionName2,OptionValue2for the second option- And so on dynamically for any number of options
- For
OptionValuefields, convert it into a single text
JSON:
<PASTE YOUR DATA HERE>
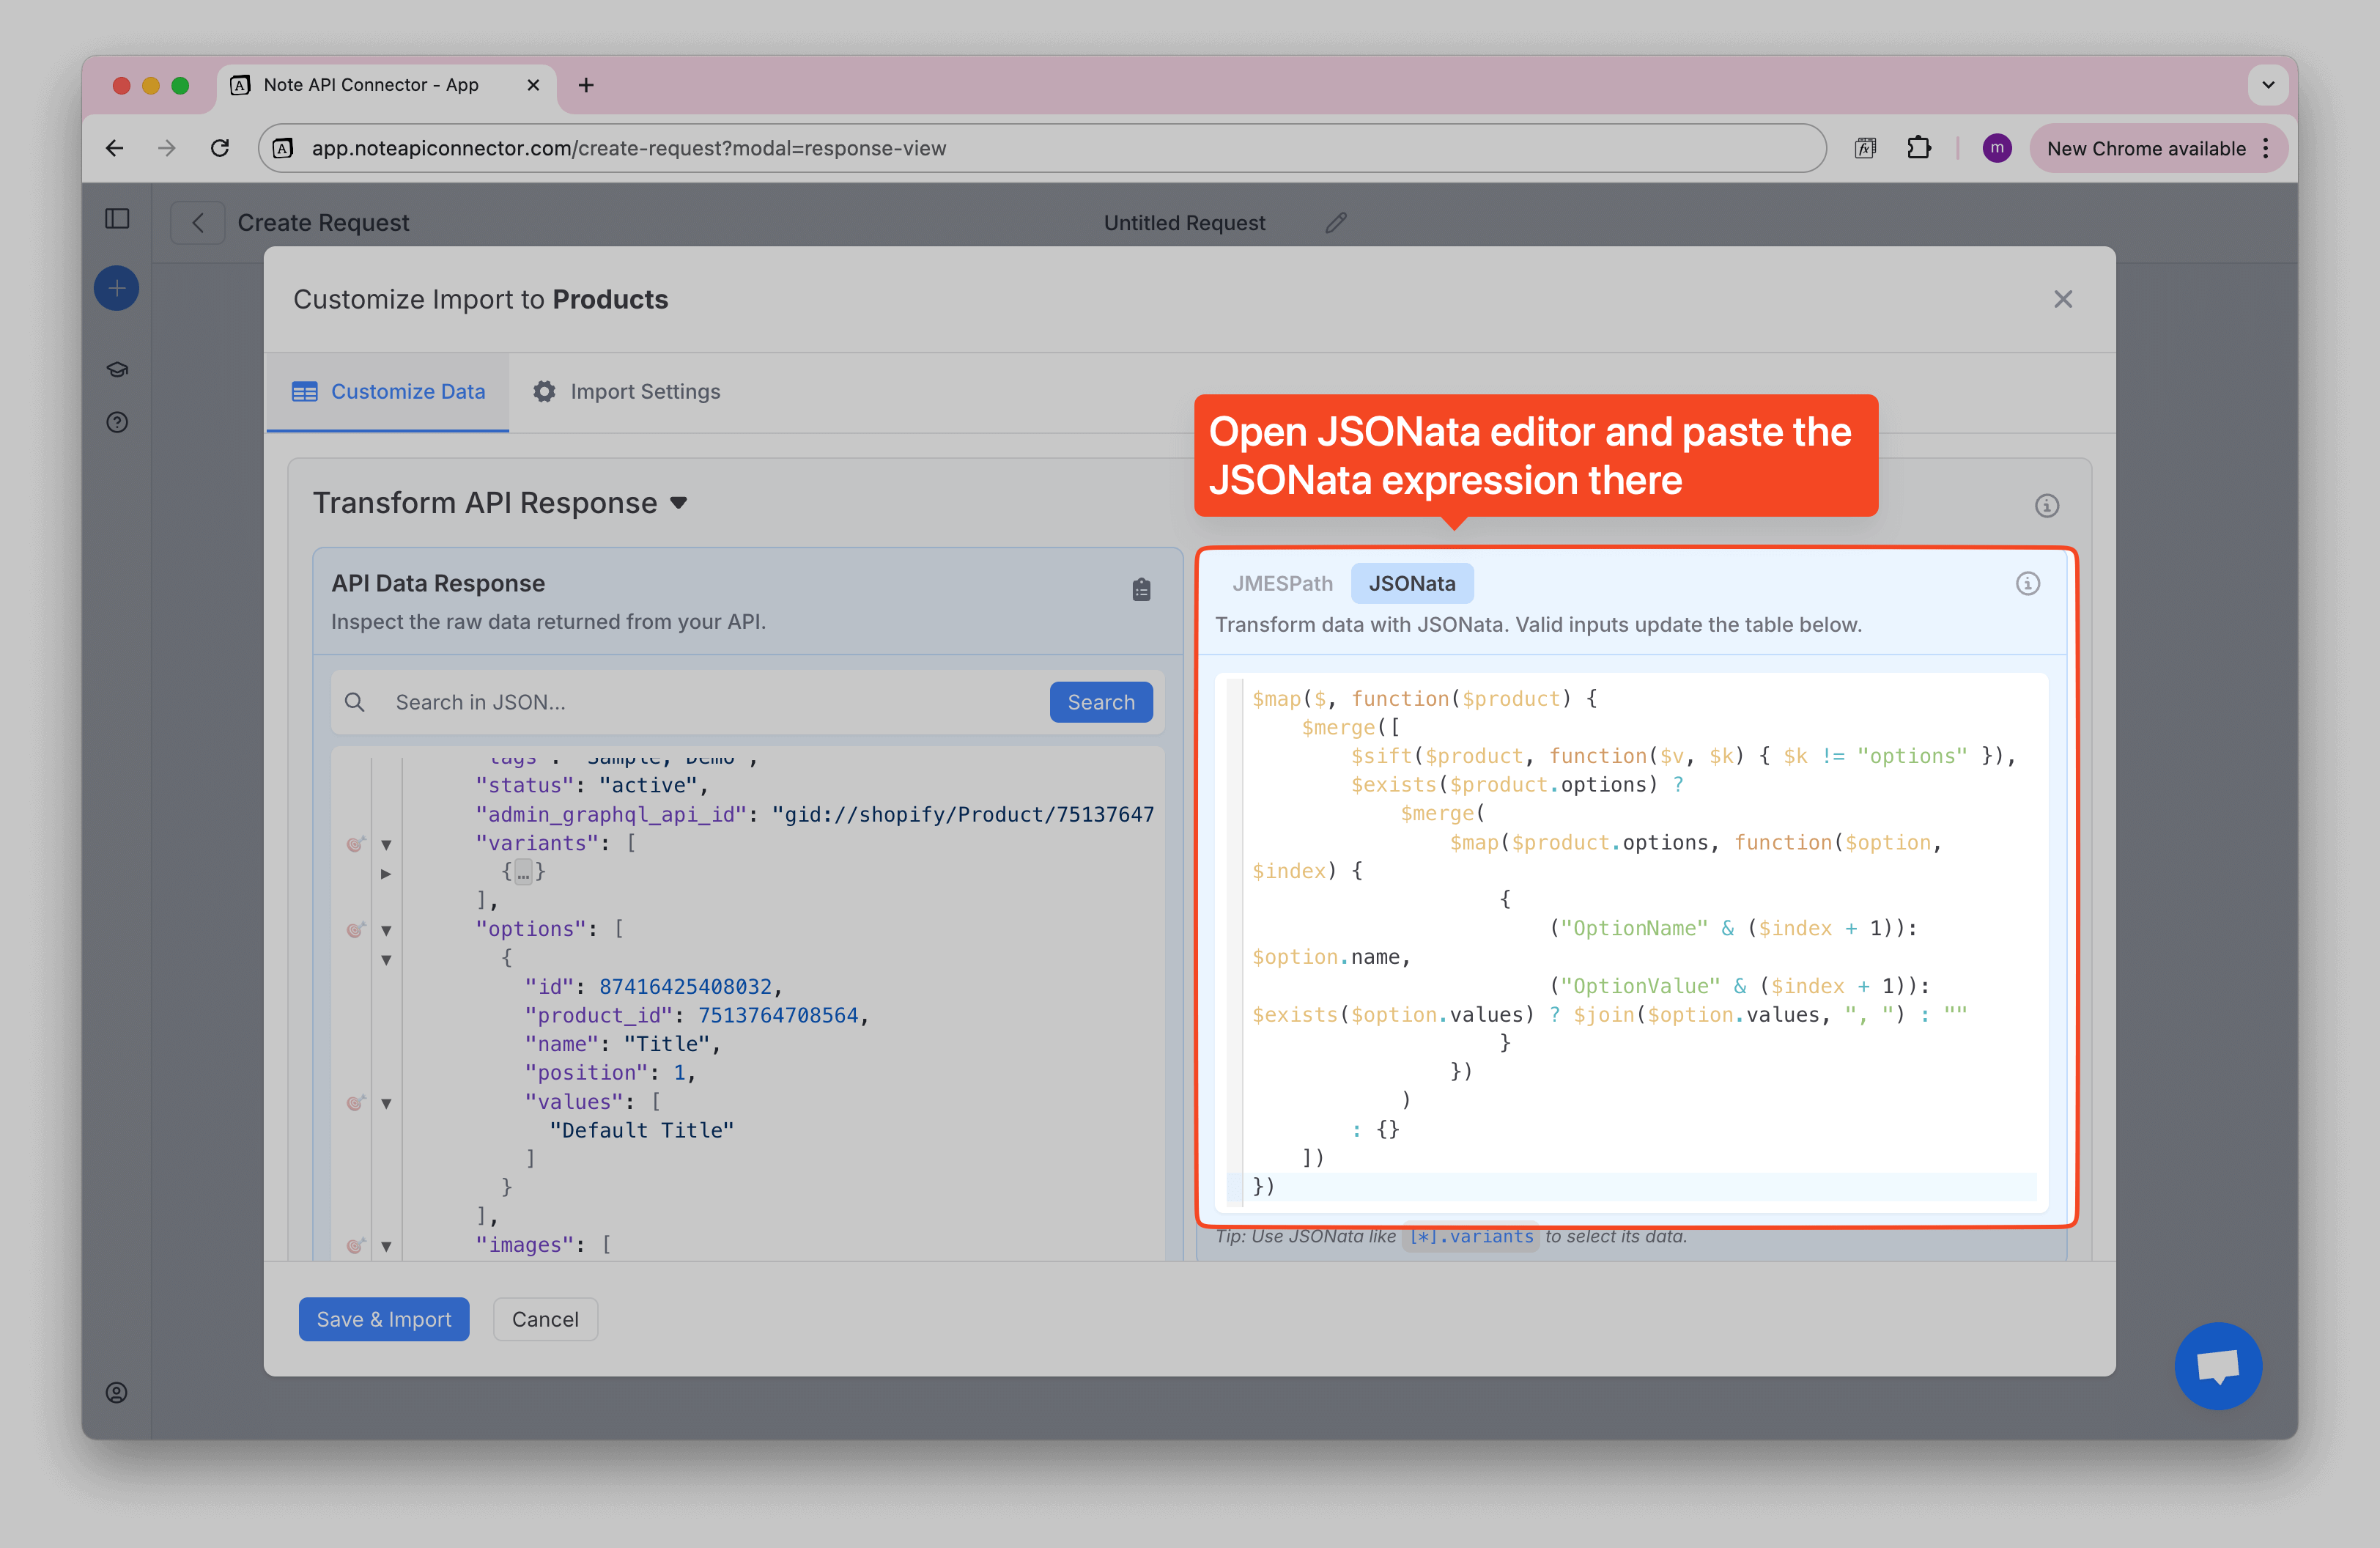
$map($, function($product) {
    $merge([
        $sift($product, function($v, $k) { $k != "options" }),
        $exists($product.options) ?
            $merge(
                $map($product.options, function($option, $index) {
                    {
                        ("OptionName" & ($index + 1)): $option.name,
                        ("OptionValue" & ($index + 1)): $exists($option.values) ? $join($option.values, ", ") : ""
                    }
                })
            )
        : {}
    ])
})
Open JSONata editor, paste JSONata code snippet to run the transformation. Then check the Response table. You should now see the new option fields ready to map to Notion properties.
Step 5: Import and keep data in sync
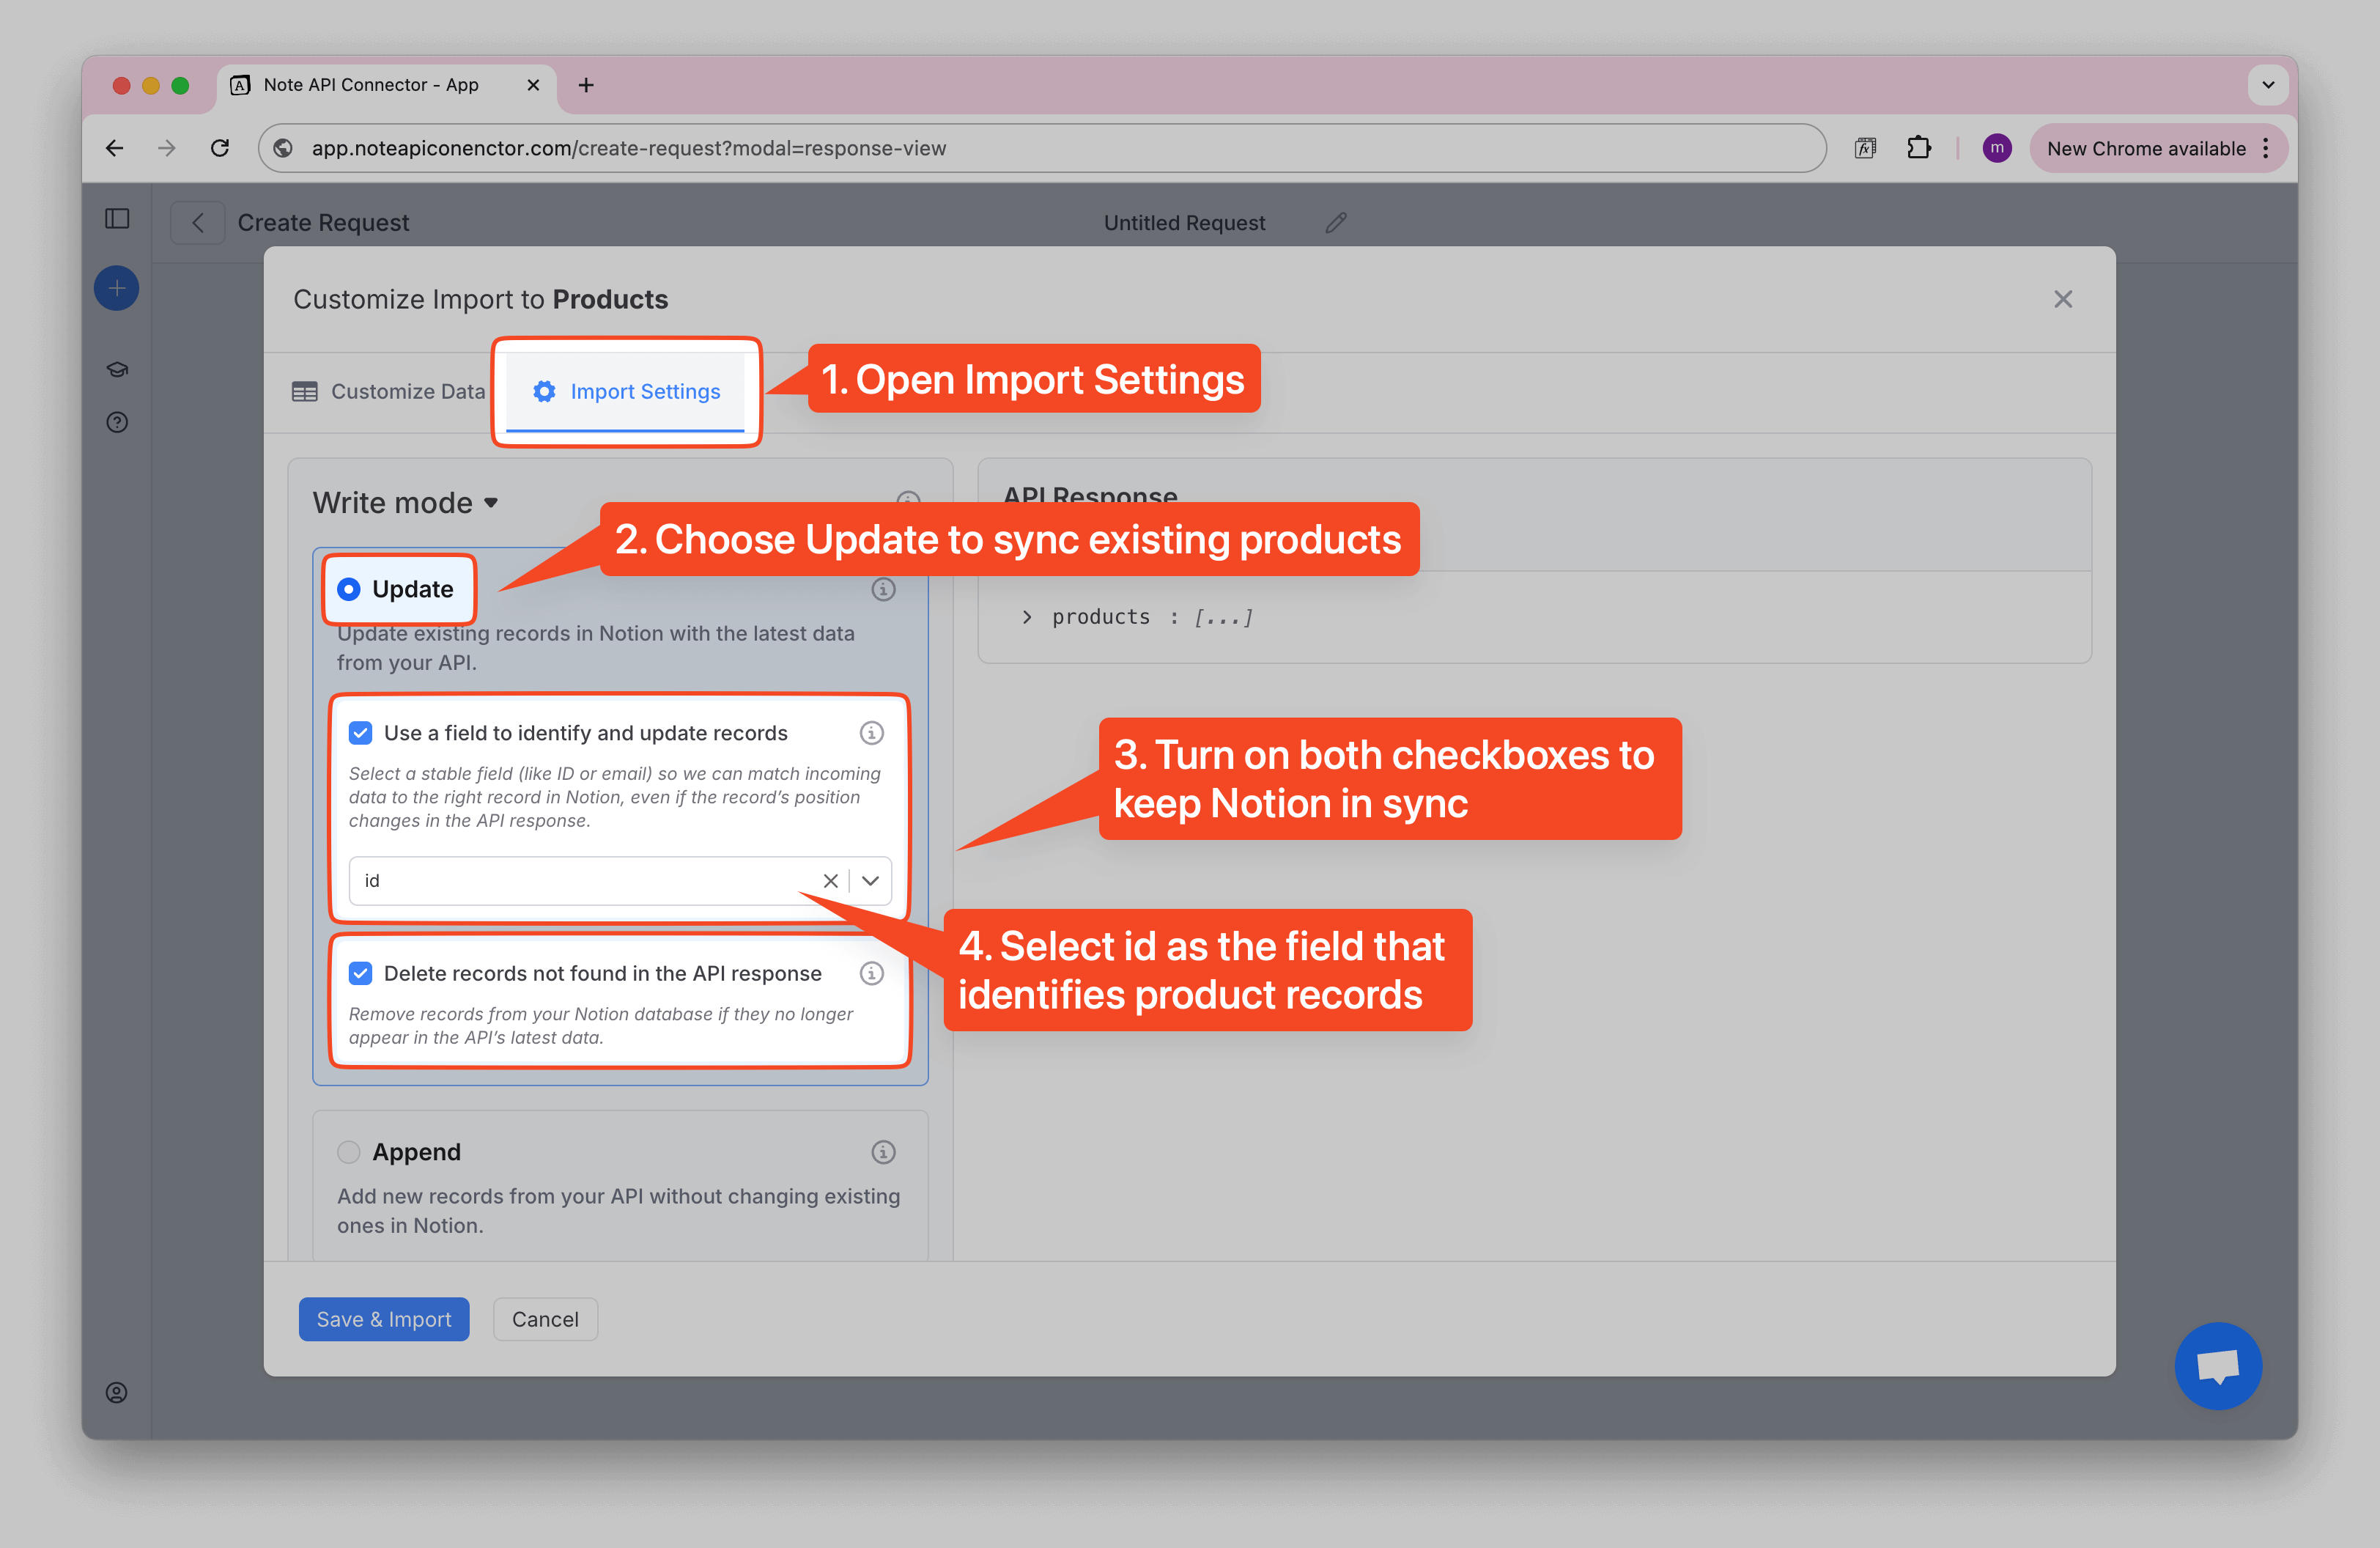
To keep your Notion data in sync, open
Import Settings and choose
Update mode.
Turn on both options to create new records and update existing ones. Set id as the
unique identifier
so future imports update the right products.
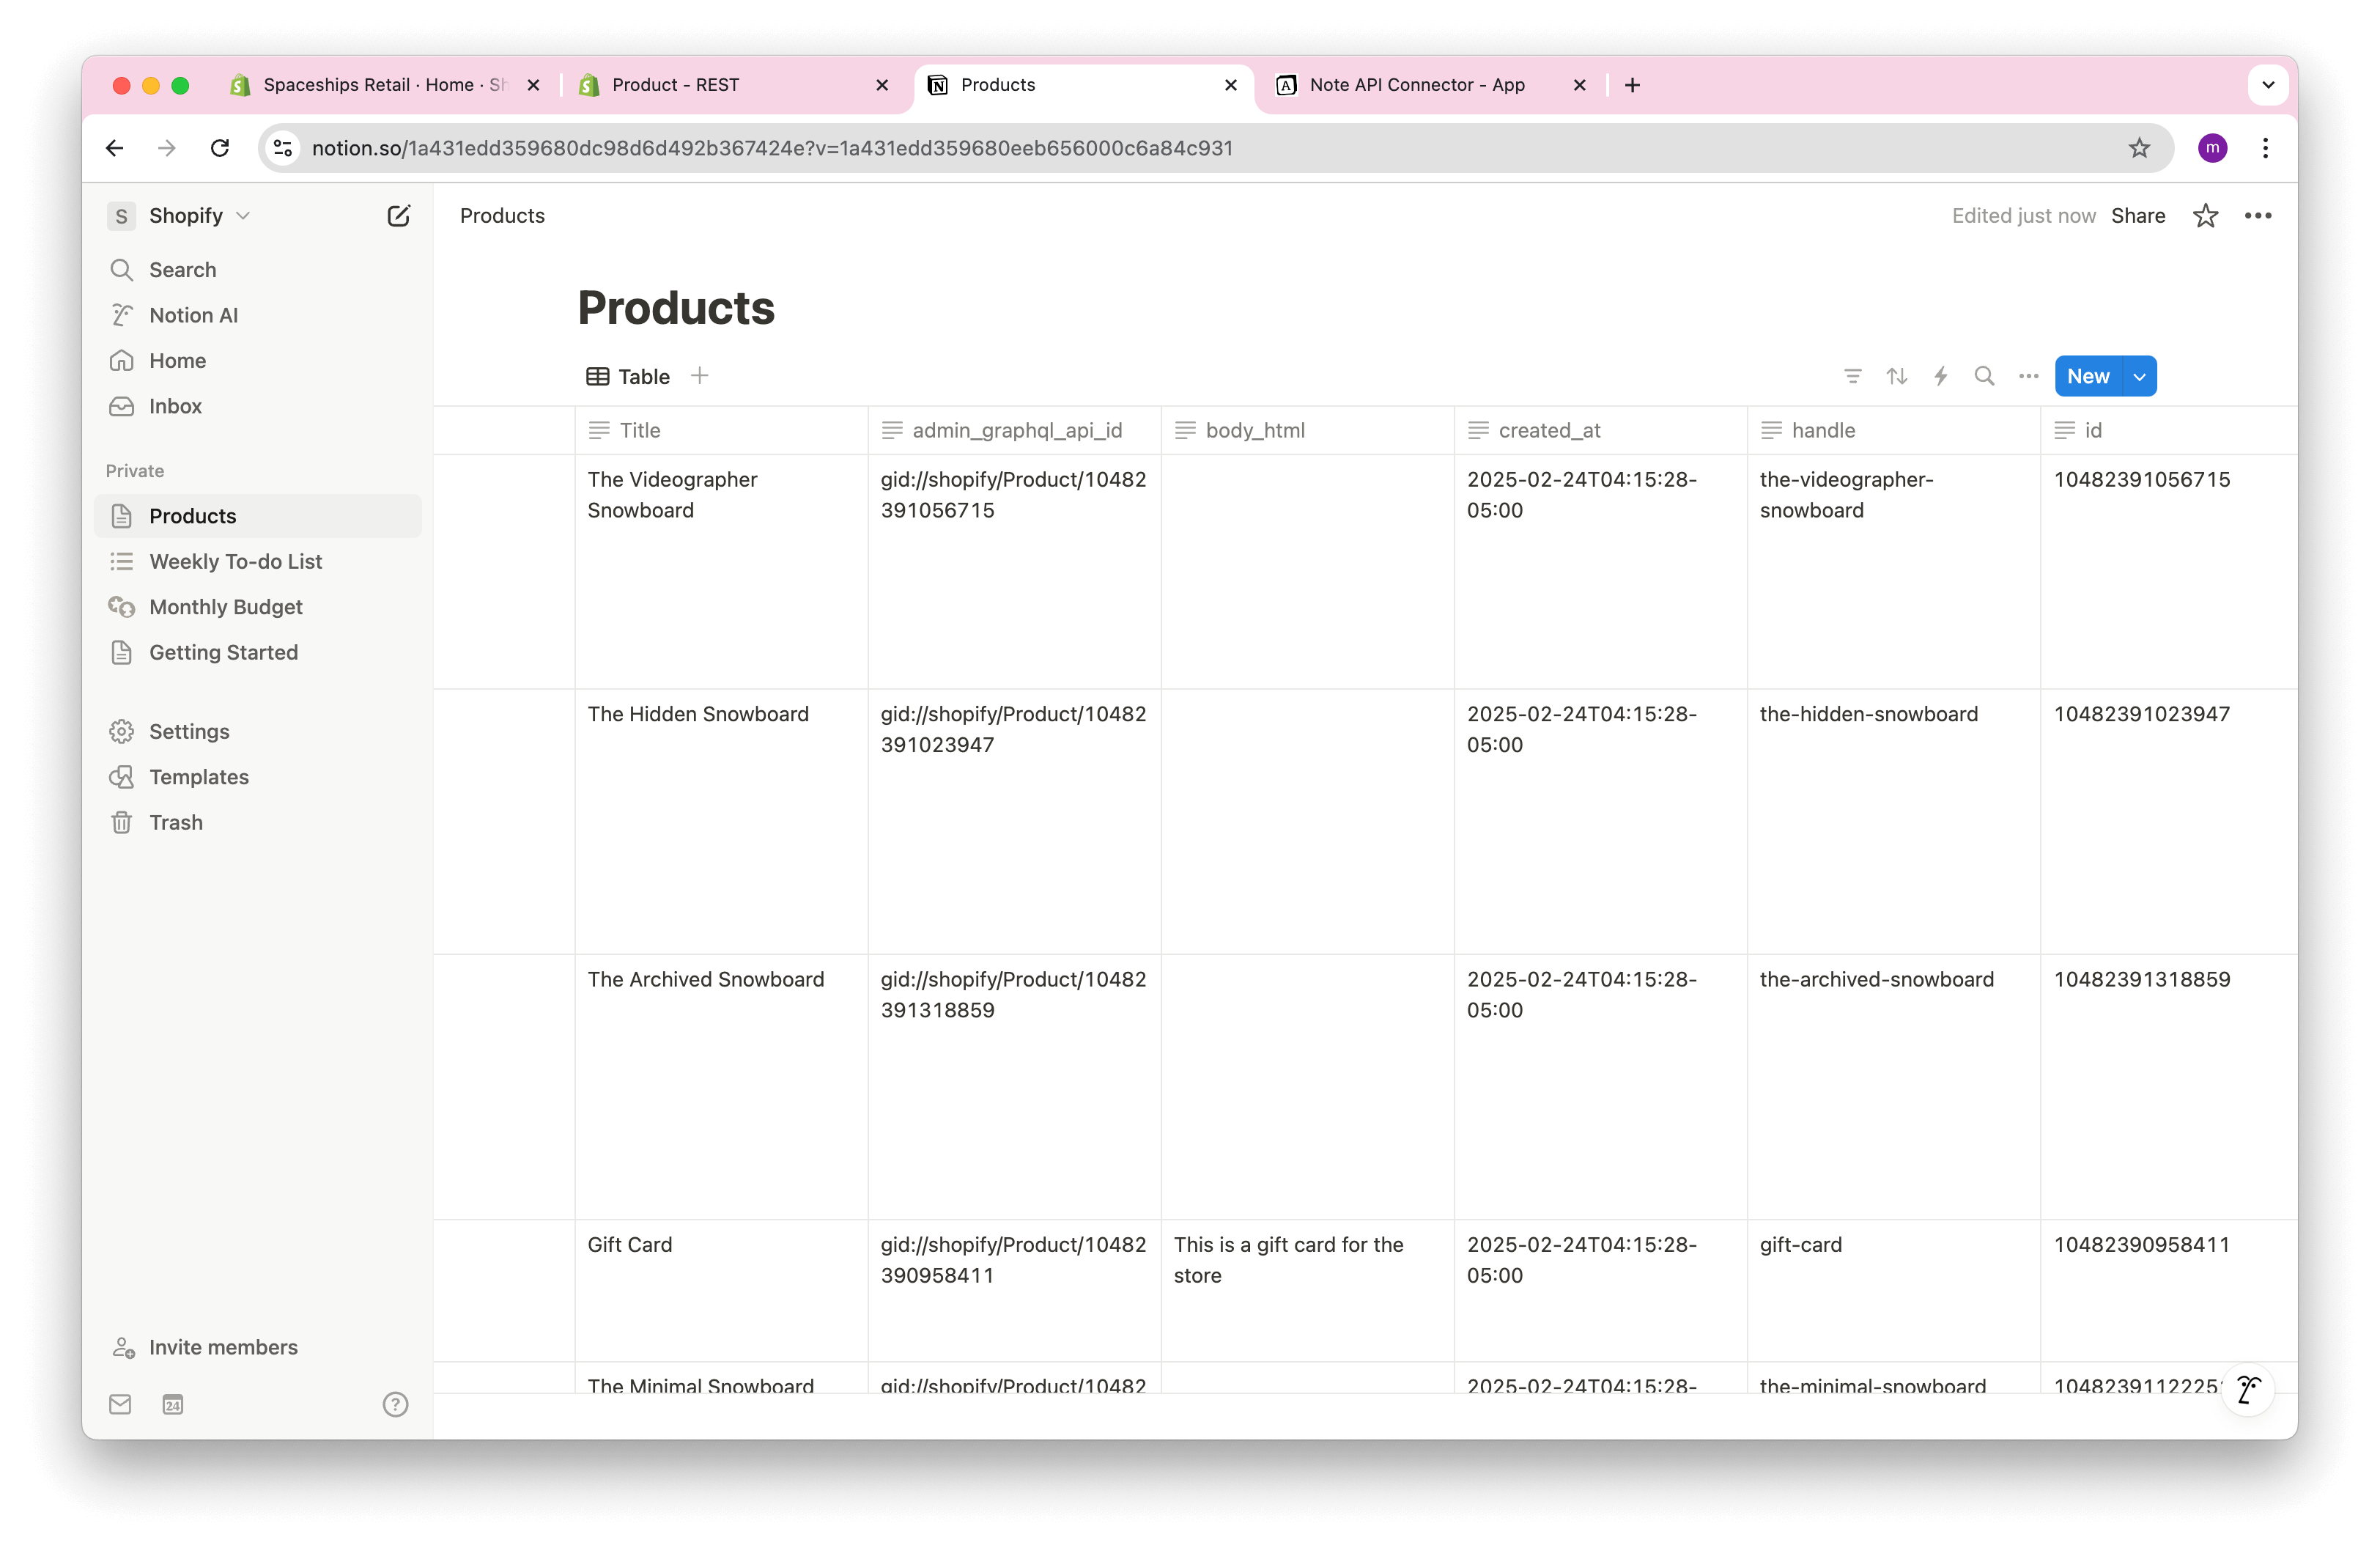
Click Save & Import to store the Shopify products in your Notion database.
Import Shopify Product Variants
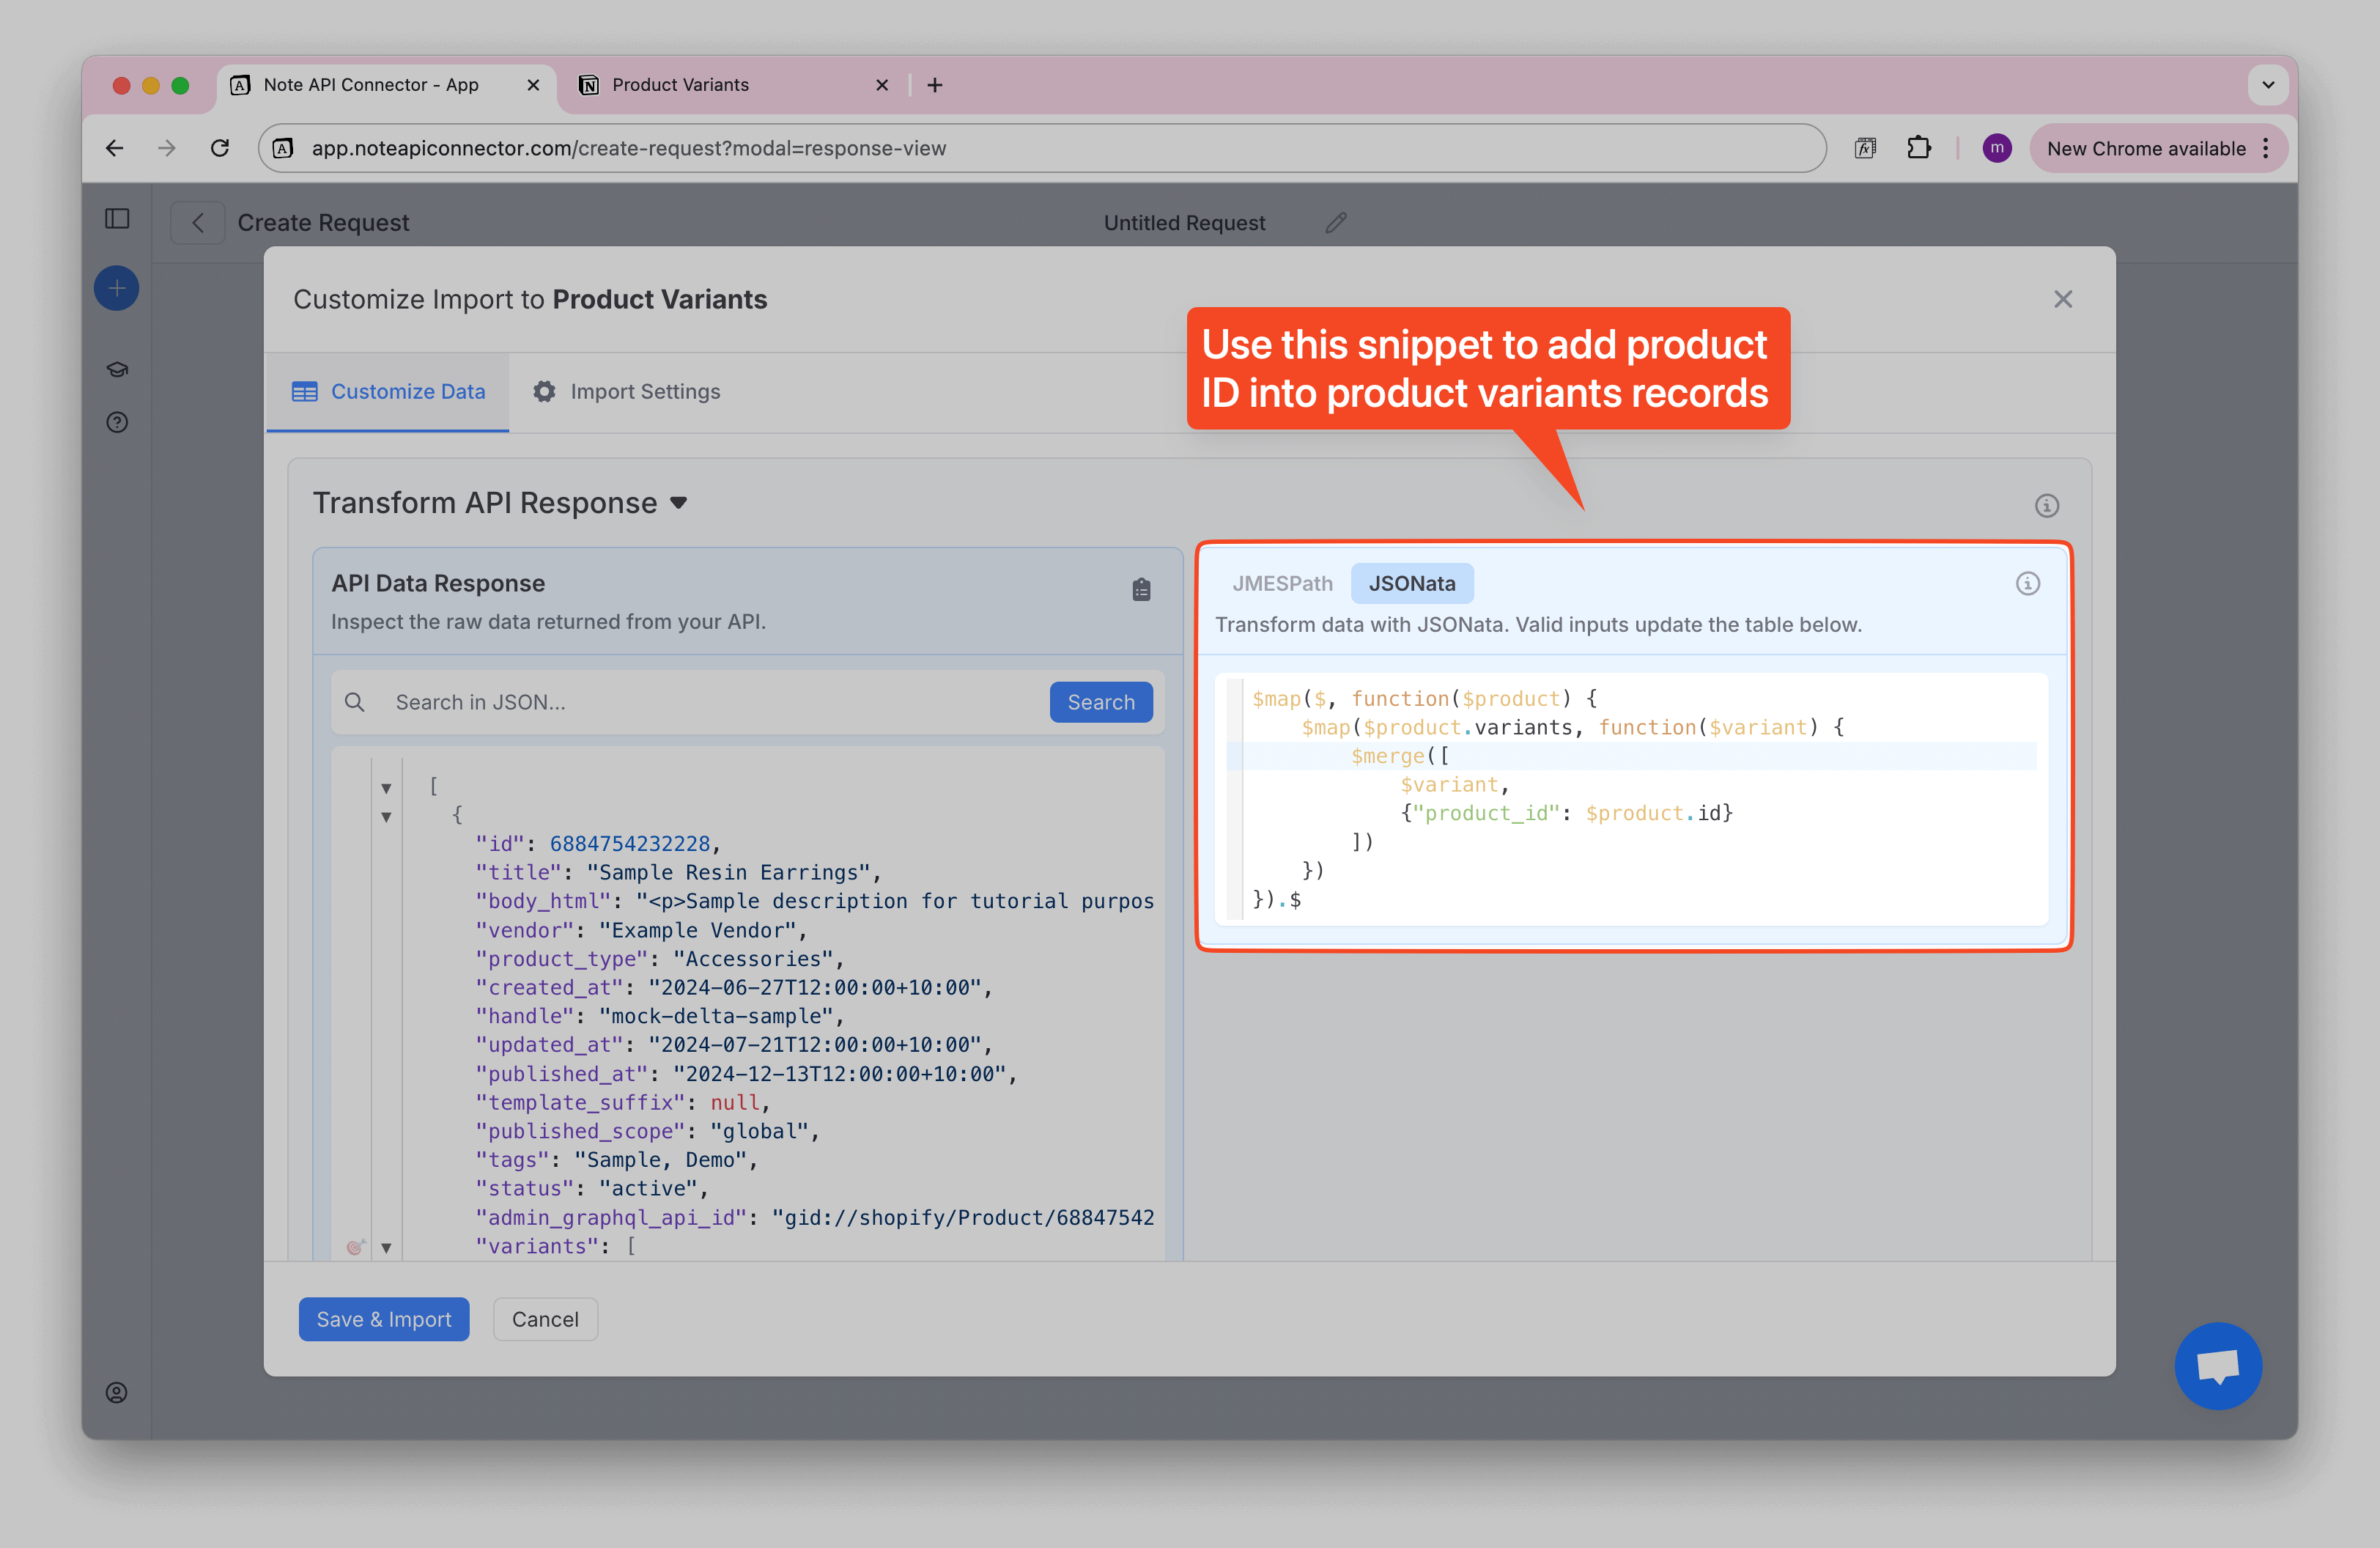
To import Product Variants, use the same request you created for Products. The only change
is a small JSONata transformation that returns one row per variant and adds the parent
product_id so you can link variants back to Products in Notion.
🙌 No coding experience? No problem. Use your favorite AI tool (e.g., ChatGPT, Claude) to create the JSONata. Click to learn how.
I have API response with Shopify products. I need a JSONata expression that that returns product variants and bring product id to the data.
JSON:
<PASTE YOUR DATA HERE>
Use this JSONata expression in the editor to produce variant records that also carry the
product_id:
$map($, function($product) {
    $map($product.variants, function($variant) {
        $merge([
            $variant,
            {"product_id": $product.id}
        ])
    })
}).$
Paste the snippet into the
JSONata editor
You should now see one row per variant, each with a product_id column.
Link Shopify Product Variants to Products
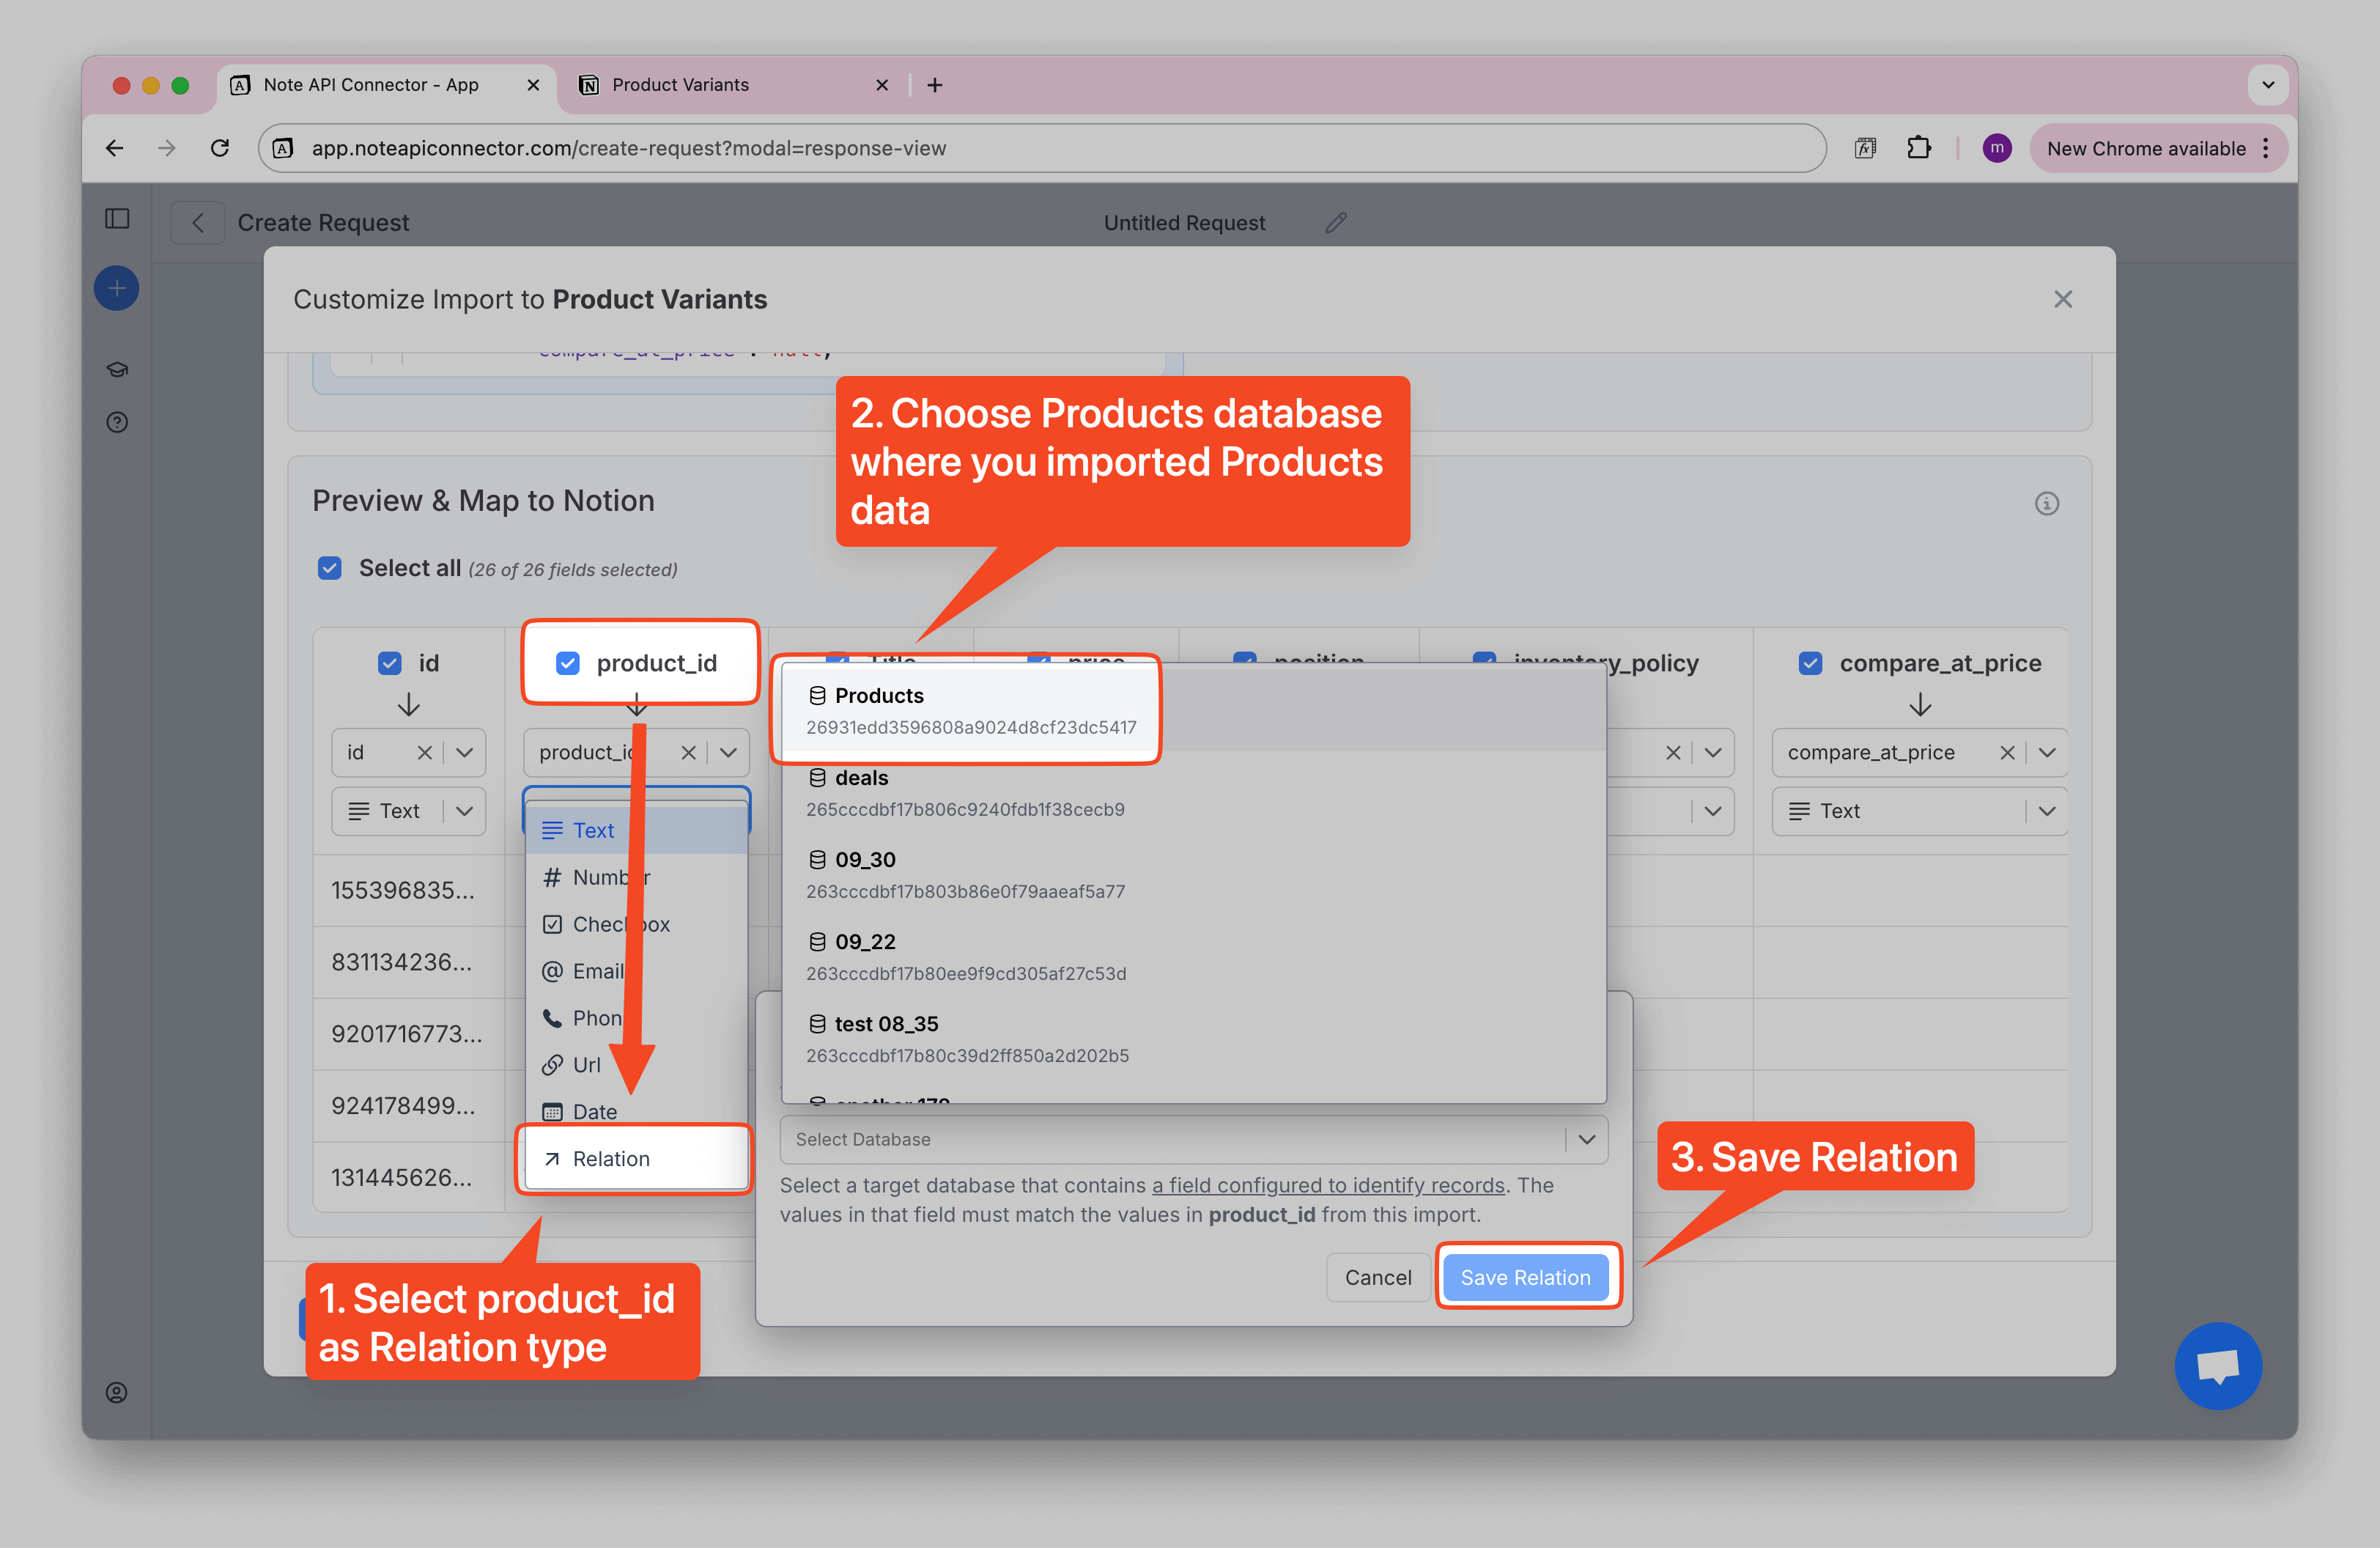
Next, map product_id as a
Relation
to your Products database. In
Import Settings, choose
Update mode so
future runs keep data in sync.
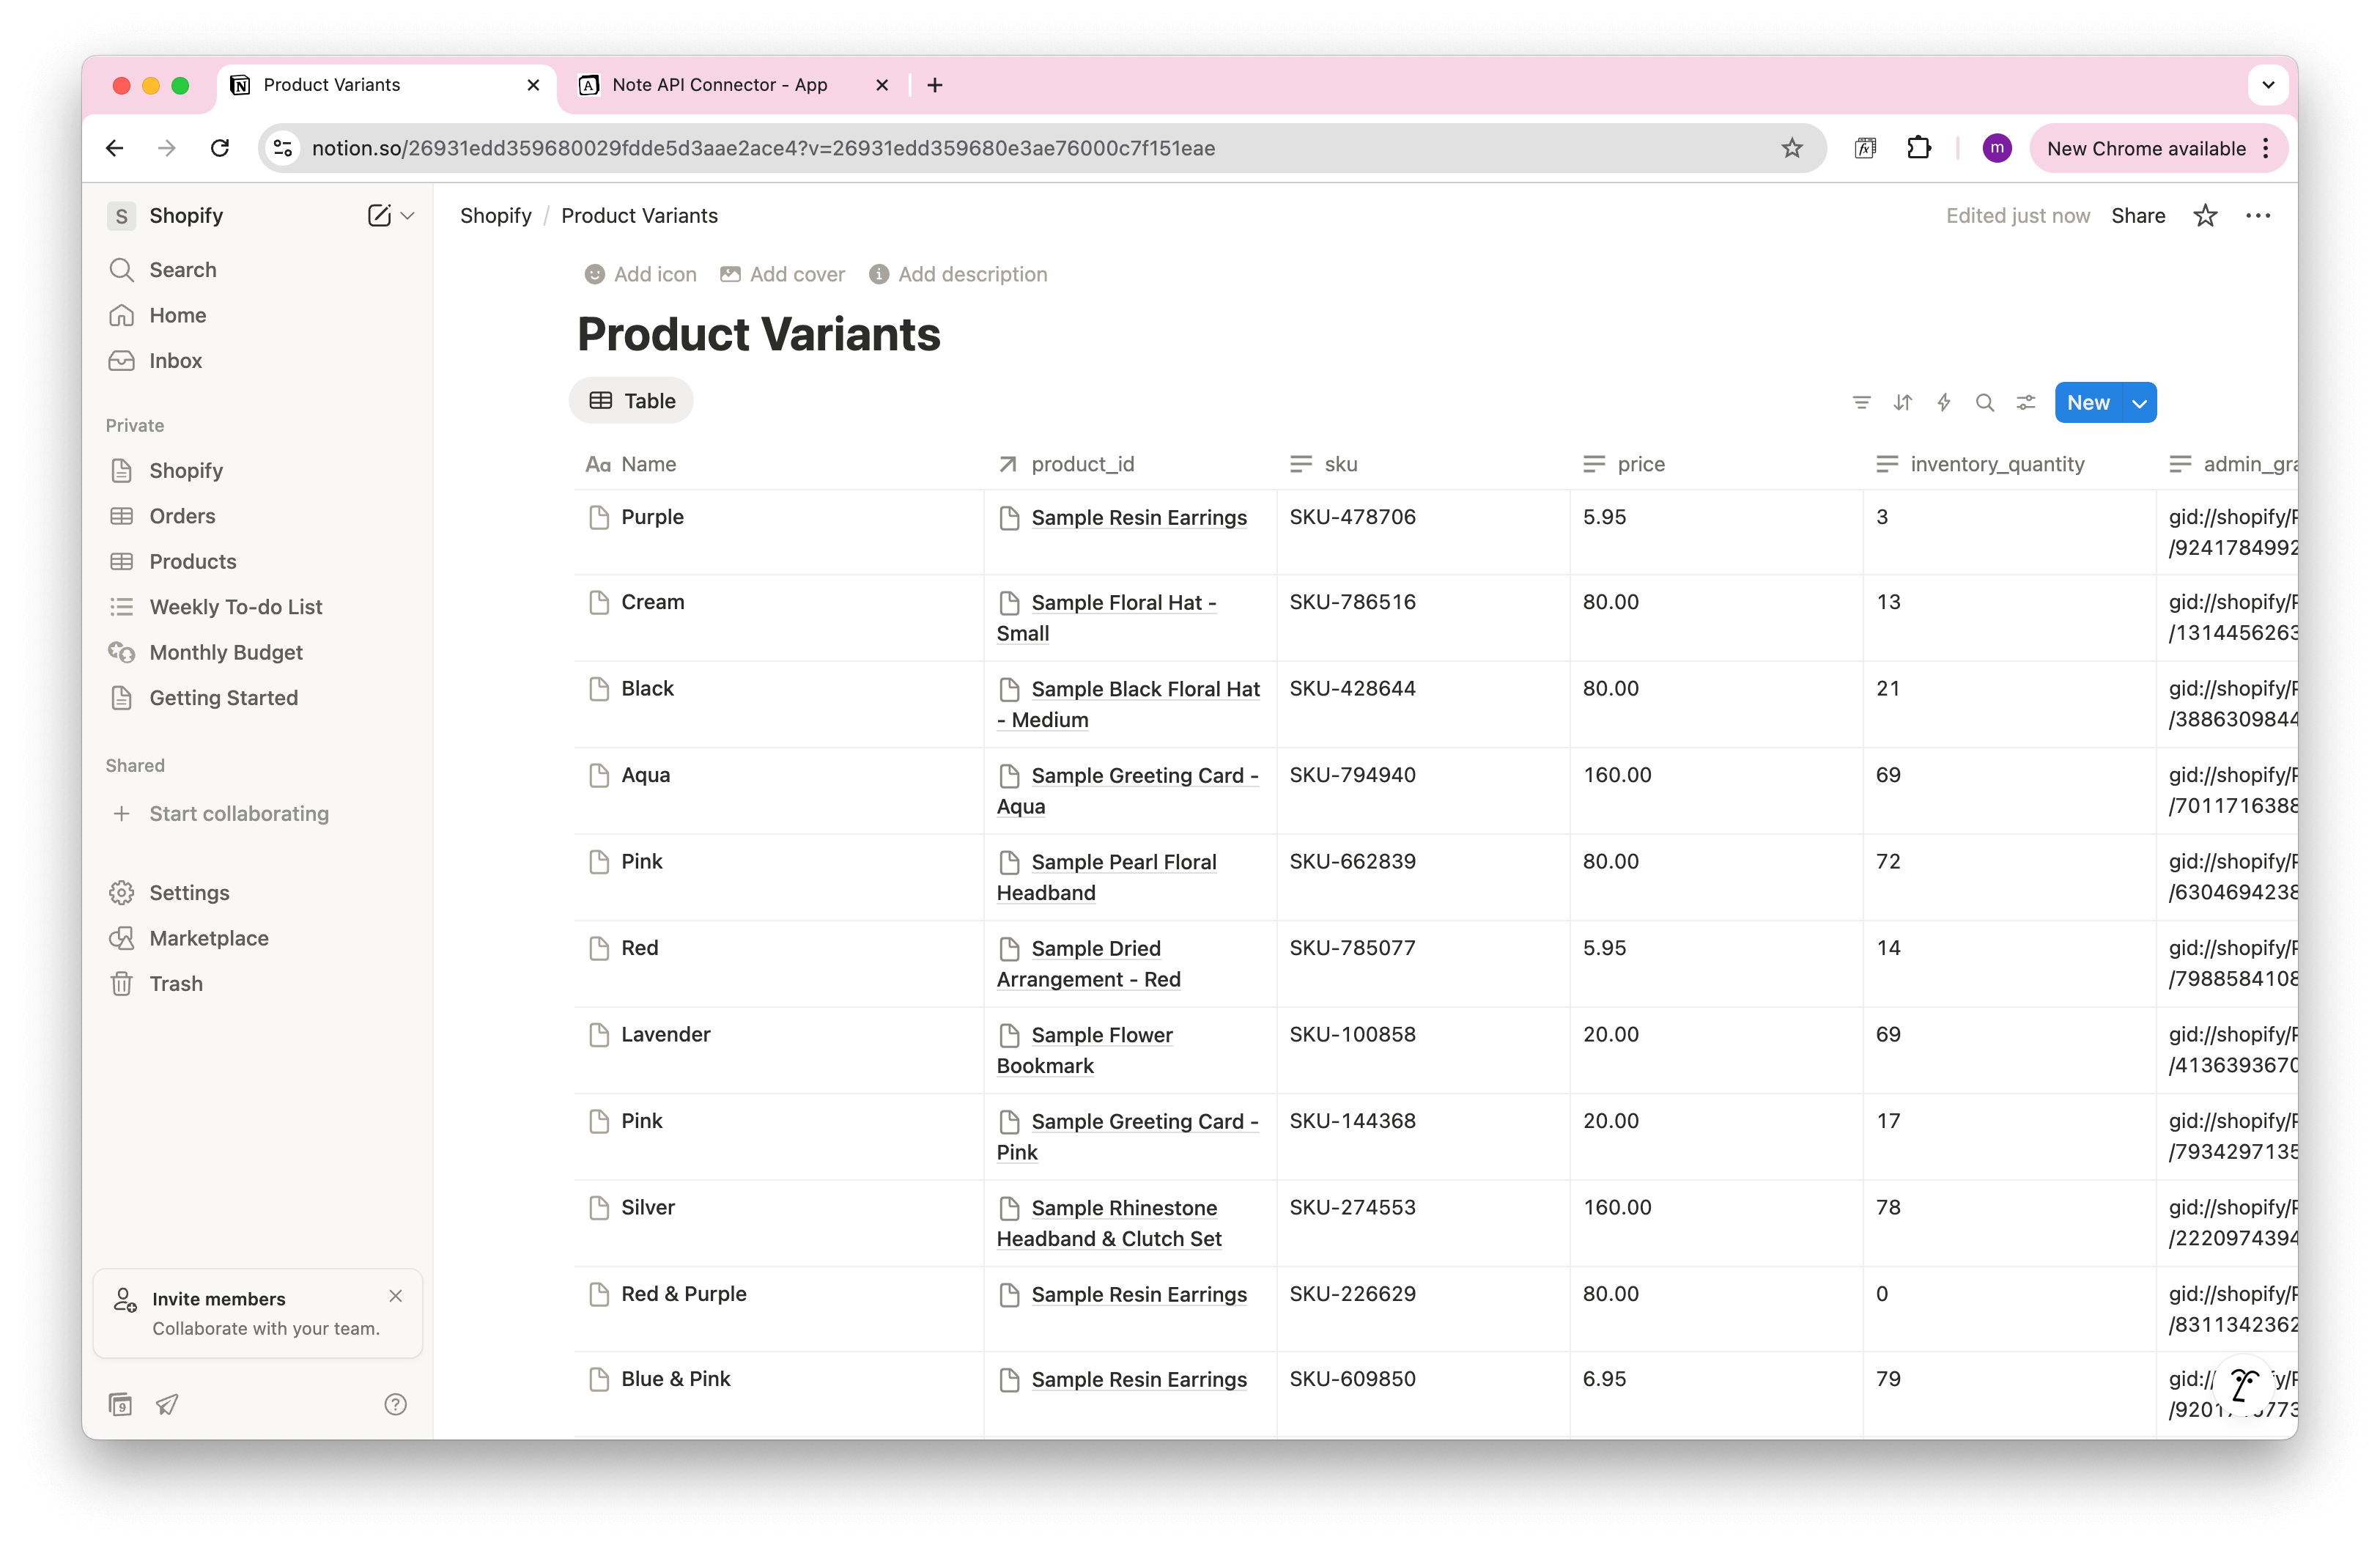
You should now see your variant records linked to the correct Product in Notion.
Import and Sync Shopify Orders into Notion
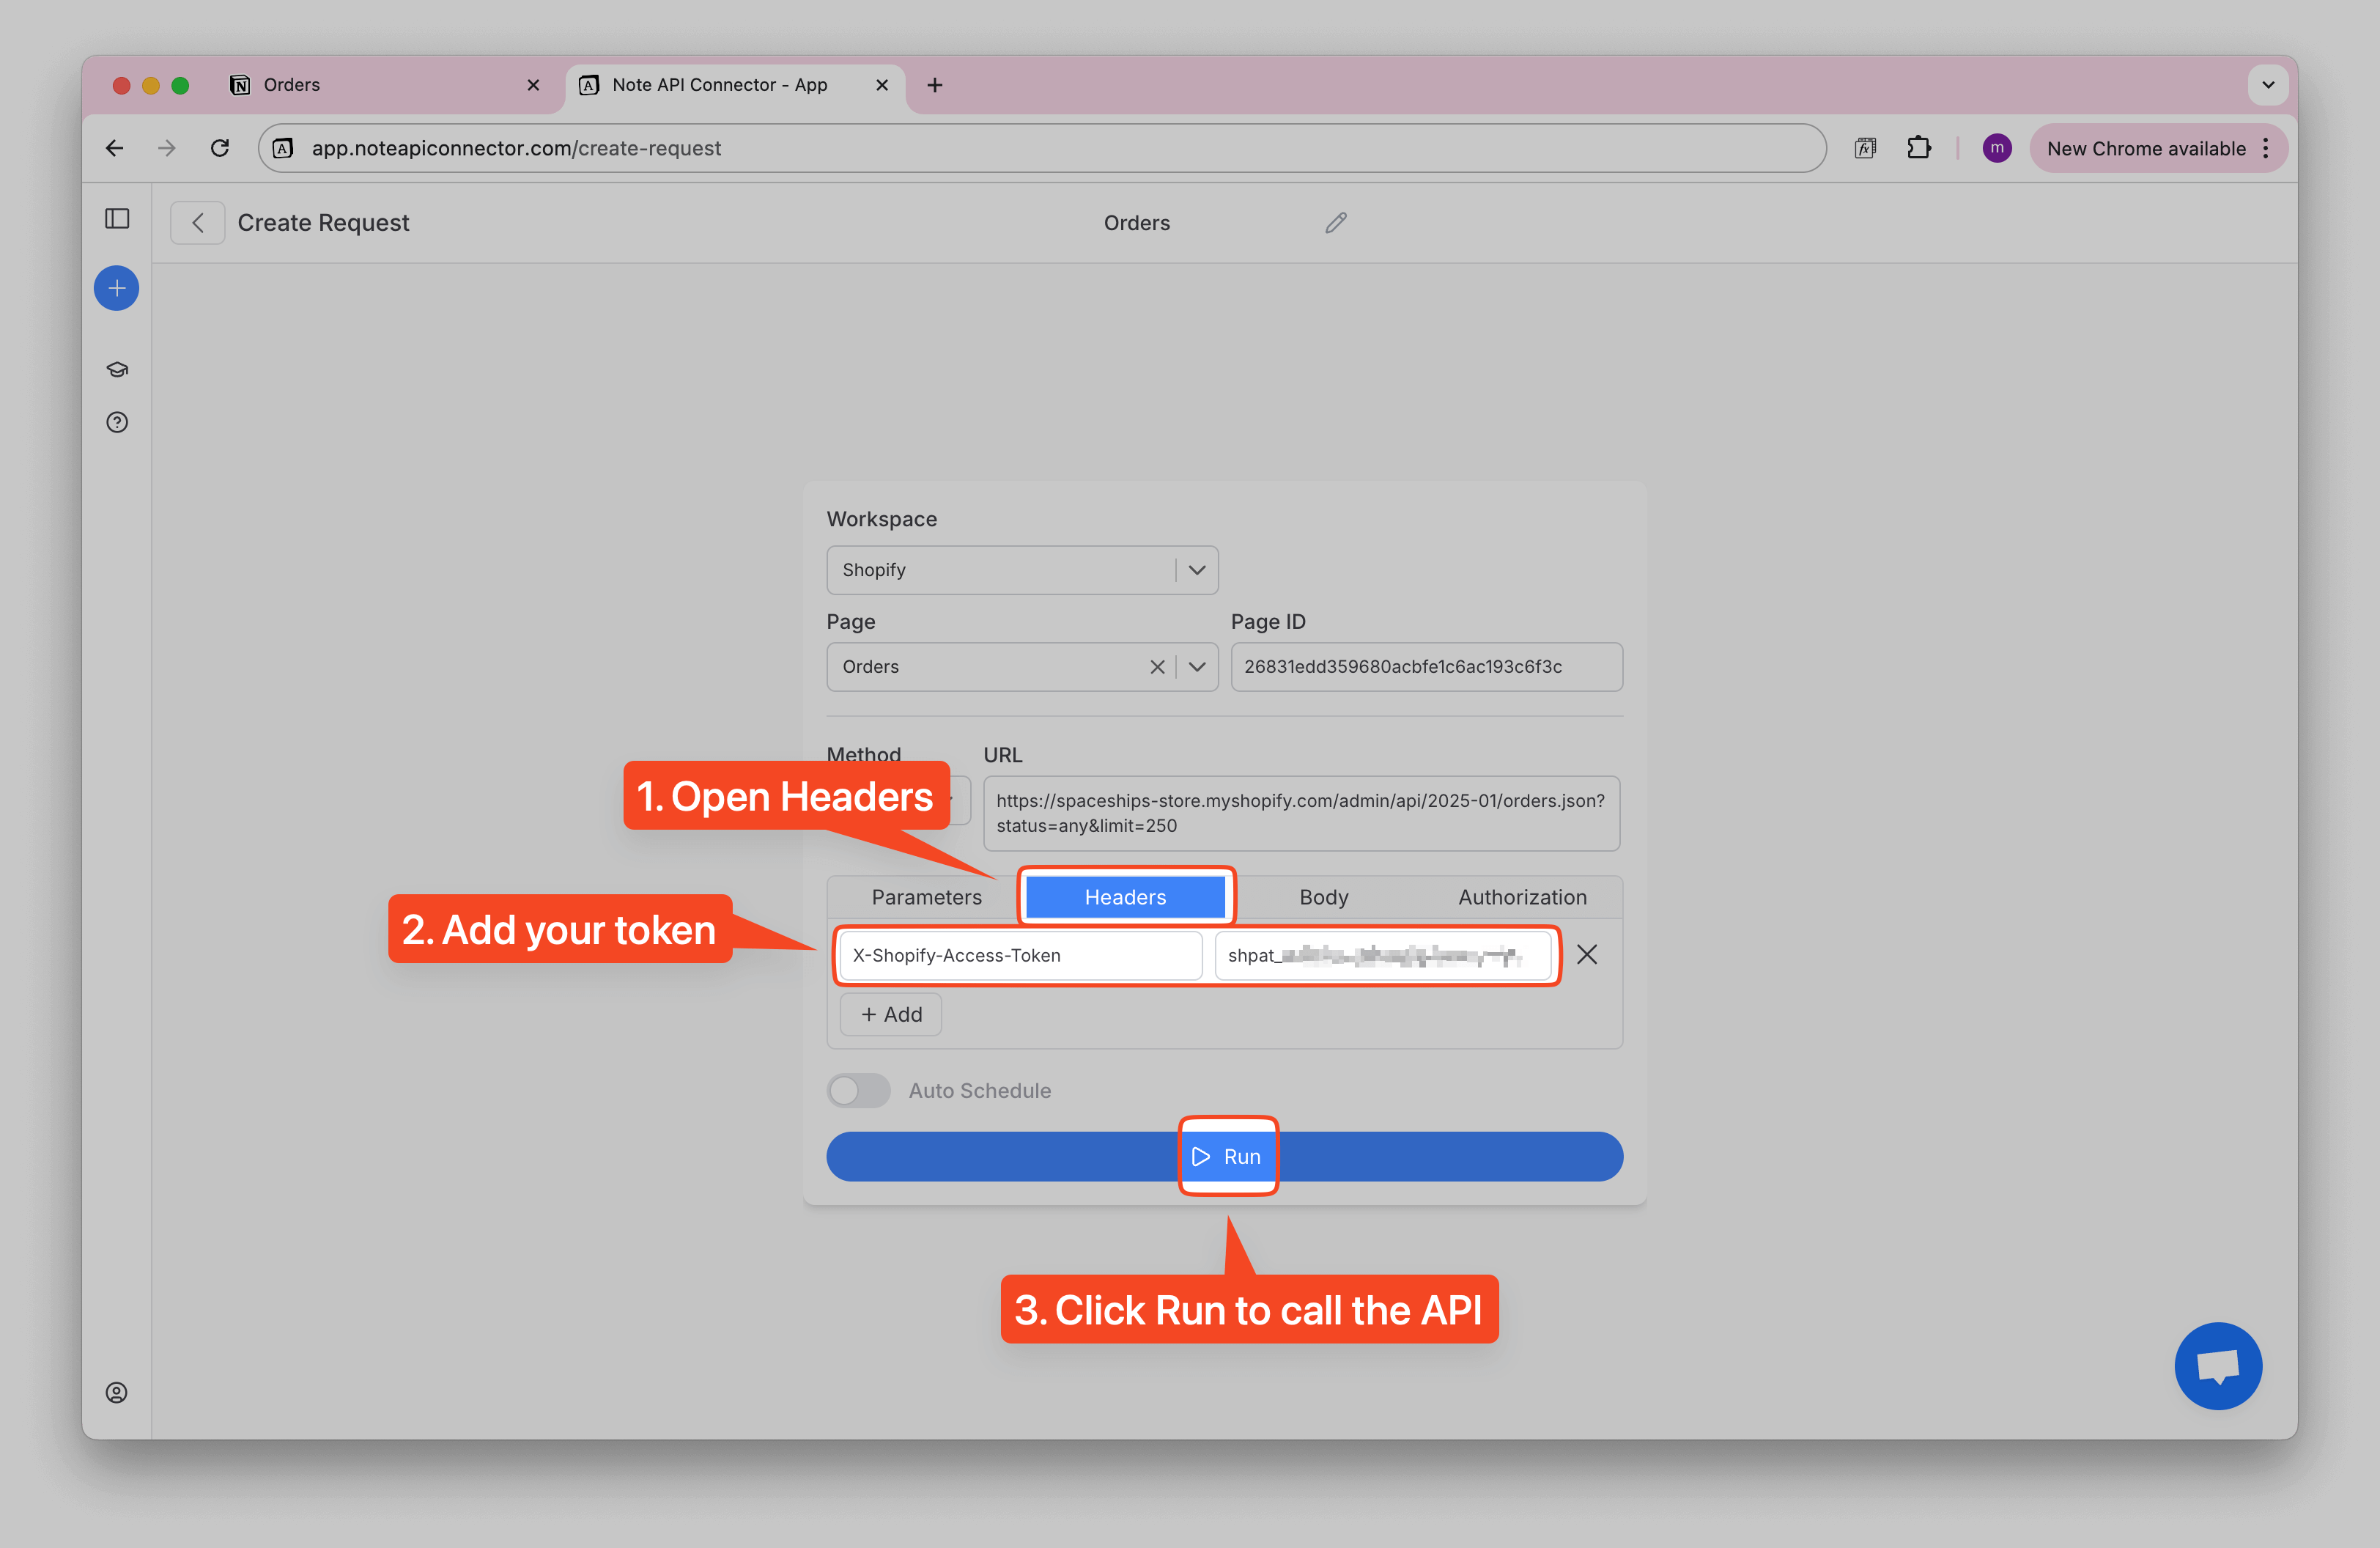
To pull orders from Shopify, use this endpoint (replace the domain with your store):
https://spaceships-store.myshopify.com/admin/api/2025-01/orders.json?status=any&limit=250
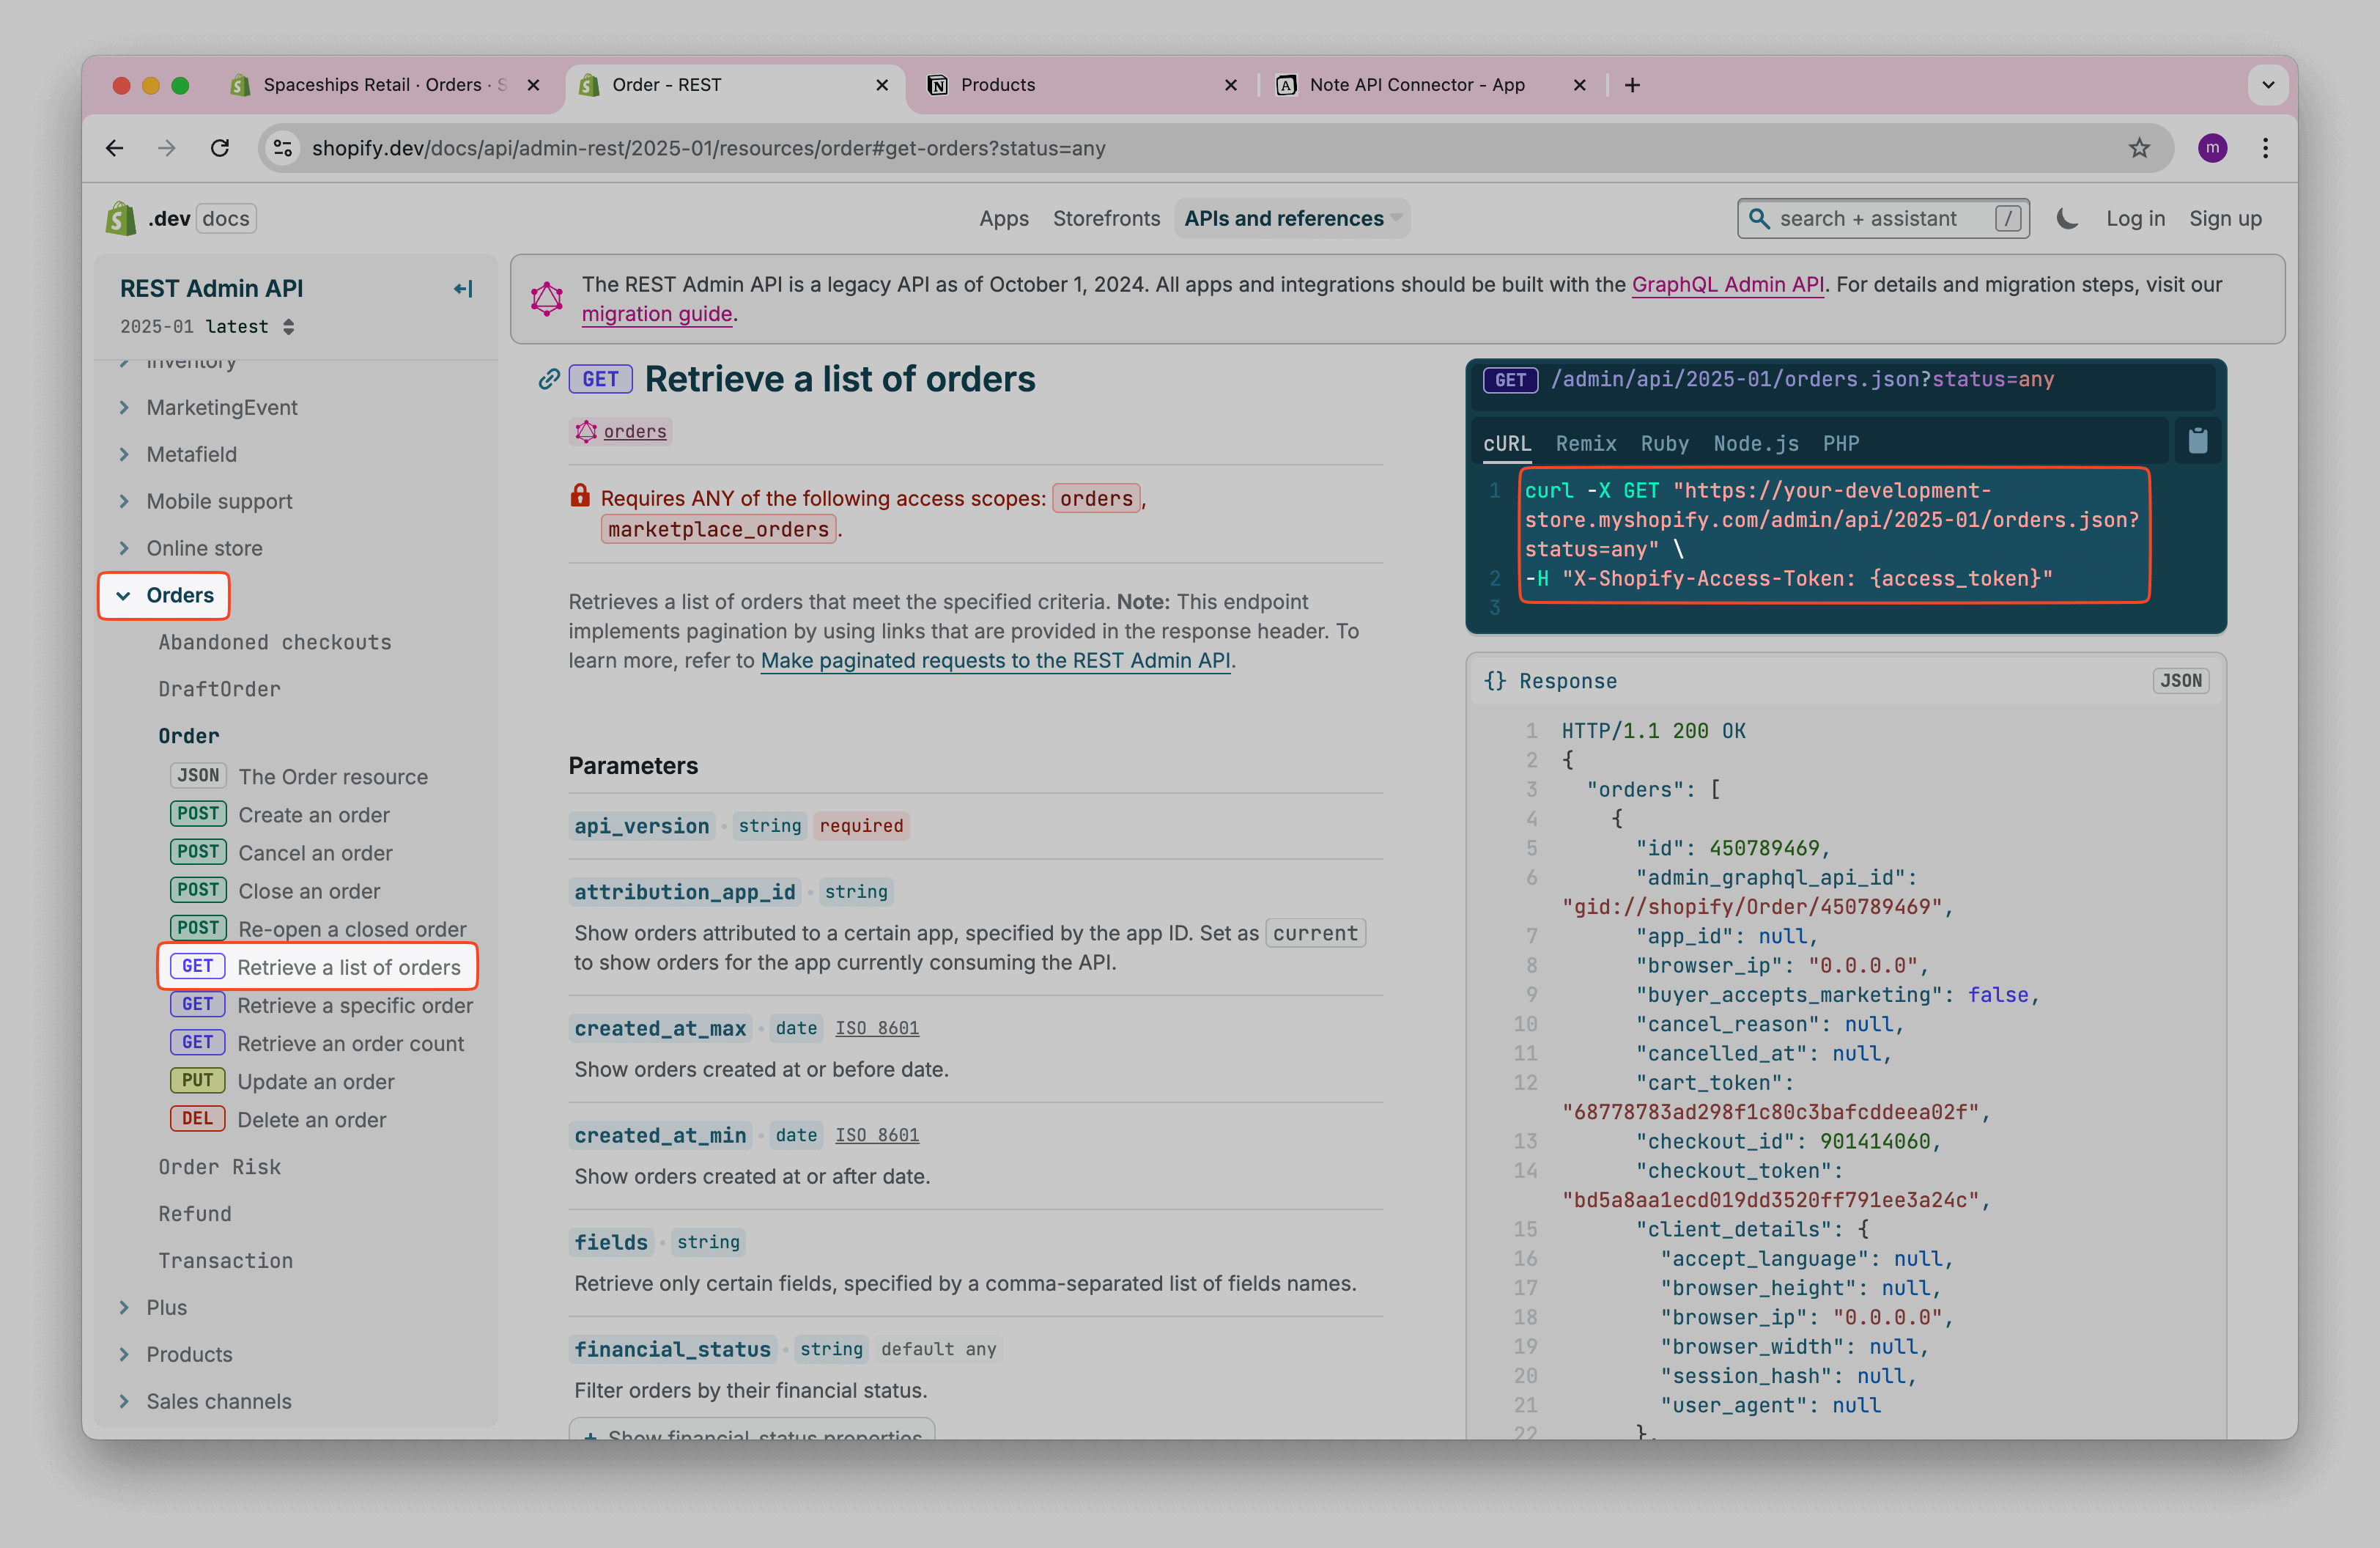
Add your Shopify access token in Headers.
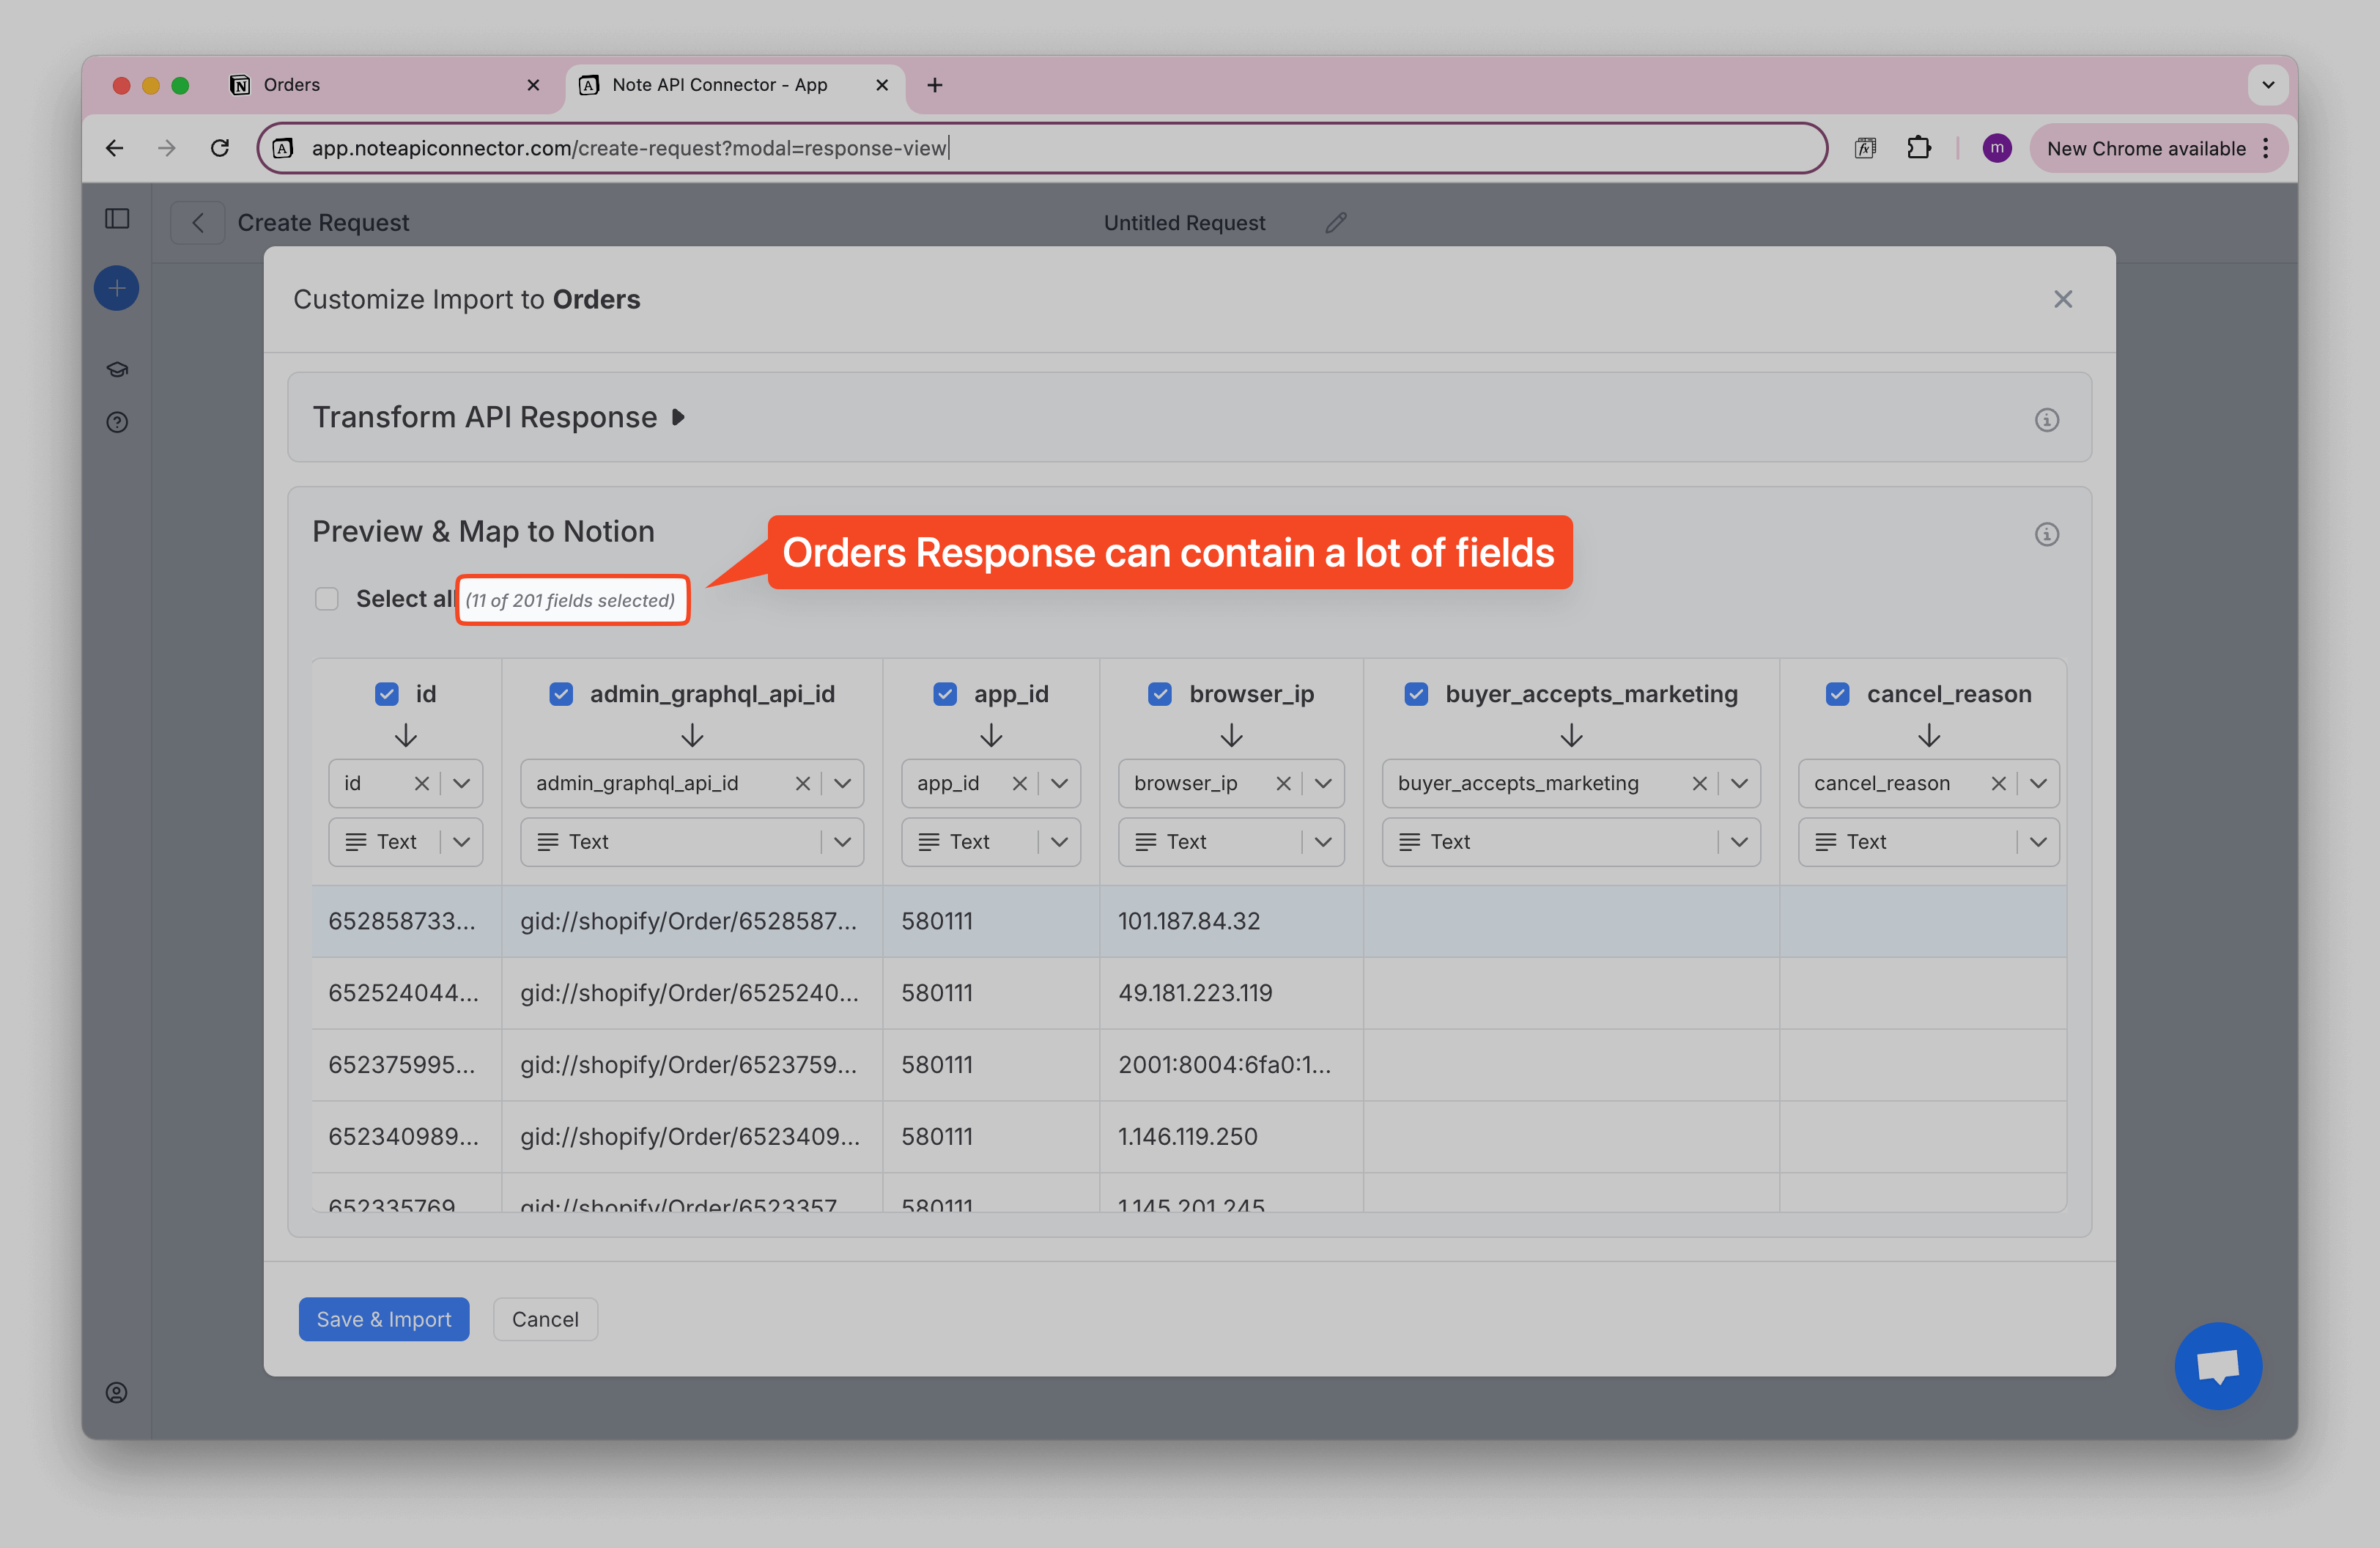
Orders include many fields. In the next step you can choose what to import and reduce the amount of data.
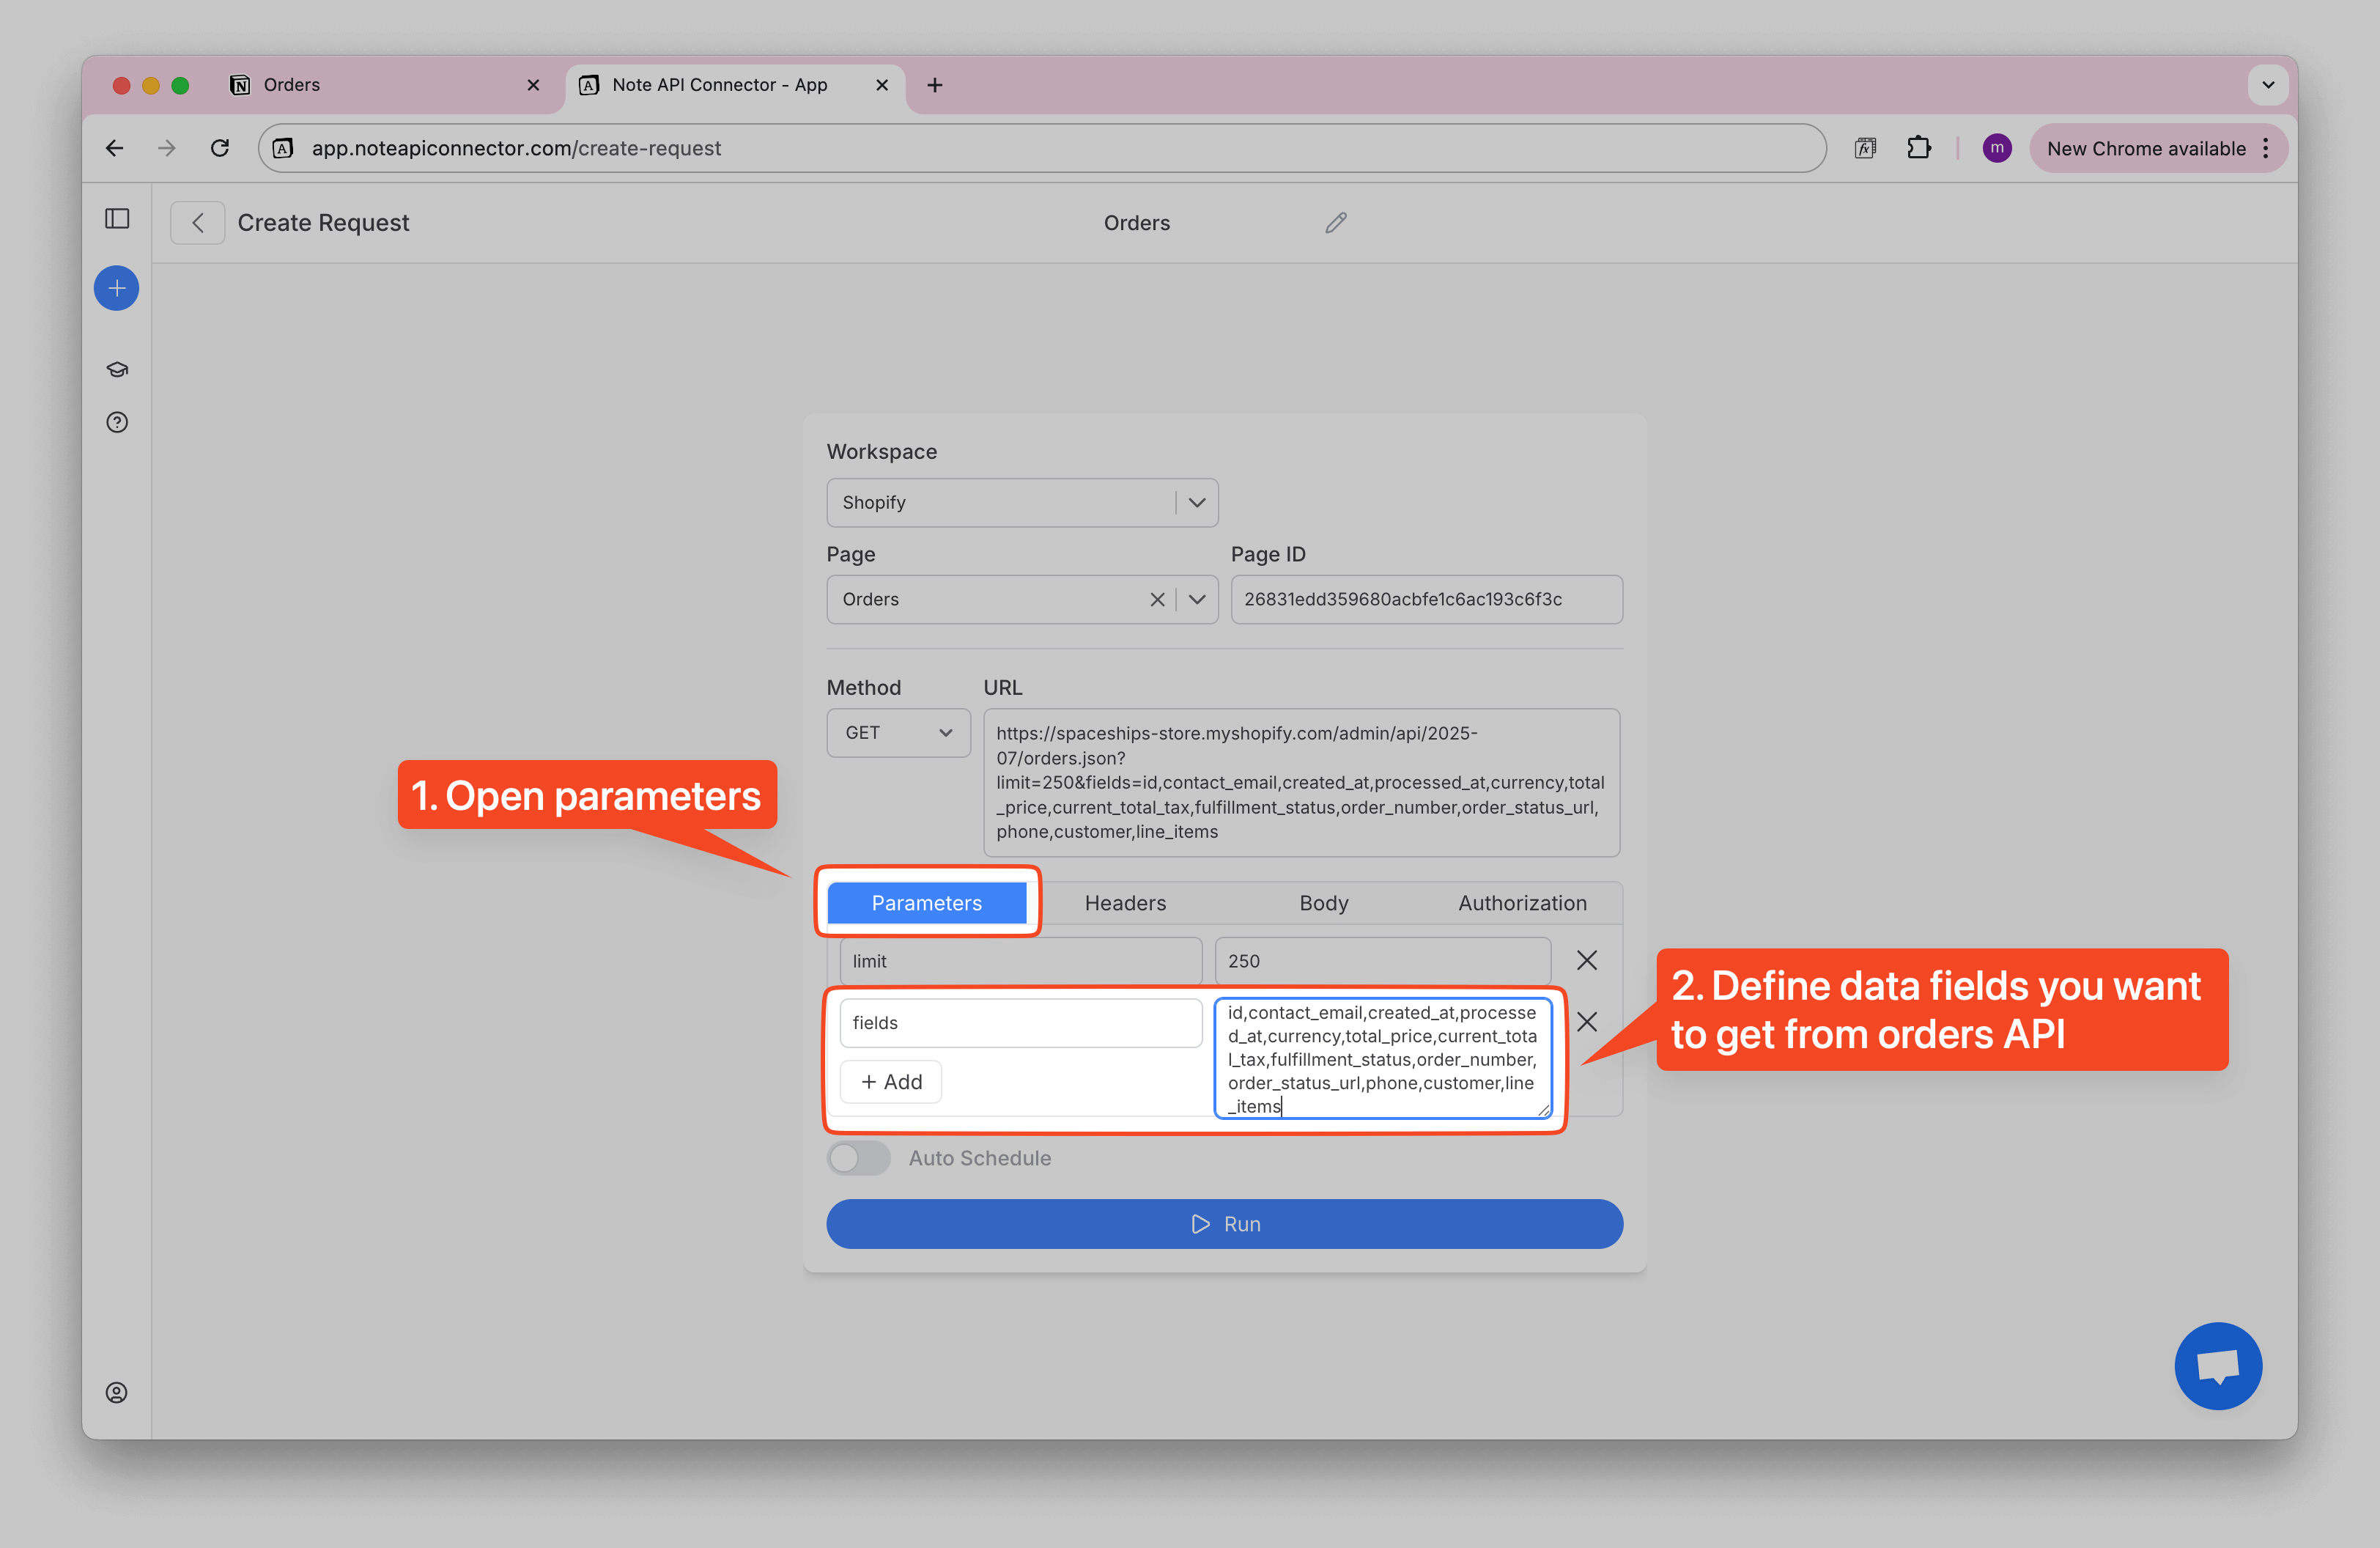
You have two ways to keep only what you need:
- Ask the API for fewer fields using the
fieldsparameter, or - Transform the response with JMESPath or JSONata.
After limiting fields, you may still want to tidy the values. For example, the customer name comes as first
and last name, and products are nested under line_items.
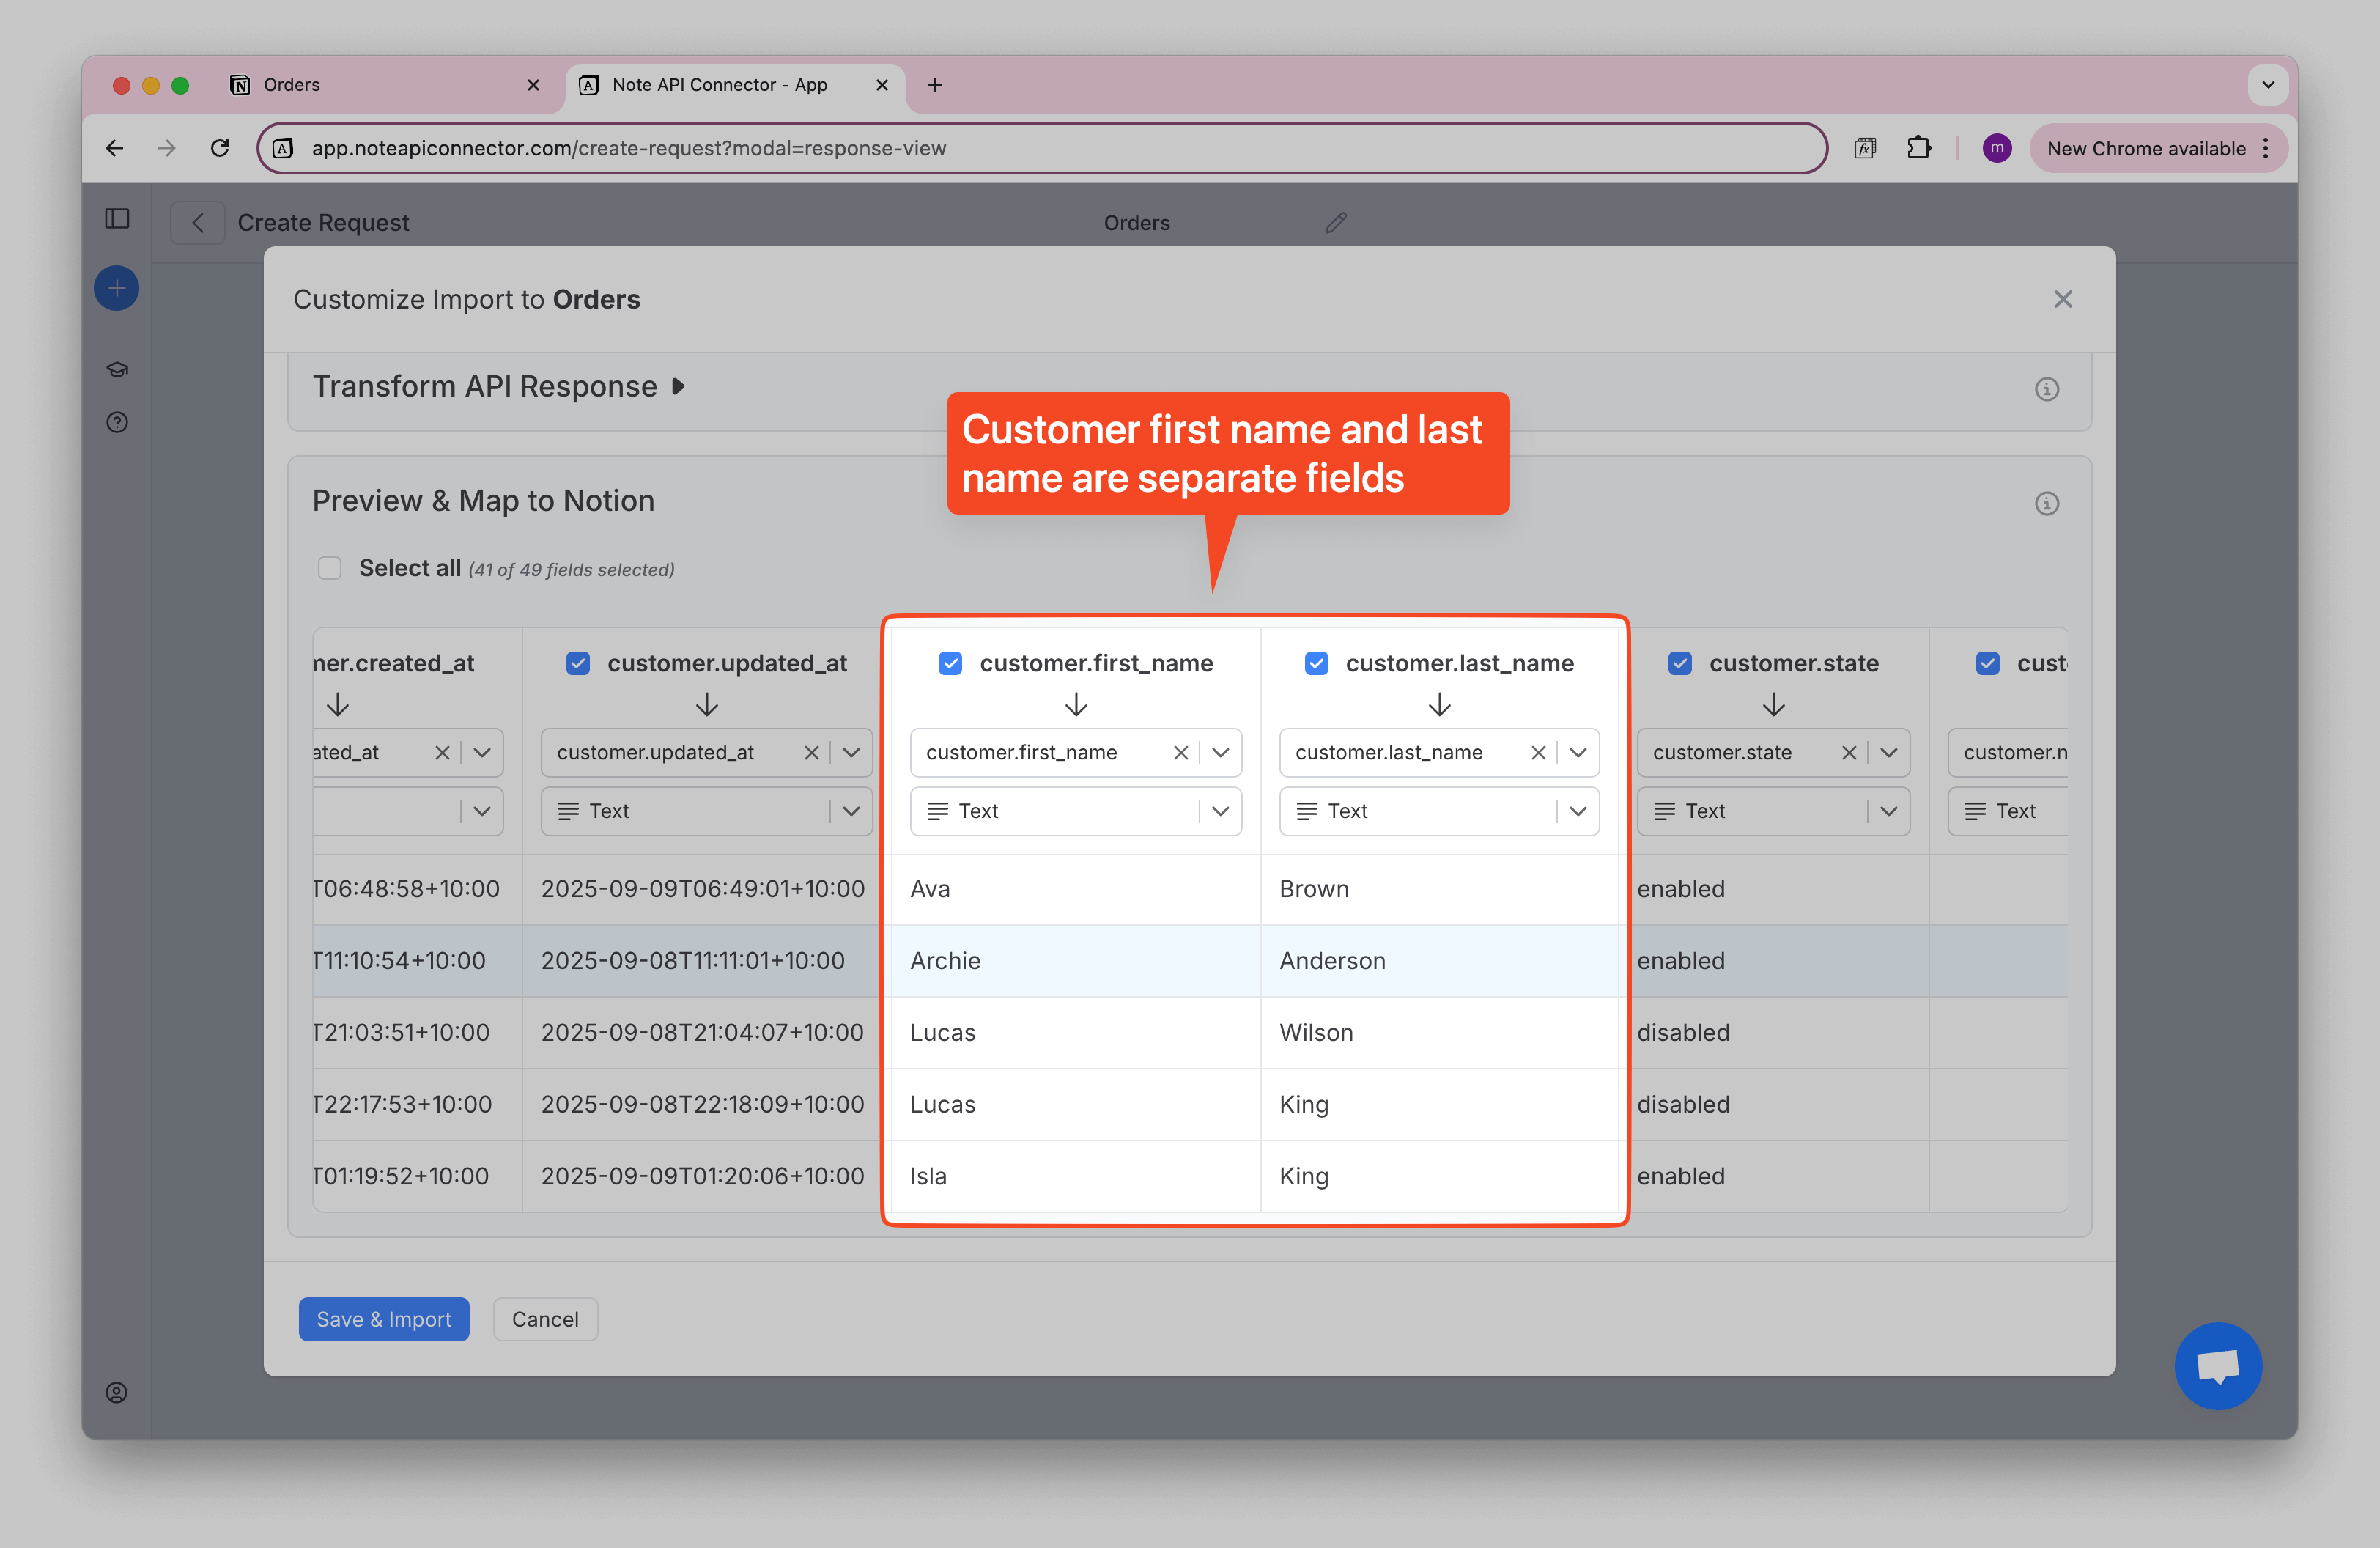
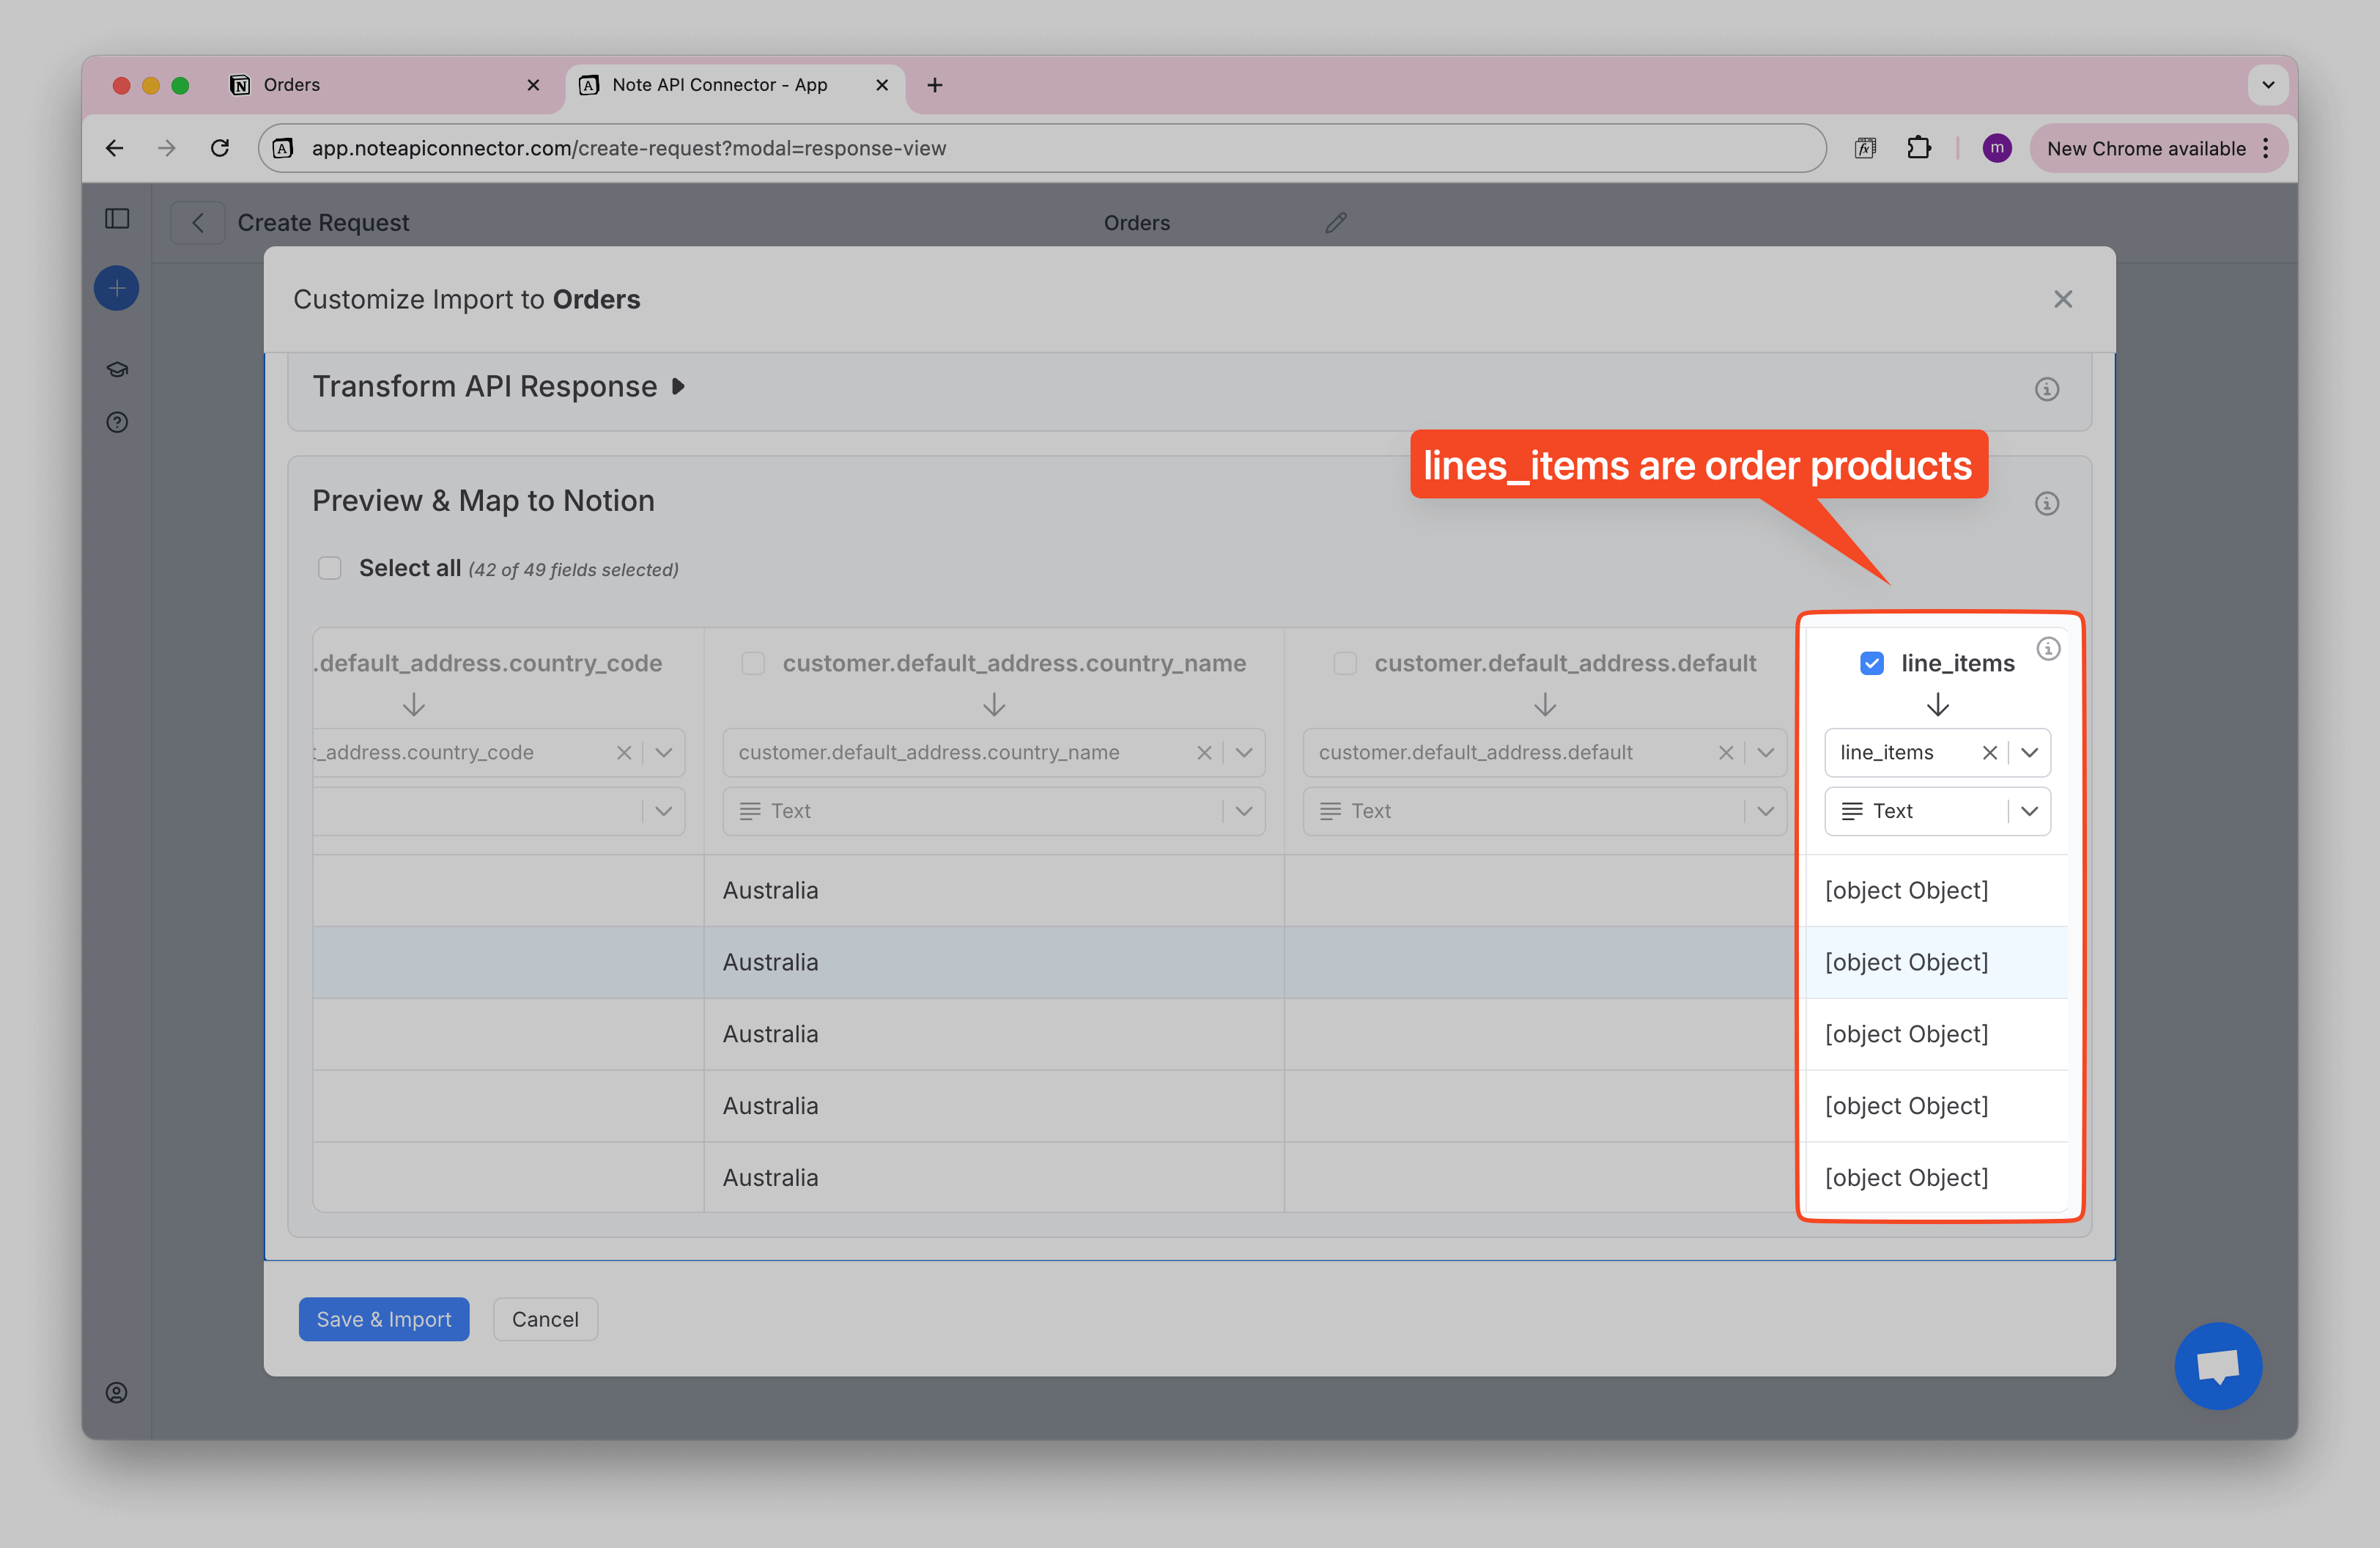
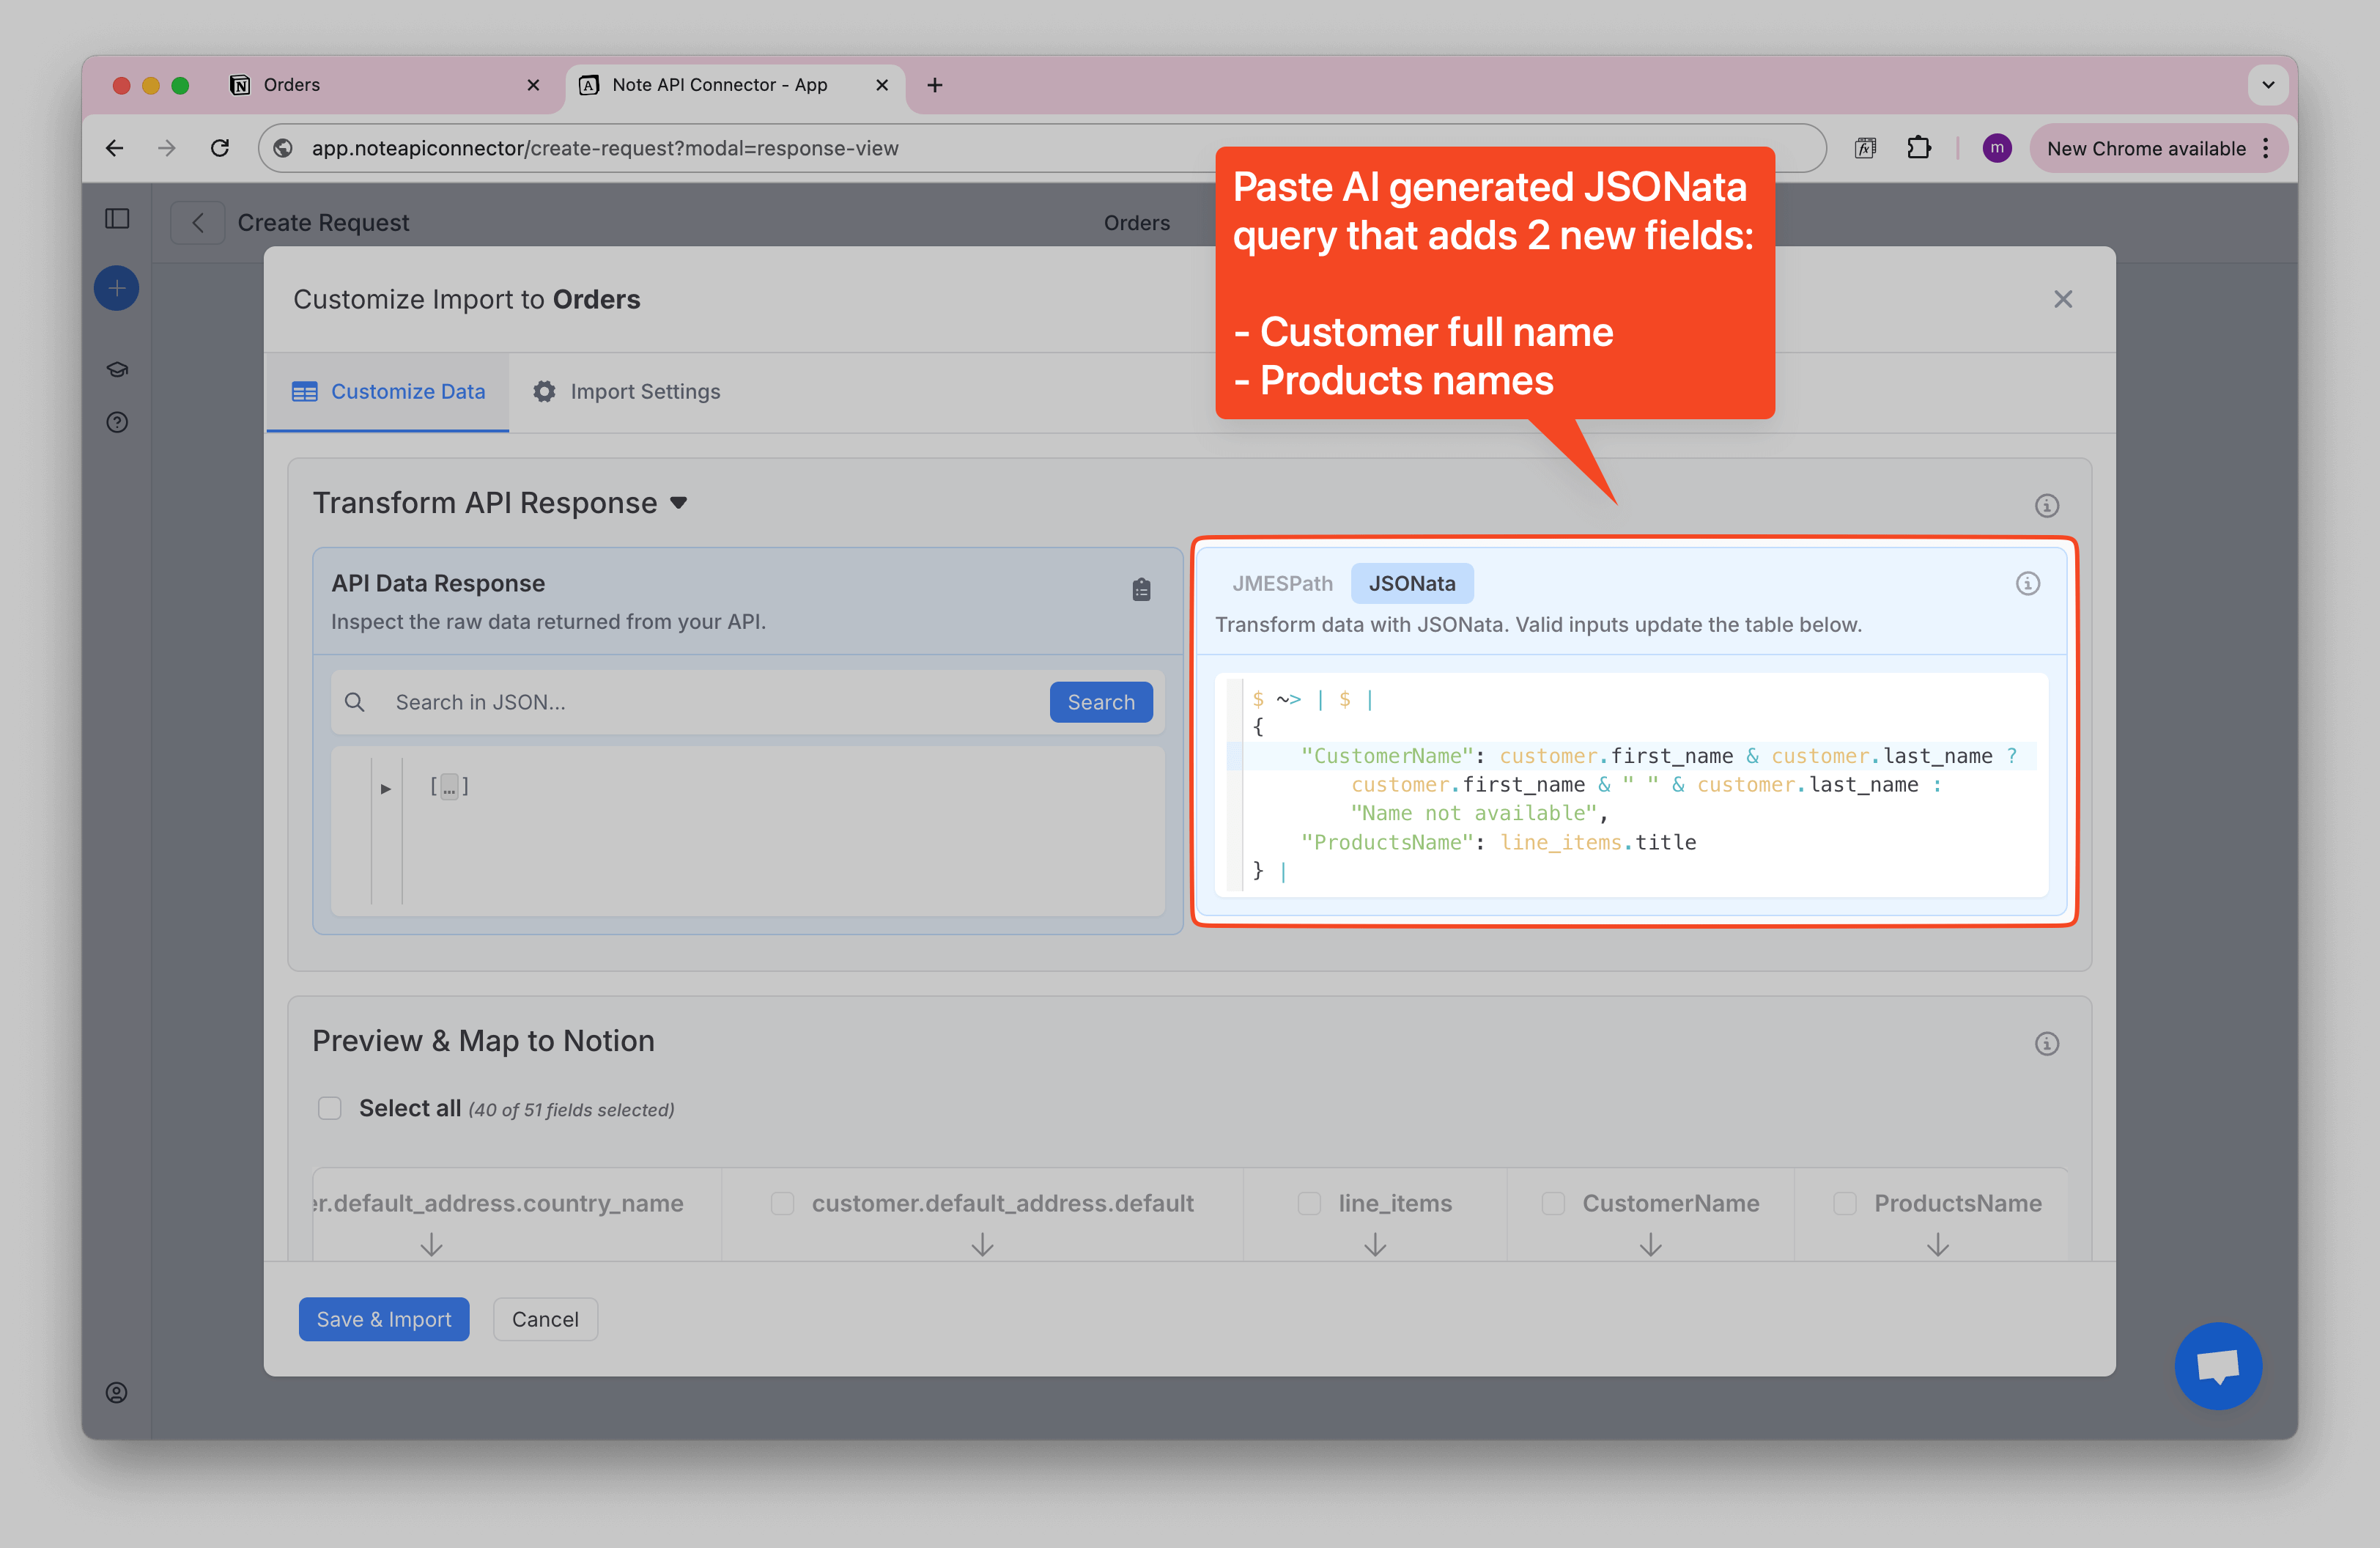
Use the JSONata example below to: 1) build a full customer name that handles missing data, and 2) combine product titles into one line of text.
🙌 No coding experience? No problem. Use your favorite AI tool (e.g., ChatGPT, Claude) to create the JSONata. Click to learn how.
I have API response with Shopify orders. I need a JSONata expression that returns customer full name, (take into account customer name can be missing) and return products as a list of its names.
JSON:
<PASTE YOUR DATA HERE>
$ ~> | $ |
{
    "CustomerName": customer.first_name & customer.last_name ?
        customer.first_name & " " & customer.last_name :
        "Name not available",
    "ProductsName": line_items.title
} |
Paste the snippet into the JSONata editor and run it.
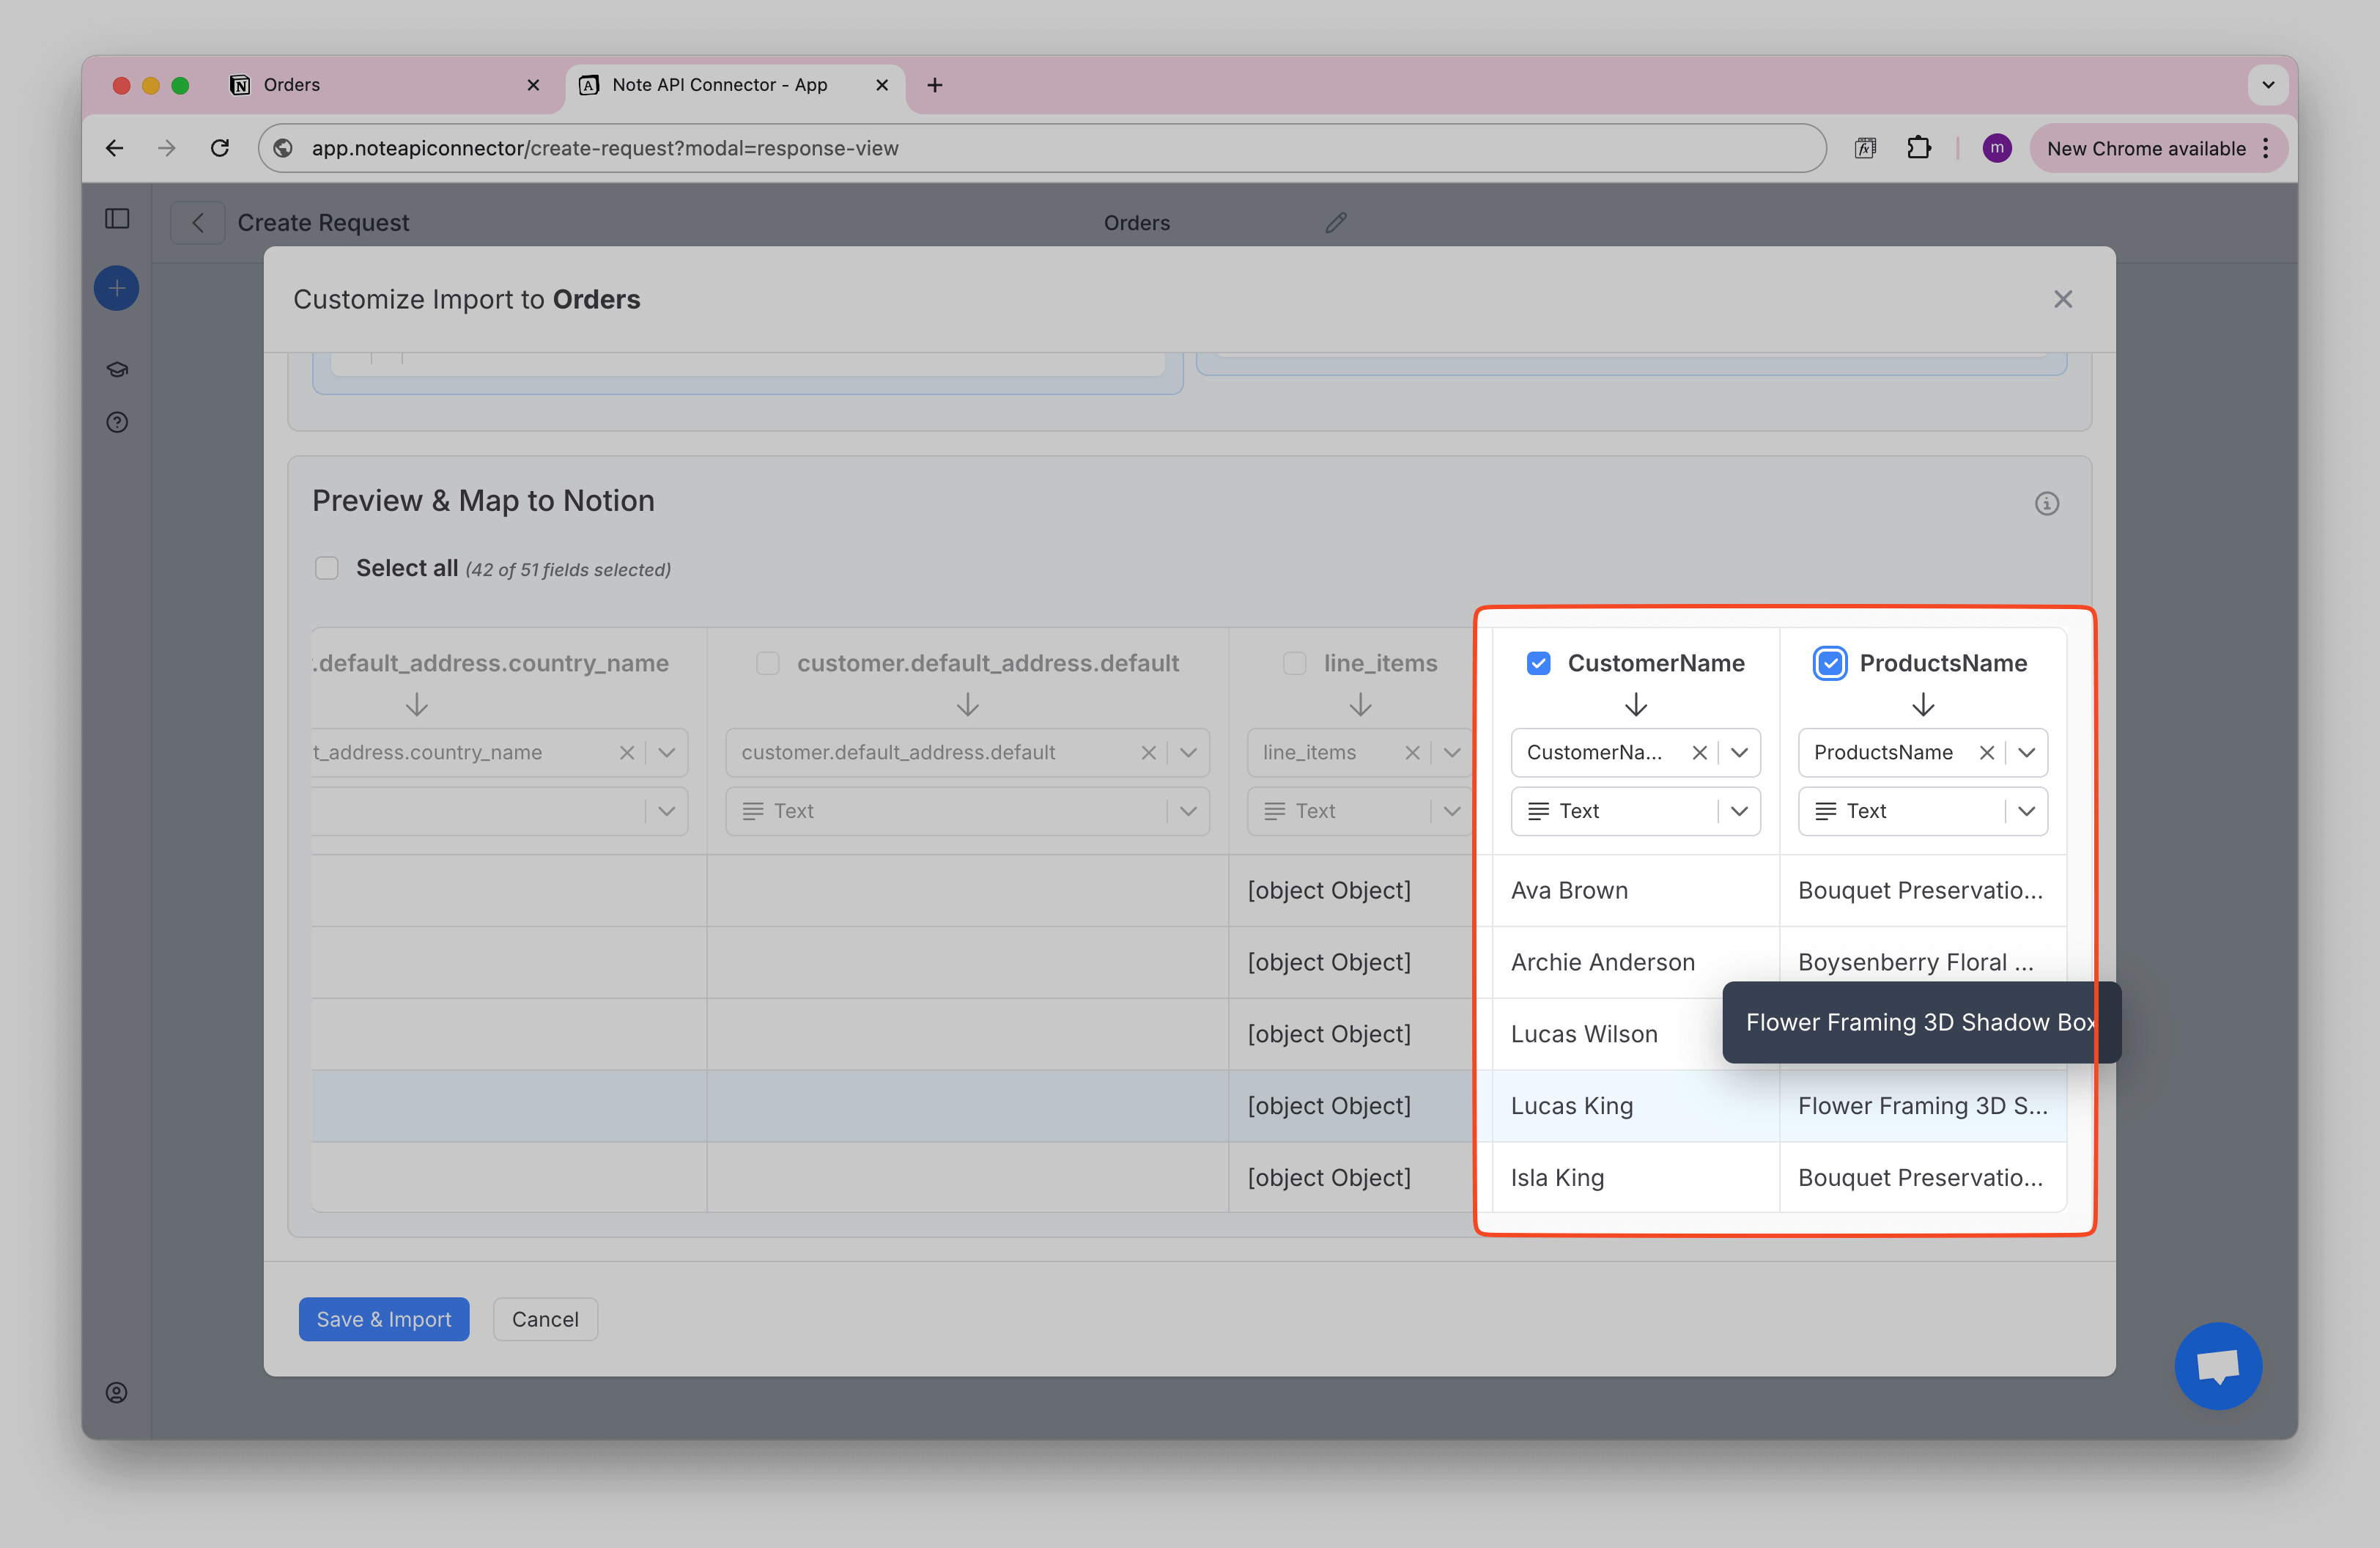
You should now see two new fields in the results: CustomerName and ProductsName.
Keep orders in sync
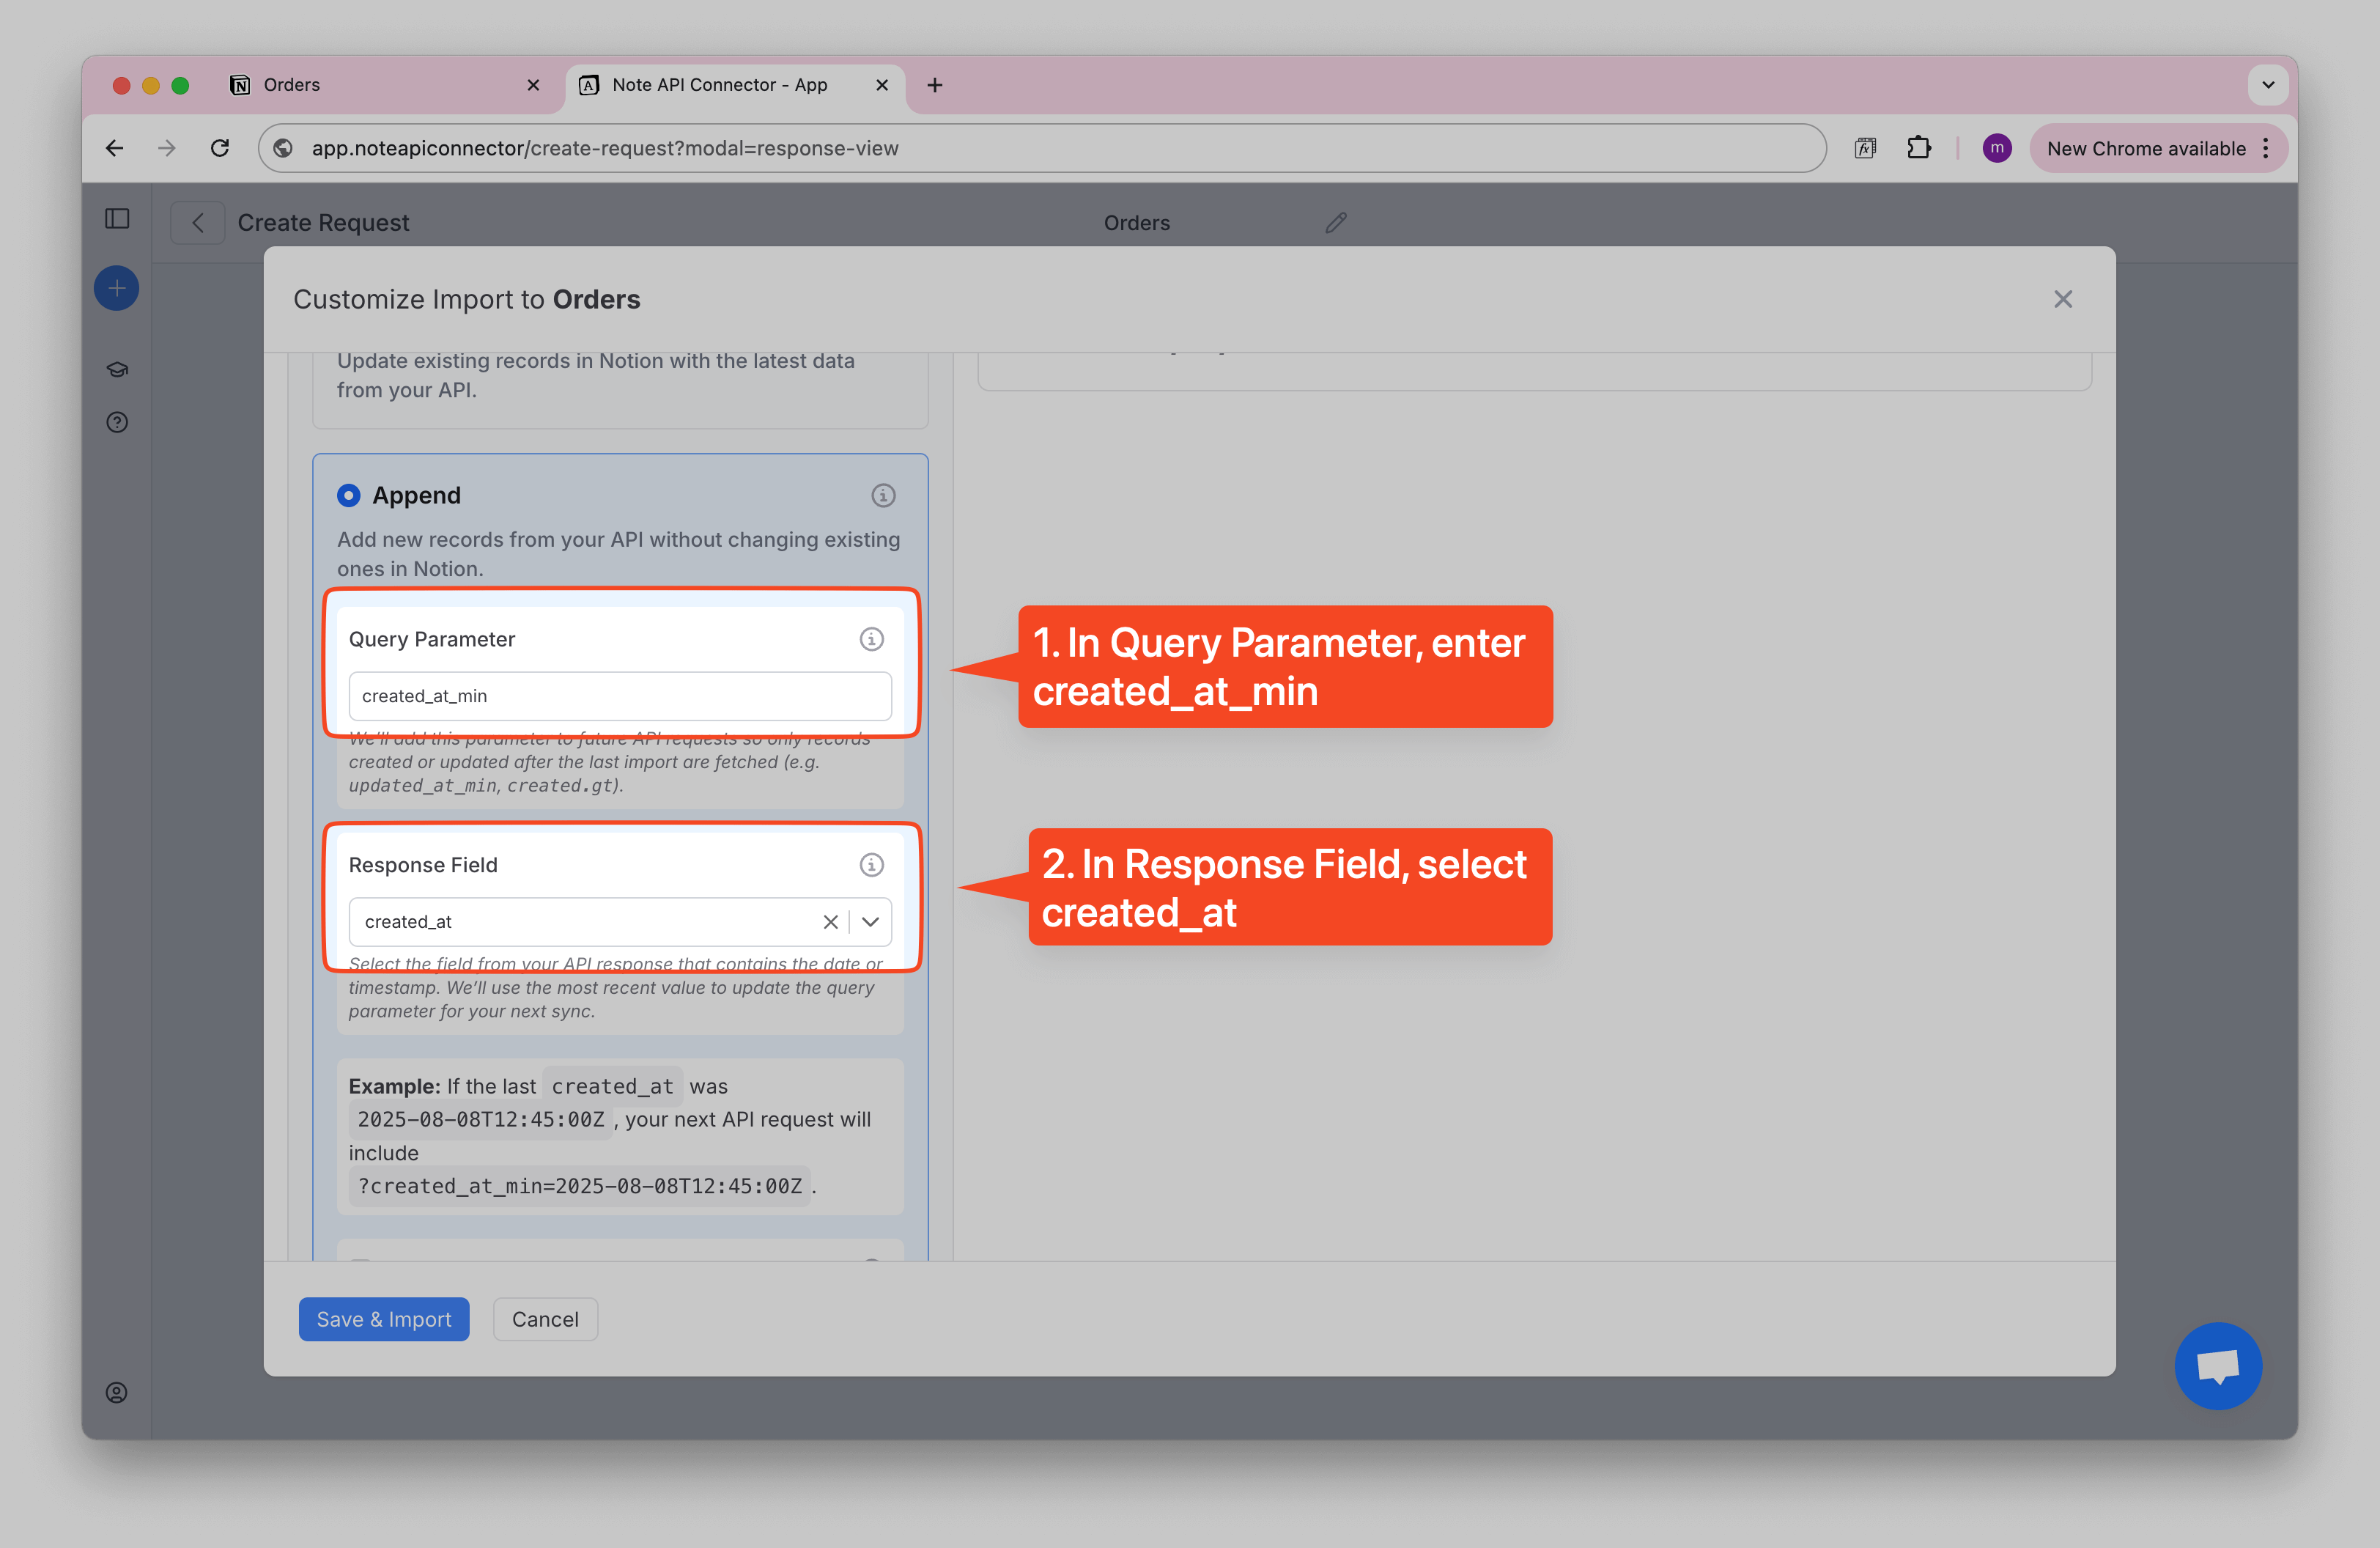
In Import Settings, choose Append so new orders are added on every sync.
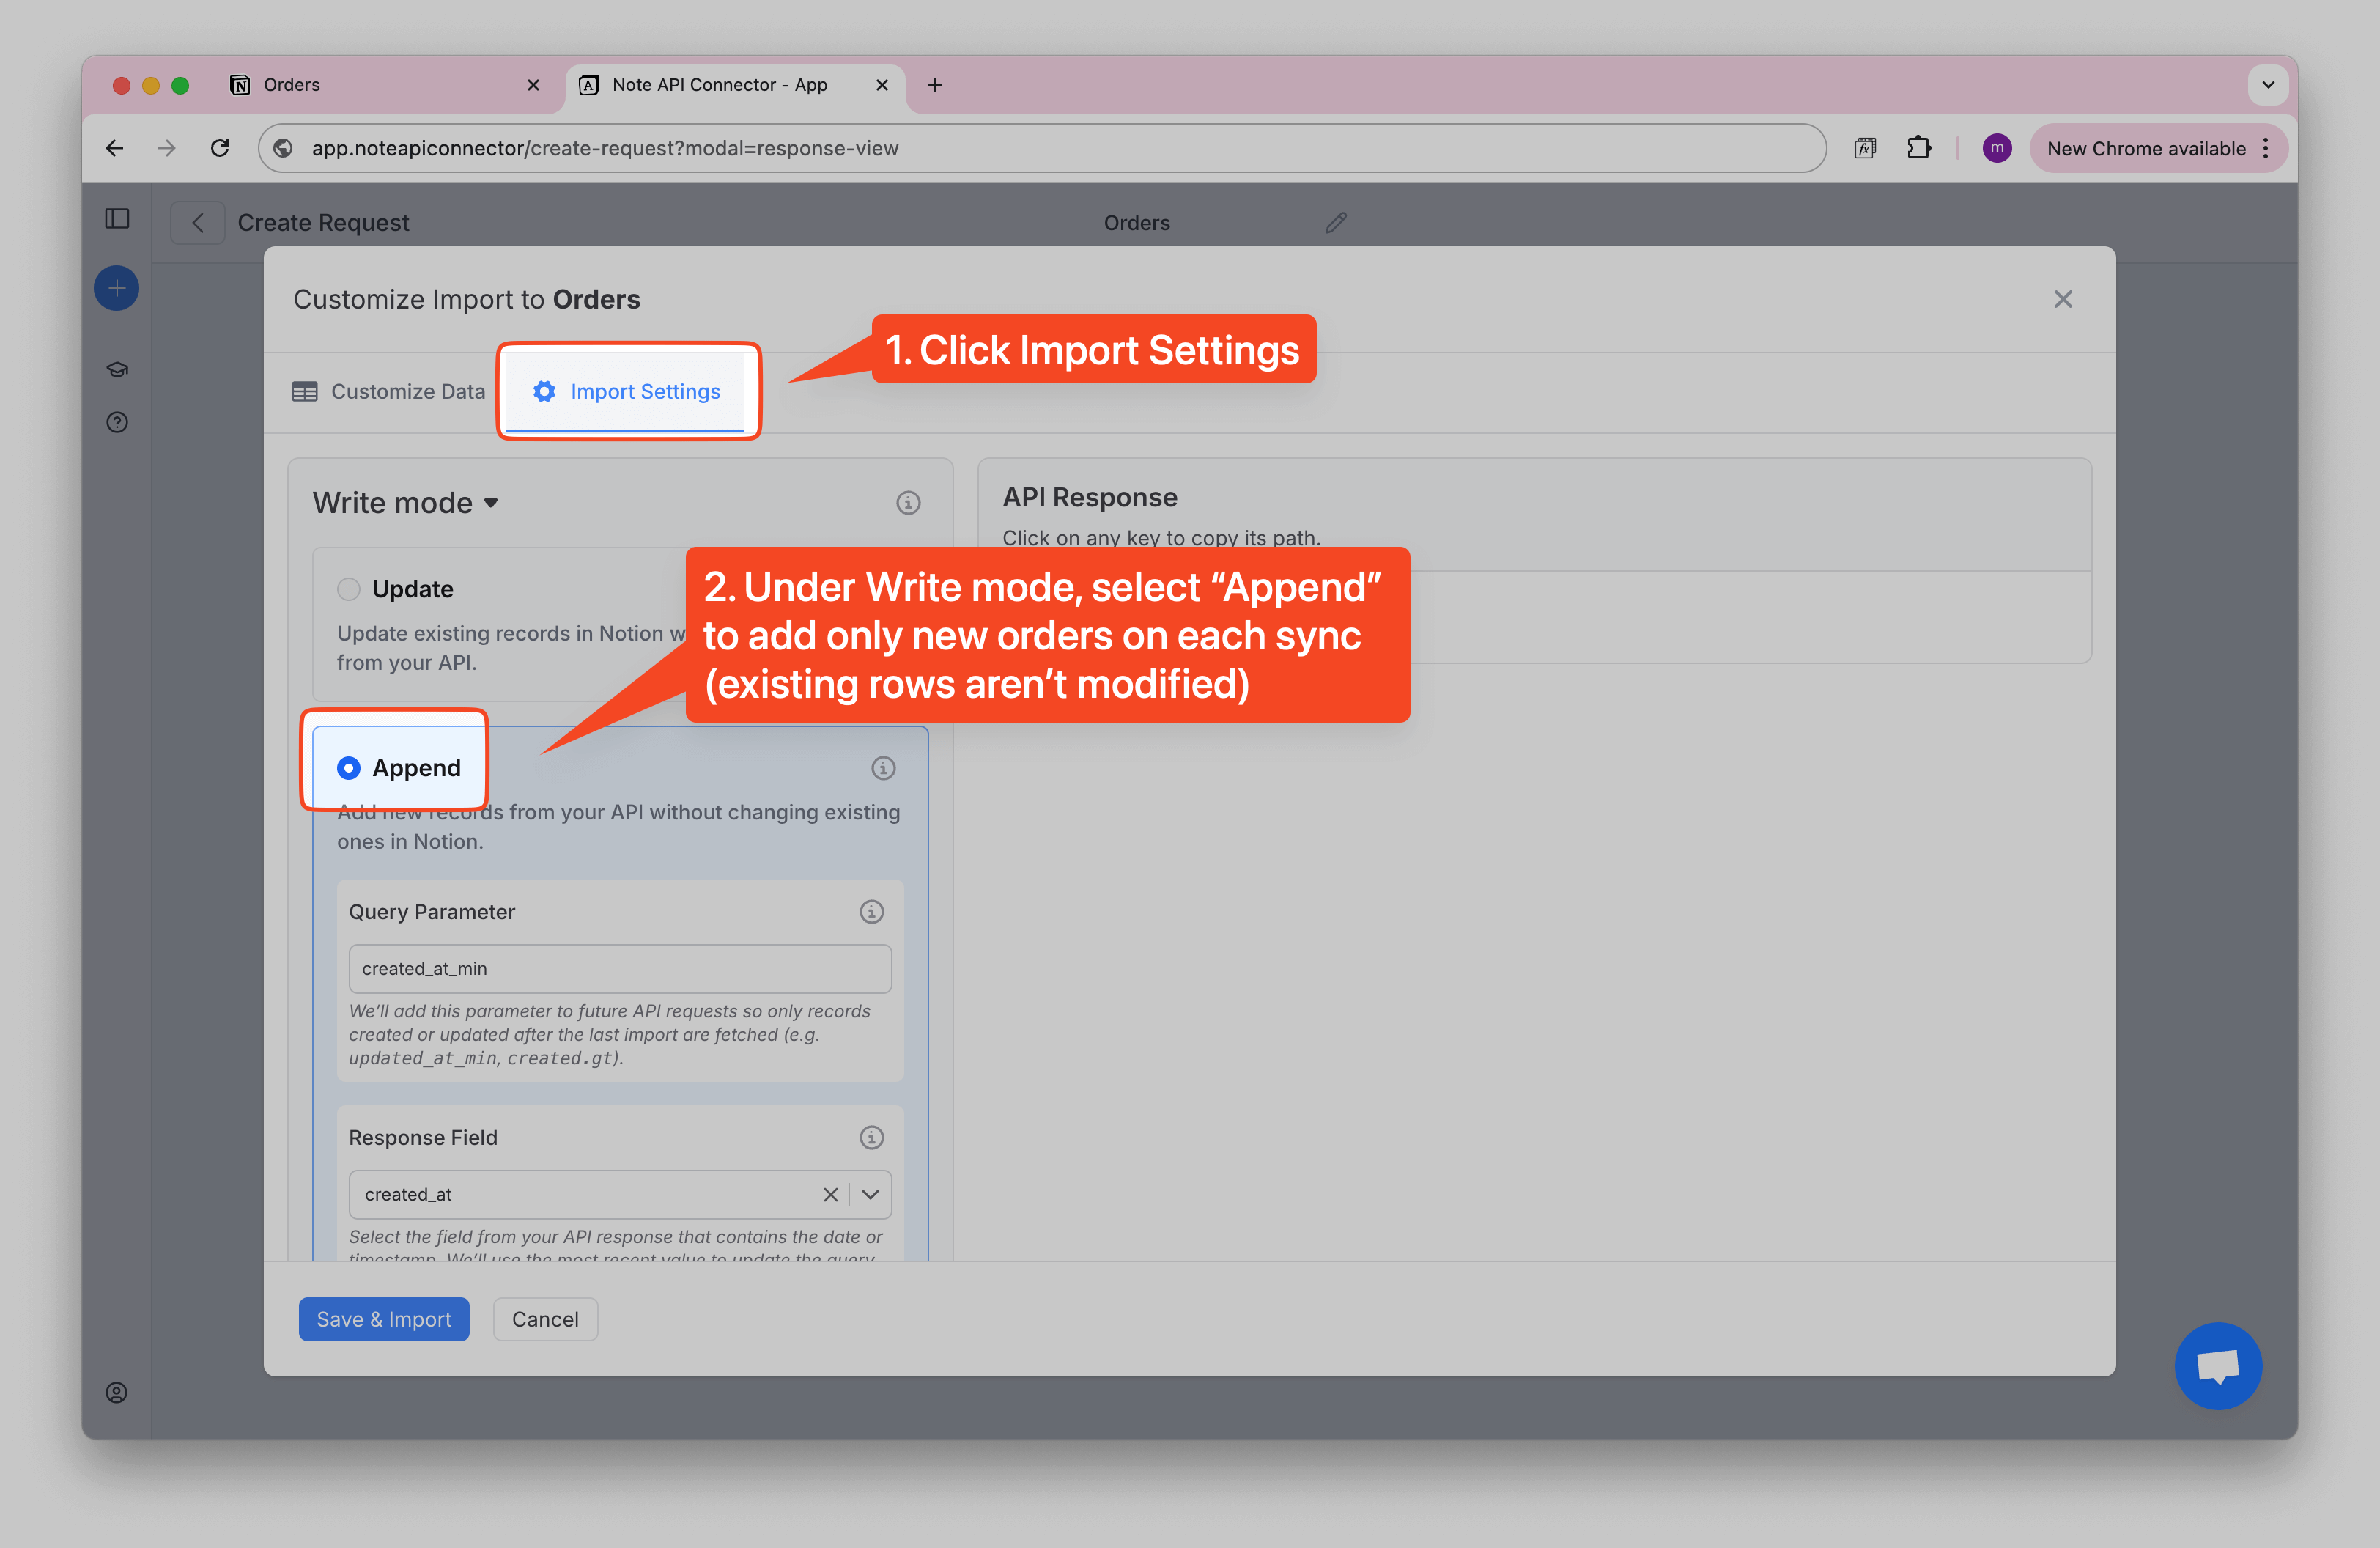
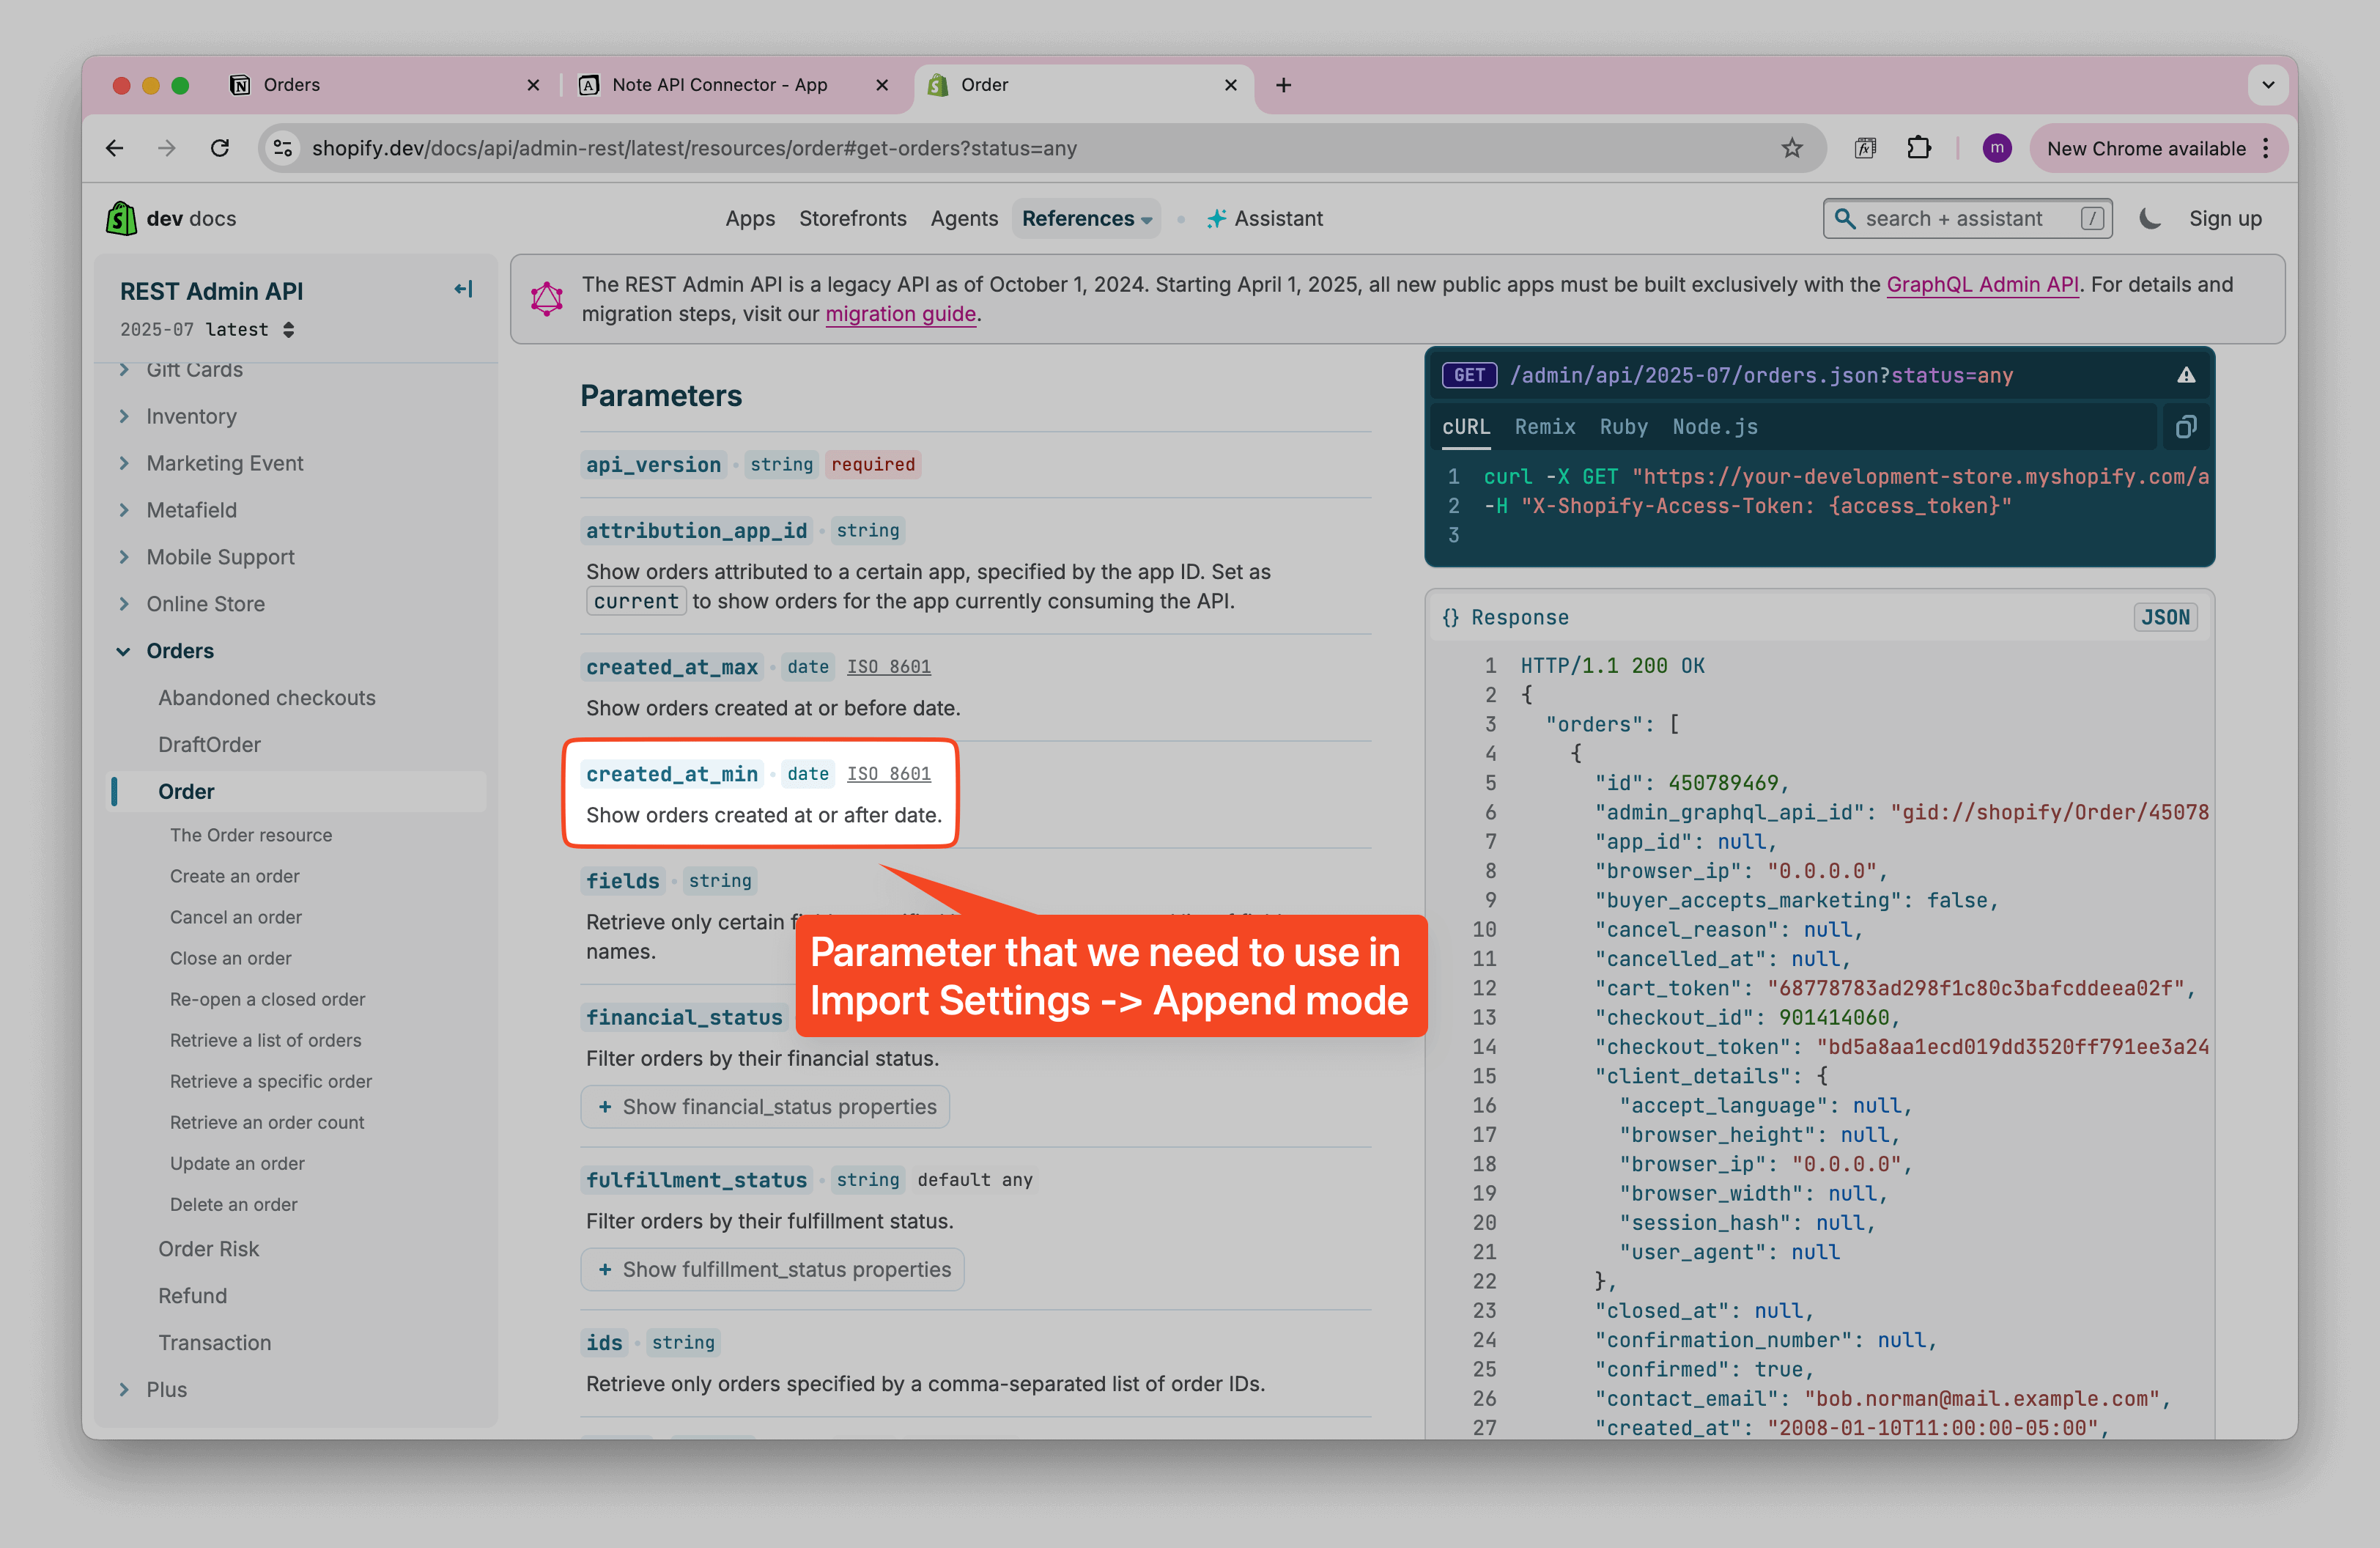
Tell the connector how to fetch only new orders by setting:
- Query parameter:
created_at_min - Response field:
created_at
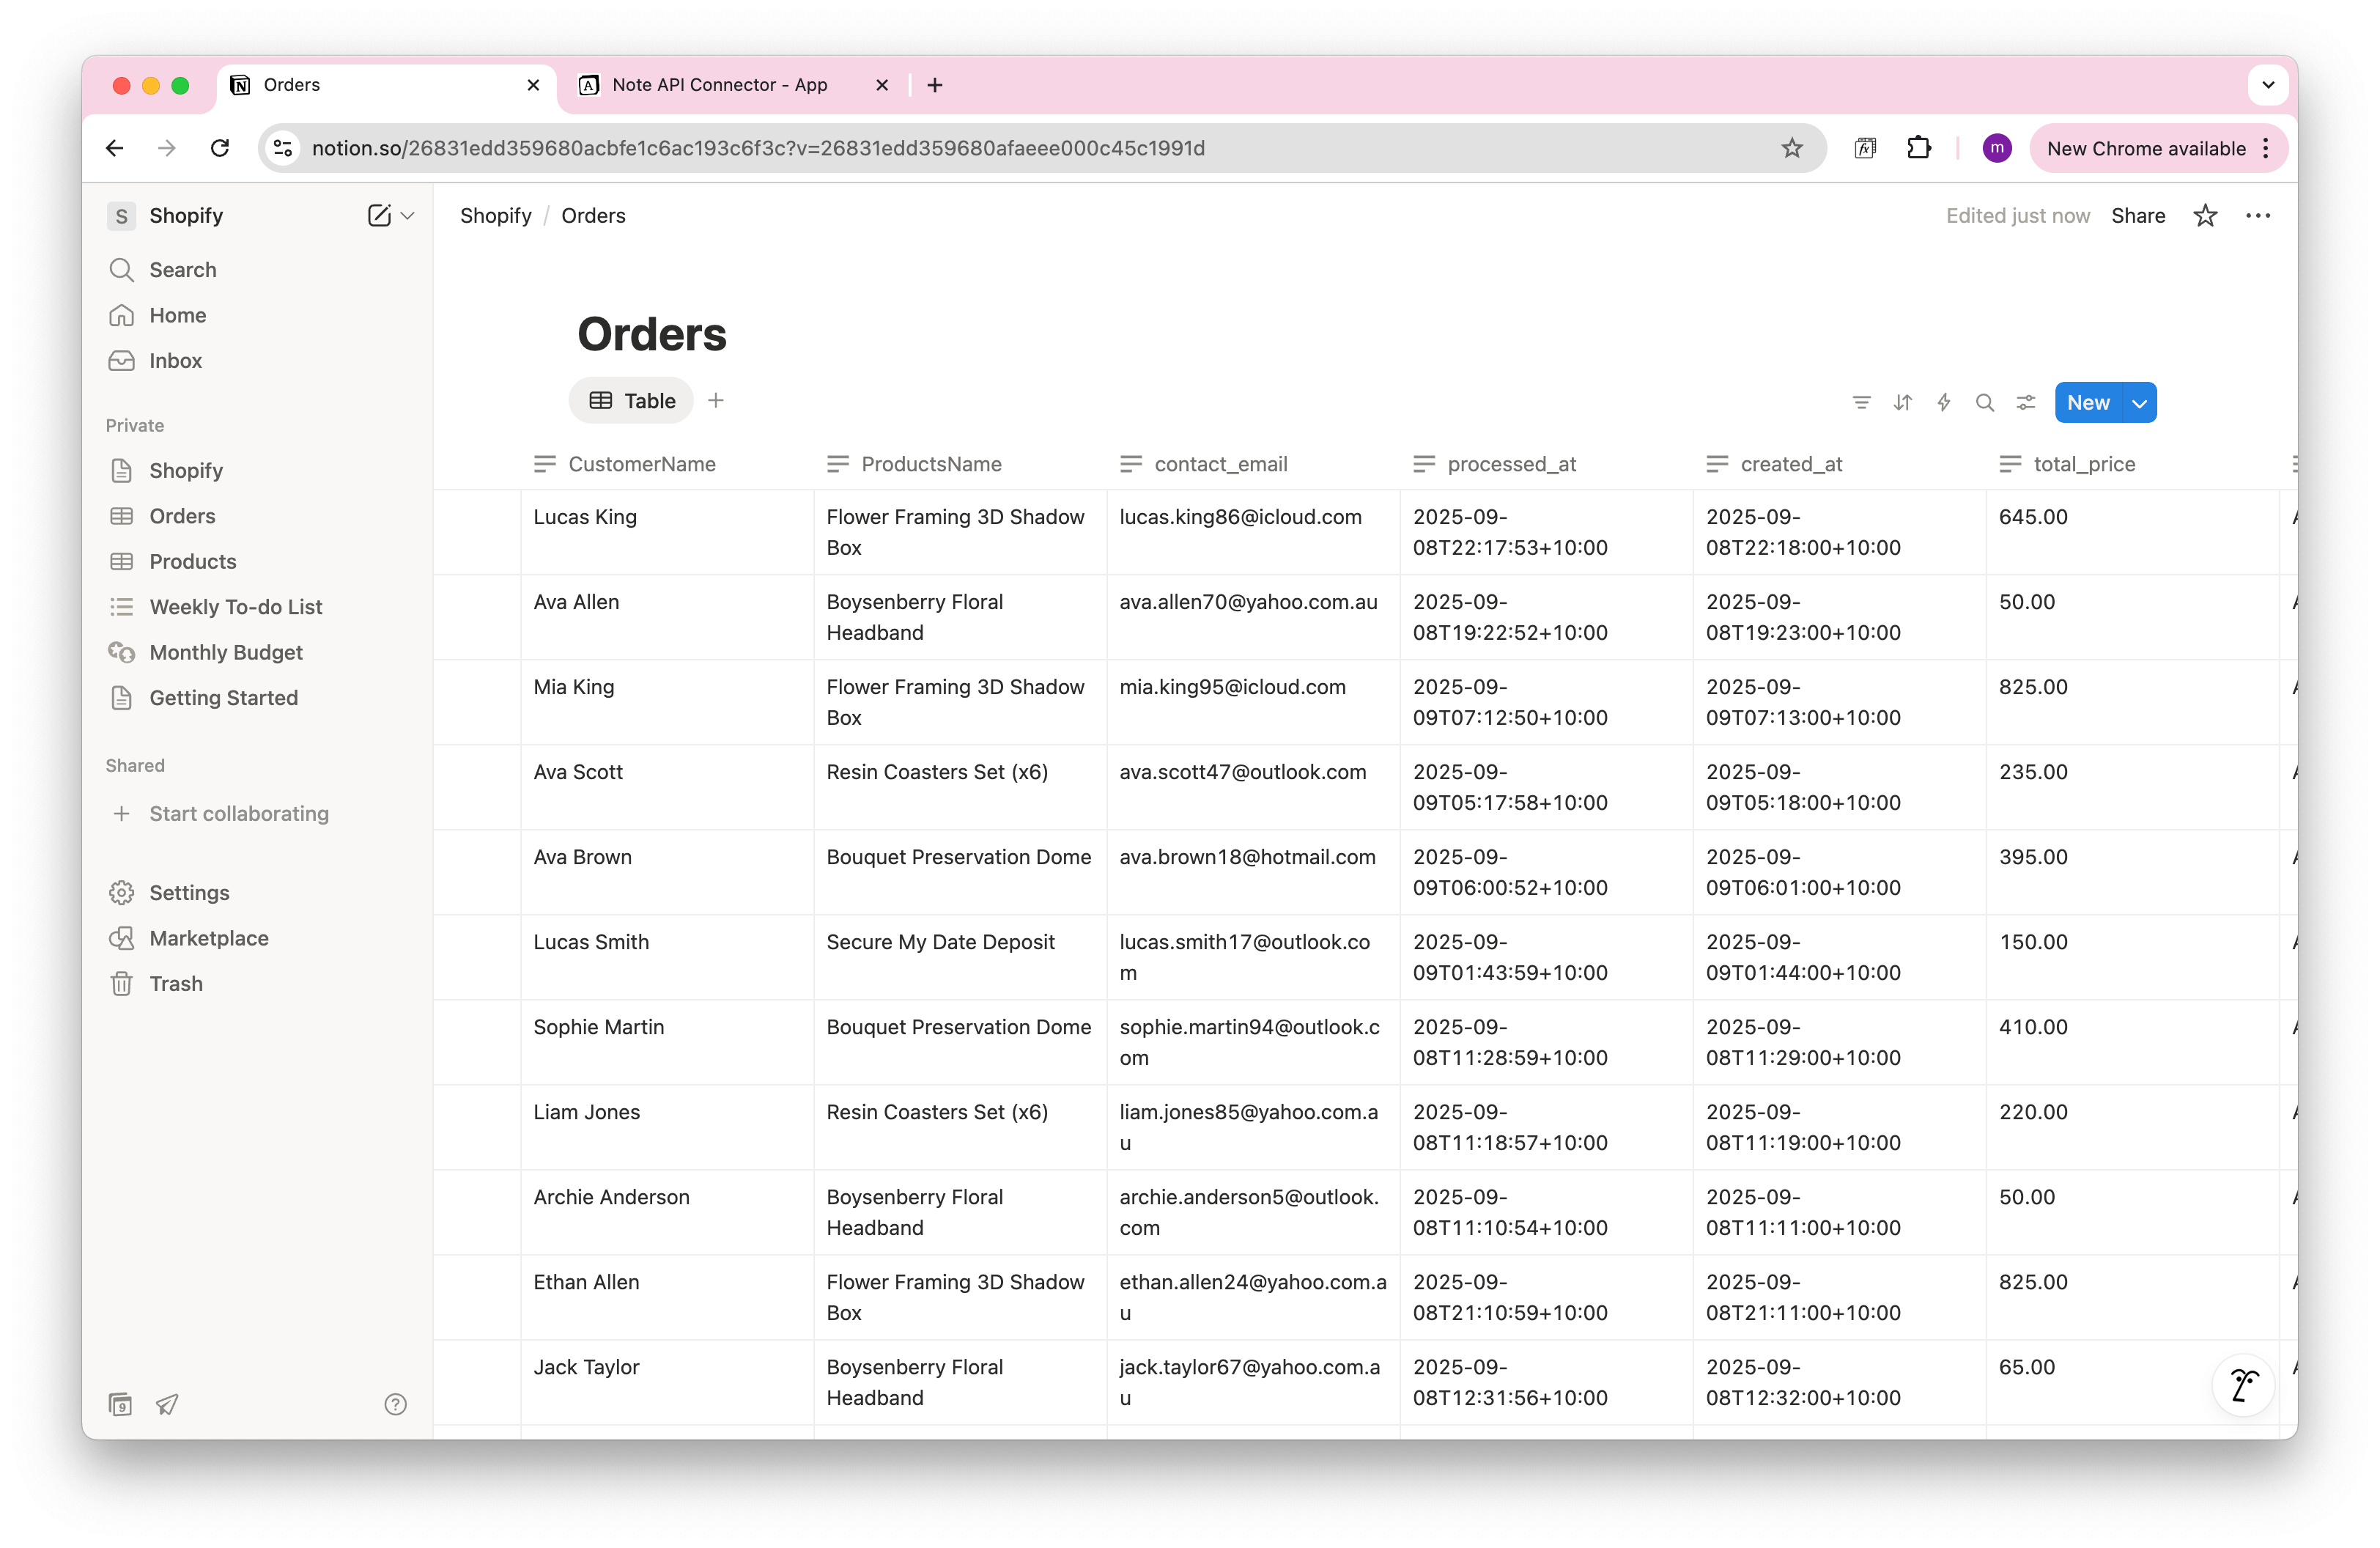
Once imported, your Shopify orders will be available in Notion for tracking and analysis. Each sync adds only new orders to the database.
Automate Shopify Data Updates in Notion
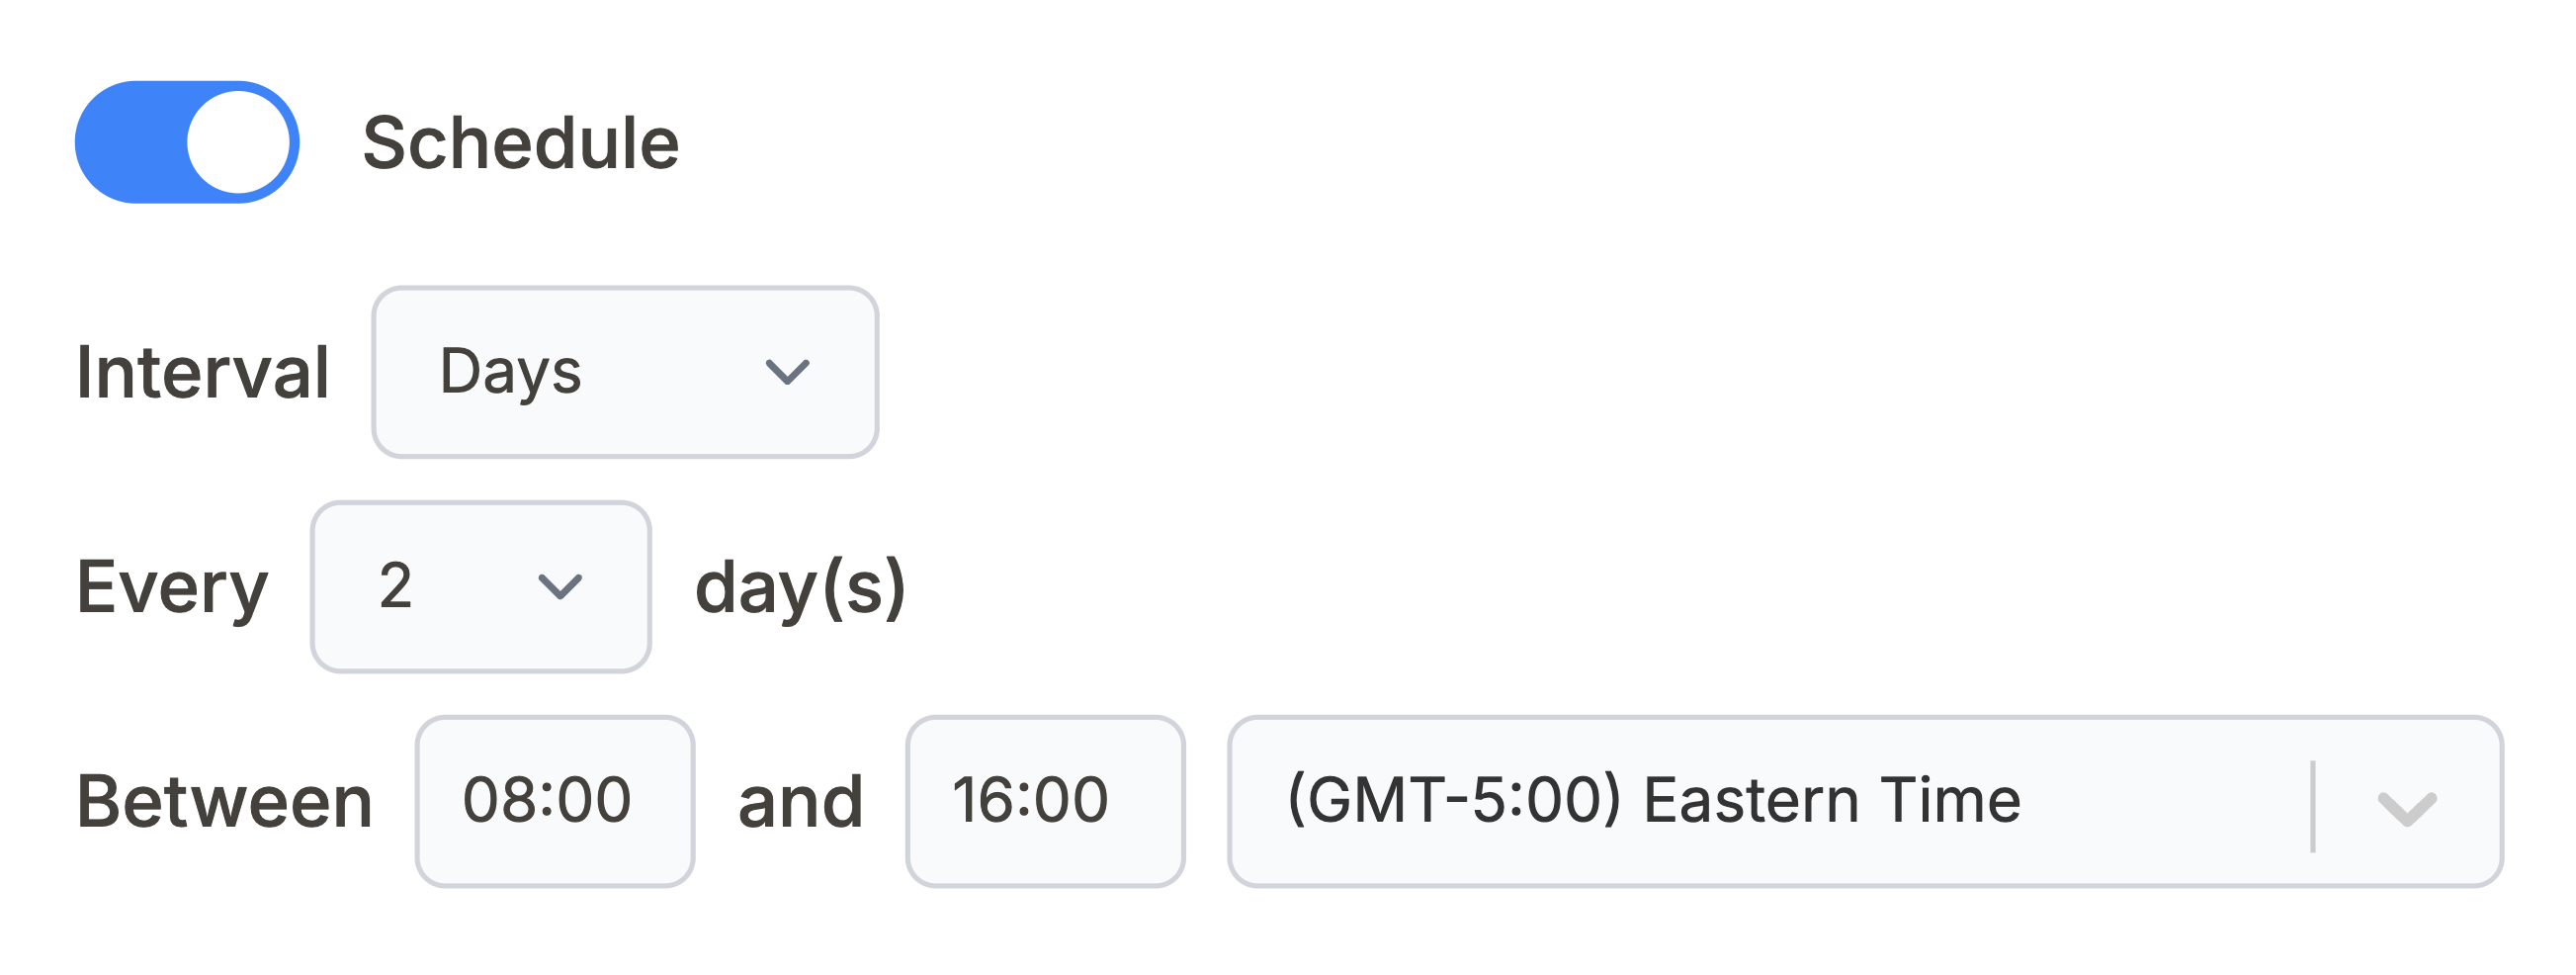
Manually refreshing your Shopify data in Notion can be a hassle, especially when you're tracking orders, inventory, and customer insights. With Note API Connector’s scheduling feature , you can automate data updates , ensuring your Notion dashboard always reflects the latest Shopify metrics, without lifting a finger. Set it to refresh hourly, daily, or at custom intervals , so you never have to worry about outdated numbers again. Whether you're monitoring sales performance or stock levels, automation lets you focus on growth while your data stays in sync .
Conclusion
With Note API Connector , importing Shopify data into Notion is simple and code-free. Whether you’re tracking inventory, monitoring orders, or analyzing customer insights, this integration keeps your data centralized and easily accessible.
🚀 Start automating your Shopify workflows today. Try Note API Connector and bring all your business data into Notion effortlessly.
Frequently Asked Questions
You can import Shopify data into Notion using Note API Connector, a no-code tool that connects directly to Shopify’s API. This allows you to sync orders, products, inventory, and customer details into your Notion database in just a few steps. Follow our tutorial for a complete setup guide.
No, Note API Connector requires no coding. It provides an easy-to-use interface where you can connect Shopify, fetch data, and send it directly to Notion.
Yes. With automatic scheduling , you can set your data to update hourly, daily, or at custom intervals. This ensures your Notion dashboard always reflects real-time Shopify metrics, reducing manual updates.
Yes, security is a priority. Note API Connector uses secure API authentication, and your credentials are not stored. You can control API access through Shopify’s admin settings.
