Stripe Notion Integration: Connect and Import Stripe Data into Notion
Stripe is one of the most widely used payment platforms, helping businesses of every size process payments, manage subscriptions, and track revenue. While Stripe gives you detailed financial data, many teams need a more centralized and customizable way to keep an eye on their key business metrics. In this guide, you’ll learn how to connect Stripe to Notion and sync your financial data automatically, all without writing code.
At the same time, countless businesses already rely on Notion to organize projects, documents, and databases. A Stripe Notion integration bridges these two tools, letting you import Stripe data to Notion and build dashboards that show your financial health in real time.
With Note API Connector, you don’t need to copy numbers by hand. Instead, you can sync Stripe with Notion automatically, whether it’s invoices, subscriptions, or payments.
In this tutorial we will cover:
- Track Monthly Recurring Revenue (MRR) in a customizable Notion database
- Analyze top-selling products with interactive charts
- Import and sync Stripe customers into Notion for customer management
- Set up pagination to handle large datasets efficiently
- Choose between update and append modes for invoice data synchronization
- Automate data syncing to keep everything up to date
By the end of this guide, you’ll have a working Stripe Notion integration that lets you import Stripe data to Notion without writing code. This makes it easy to create financial dashboards, track performance, and make better business decisions—all inside the tool you already use every day.
Quick start with Note API Connector
Start syncing your data to Notion in just a few clicks. Connect your Notion workspace, grant the necessary permissions, and you’re ready to create powerful API-based automations, no coding required.
👉 Follow the official setup guide to get started in minutes.
Generate a Stripe API Key for Secure Access
To bring your Stripe data into Notion, you’ll first need a secure way for Note API Connector to access it. This is done using a Stripe API key. Think of it as a digital pass that lets the integration read your invoices, payments, and customer data, while keeping everything safe.
Open your Stripe dashboard, then go to Developers → API keys .

Here you’ll see a list of keys. For security, we’ll create a restricted key that only has read access to the specific Stripe data you want to sync with Notion.

On the next screen, choose Building your own integration.

Give your key a name such as Note API Connector.

Next, select which data the integration should access. For this tutorial, we’ll select Invoices. You can also allow access to Customers or other objects depending on the dashboard you want to build.

Scroll down and click Create Key. Copy your new API key and keep it safe. You’ll use it in the next step to sync Stripe with Notion.

With your API key ready, you can now move on to the exciting part: importing Stripe data into Notion and turning it into a live dashboard.
Import Stripe Data into Notion
It’s time to pull real financial data into your Notion workspace. We’ll use the Invoices API to track paid invoices, which is perfect for building a Monthly Recurring Revenue (MRR) dashboard.

Tracking Monthly Recurring Revenue (MRR) in Notion
One of the most valuable parts of a Stripe Notion integration is the ability to track Monthly Recurring Revenue (MRR). MRR tells you how much subscription-based income your business brings in each month, and keeping it inside Notion makes financial reporting far easier.
There are two main ways to measure MRR with Stripe data:
- Project future revenue by pulling a list of active subscriptions.
- Track actual money received by importing paid invoices. This approach is more accurate for monitoring real cash flow.
In this tutorial we’ll focus on the second option, using the Stripe Invoices API to
import Stripe data to Notion. Specifically, we’ll request /v1/invoices with
status=paid so we only bring in invoices that have been successfully paid.
By default, Stripe only returns 10 invoices per request. To work with more data, you can increase the
limit parameter up to 100. Combining status=paid with a higher limit ensures your
MRR database in Notion only includes real, completed payments.

Create a new Notion database MRR Import where you import your Stripe data.

Next, create a new Notion database called MRR Import. This is where your invoices will be stored after you sync Stripe with Notion.

Paste the API url into the URL field.
https://api.stripe.com/v1/invoices?status=paid&limit=100
Then, open Authorization, choose Bearer token and add your API key.

Once you run the request, you’ll see your Stripe invoices appear in the Response Field Mapping view. For MRR tracking, we only need a few key fields:
id→ Invoice IDamount_paid→ The paid amountstatus_transitions.paid_at→ The payment date

You can also enrich your database by adding customer_name or customer_email to the
Notion Name field. Then click Save & Import and your Stripe data will be
live inside Notion.

You can see imported data in Notion database. Field
amount_paid
is in cents format and
status_transitions.paid_at
is in Unix timestamp format. Let's use Notion formula to update its format. You can create new fields
Amount
and
Paid Date
.

Let's set
Amount
property as Formula:
divide(toNumber(amount_paid.value), 100)

You can set
Pay Date
as another Formula:
fromTimestamp(multiply(toNumber(status_transitions.paid_at.value), 1000))

Now you can see both
Amount
and
Pay Date
in correct format.

Finally, visualize your revenue trends with a Notion chart.

Set the X-axis to: Pay Date -> Month.

Y-axis to: Amount -> Sum.

This will generate a clear monthly revenue graph, helping you understand recurring income directly inside Notion.

Analyze Product Sales: Identify Your Best-Selling Items
Understanding which products generate the most revenue is crucial for optimizing your sales strategy. By leveraging Stripe data in Notion, you can create a visual representation of your top-selling products, track revenue trends, and identify customer purchasing patterns.
Which Stripe endpoint should I use?
- Subscriptions (plans, recurring items) →
/v1/invoices - One-time purchases →
/v1/payment_intents - Checkout (you sell via Stripe Checkout) →
/v1/checkout/sessions
In this example we’ll use /v1/invoices?status=paid&limit=100 so we only analyze money you
actually received.
Create a new Notion database called Top Products.

Use the same request URL you used earlier:
/v1/invoices?status=paid&limit=100
but this time select Top Products as the target database.
We need the individual items billed on each invoice (products/services). These live in a nested field called
lines inside the invoice response. In the
Response Field Mapping
view, nested data may initially appear as [object Object].

To pull out those line items, open Customize Output → API Response and apply a JMESPath filter:
[].lines.data[]

Map the fields you need:
id→ a stable unique ID (for updates/deduping)description→ map to Notion Name (product name)amount→ billed amount (in cents)quantity(optional)currency(optional)

Click Save & Import. Your line items will appear in the Top Products database.

Stripe returns amounts in cents. Create a Notion formula property called Amount to convert:
divide(toNumber(amount.value), 100)


Let's create a Donut Chart to analyze revenue distribution.
- X-Axis: Set as product
Name. - Y-Axis: Set as sum of
Amount.

This will generate an interactive visual of your best-performing products, helping you identify trends and optimize sales.
Update vs Append Modes for Invoice Data
When you import Stripe data to Notion, Note API Connector gives you two ways to keep invoices in sync: Update Mode and Append Mode. Choose the one that matches how your data behaves.
Update Mode: Best for Dynamic Invoice Data
Use Update Mode when an invoice can change after it’s first imported. This is common if:
- Invoice statuses change (draft → paid → refunded)
- Payment amounts are adjusted
- Line items are edited before payment
- Customer details tied to an invoice are corrected
In Update Mode, Note API Connector will identify existing records by their Stripe ID and update them with the latest information, ensuring your Notion database always reflects the current state.

Append Mode: when invoices are final and will not change
Choose Append Mode if you only want to add new invoices and keep older rows untouched. Good for:
- Final, locked invoices
- Keeping a complete history
- Compliance or audit needs
- Faster imports (no updates to old rows)
In Append Mode, only brand new invoices are added to Notion. Existing rows stay as they are.

💡 Need both? Update Mode already handles it by updating existing invoices and appending new ones. Append Mode is useful if you only ever add new data and want to reduce your usage limits by skipping updates.
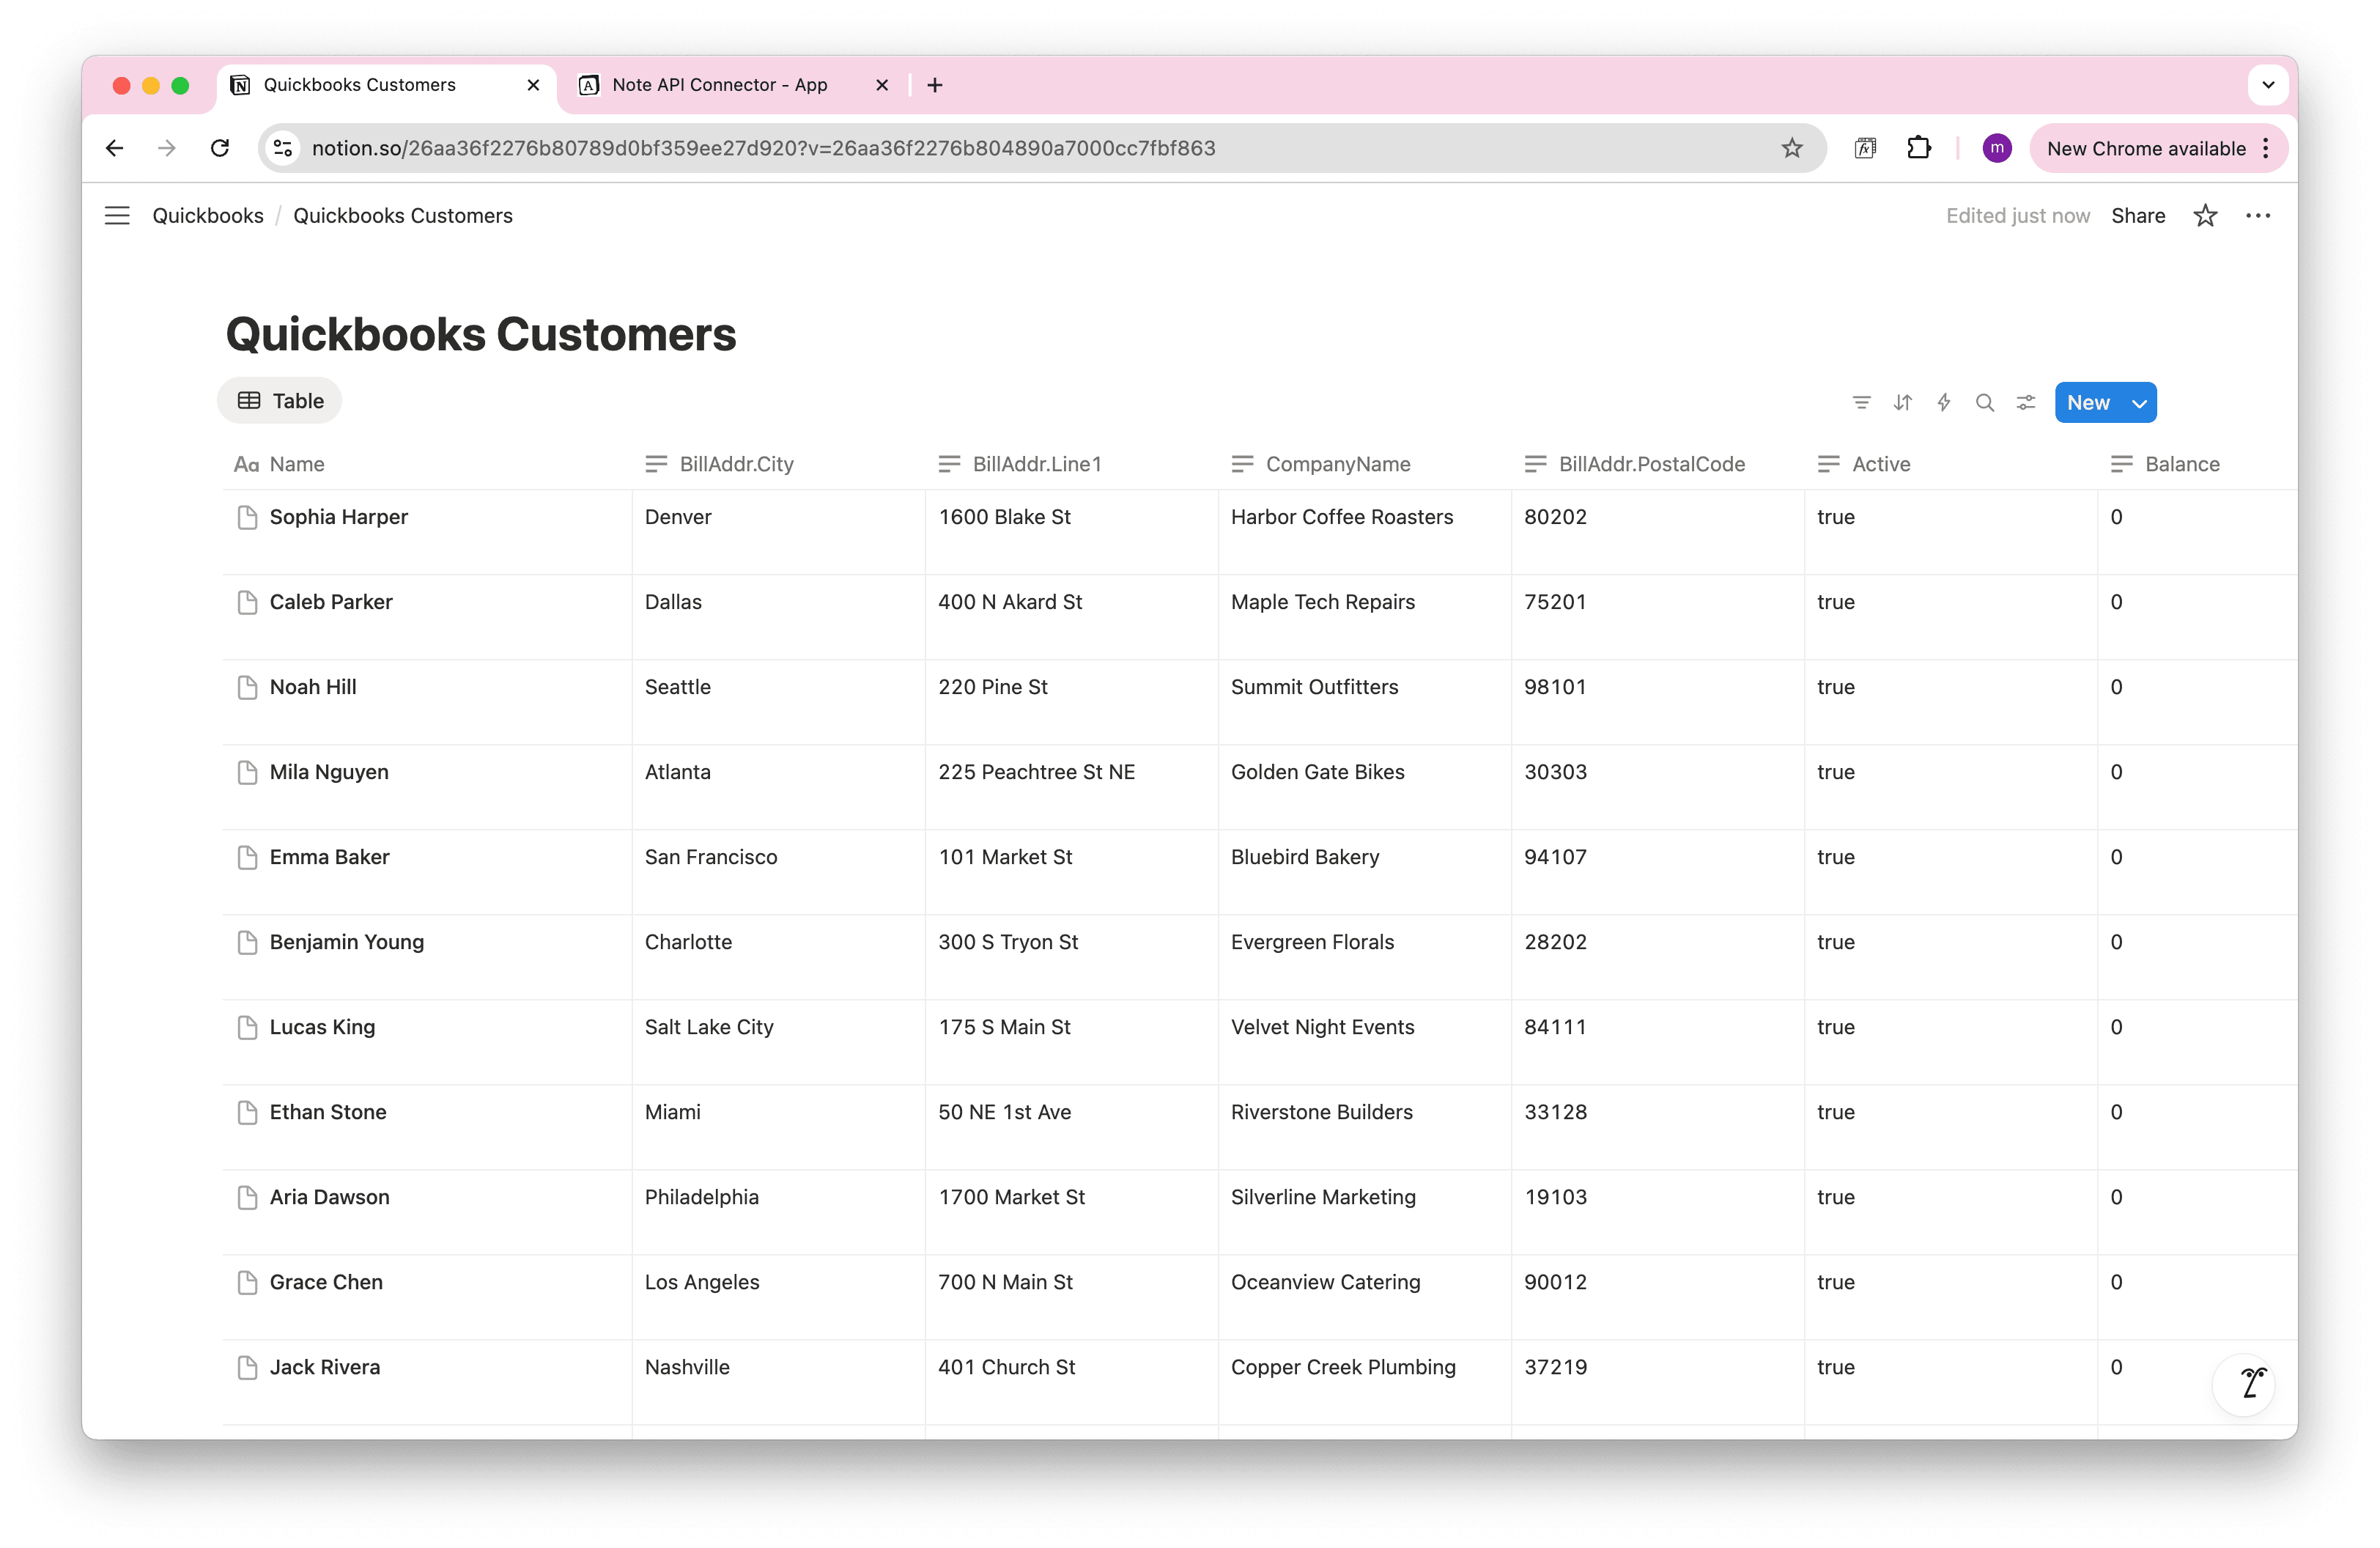
Import and Sync Stripe Customers into Notion
Beyond tracking revenue and products, managing customer relationships is essential for business growth. By importing Stripe customer data into Notion, you can create a centralized customer database that combines payment history with detailed customer profiles.
Stripe's /customers API provides comprehensive customer information including contact details, subscription status, and payment behavior.
Create a Notion database called Stripe Customers to store your customer data.

In Note API Connector, create a new request targeting your Stripe Customers database. Use the following API
endpoint to retrieve customer data:
https://api.stripe.com/v1/customers?limit=100

Select the customer fields you want to import.

Set Up Pagination for Large Datasets
Stripe sends results in pages of up to 100 records. To fetch everything, turn on pagination so the request keeps going page by page.
In your request settings, navigate to Import Settings → Pagination and configure the following:
- Pagination Type: Cursor
-
Cursor Path:
data[-1].id(JMES expression that returns ID of the last item on the page) - Cursor Parameter:
starting_after

With pagination enabled, Note API Connector will automatically fetch all available records, regardless of the total count. This is particularly useful for:
- Large customer databases (1000+ customers)
- Extensive invoice histories (years of transactions)
- Comprehensive product catalogs
- Complete subscription lists
Automate Data Updates in Notion
After you connect Stripe to Notion, you can automate data syncing so your financial dashboard always stays up to date. With Note API Connector’s scheduling feature, you can automate the process. By setting up a recurring data sync, your invoices, payments, and product sales will automatically refresh at your preferred interval, whether hourly, daily, or weekly. This ensures that your Notion dashboards always display real-time financial insights without requiring manual imports.

Copy-paste Stripe API URLs for importing data
Use these ready links with Note API Connector to speed up your Stripe Notion integration. Add pagination if you expect more than 100 records.
Core Stripe Objects
-
Subscriptions (Active)
https://api.stripe.com/v1/subscriptions?status=active&limit=100 -
All Subscriptions
https://api.stripe.com/v1/subscriptions?limit=100 -
Payment Intents (Succeeded)
https://api.stripe.com/v1/payment_intents?limit=100 -
Products
https://api.stripe.com/v1/products?active=true -
Prices
https://api.stripe.com/v1/prices?active=true -
Charges (Successful)
https://api.stripe.com/v1/charges?limit=100
Analytics & Reporting
-
Balance Transactions
https://api.stripe.com/v1/balance_transactions?limit=100 -
Payouts
https://api.stripe.com/v1/payouts?limit=100 -
Disputes
https://api.stripe.com/v1/disputes?limit=100
Checkout & Sessions
-
Checkout Sessions
https://api.stripe.com/v1/checkout/sessions?limit=100
Conclusion
By integrating Stripe with Notion using Note API Connector, you can transform raw transaction data into actionable insights. Whether you're tracking Monthly Recurring Revenue (MRR), managing customer relationships, identifying top-selling products, or setting up efficient data synchronization with proper pagination and update modes, this setup enables a comprehensive financial dashboard without manual data entry.
The combination of customer data, invoice tracking, and automated synchronization provides a complete view of your business performance. With the copy-paste API URLs provided, you can quickly set up additional data imports to further enhance your Stripe-Notion integration.
Now that you have a dynamic Stripe dashboard in Notion, what other insights would you like to track? Drop a comment below or explore more ways to automate your workflow with Note API Connector.
Frequently Asked Questions
You can connect Stripe into Notion by using Note API Connector. This no-code tool connects to Stripe’s API, allowing you to pull customers, invoices, payments, or subscriptions into a Notion database. Follow our step-by-step guide to set it up easily.
No, you don’t need coding skills. Note API Connector simplifies the process with a no-code interface. Just input your Stripe API key, configure the request, and map the data to your Notion database.
You can import various Stripe data, such as invoices, payments, subscriptions, or product details. The
tutorial demonstrates using the
/v1/invoices
endpoint, but you can adjust it to fetch other data like
/v1/subscriptions
or
/v1/payments
.
Yes, Note API Connector’s scheduling feature lets you automate Stripe data imports. Set it to refresh hourly, daily, or weekly, keeping your Notion dashboards up-to-date without manual effort.
Stripe stores product details in nested fields (e.g.,
lines
in invoices). Use Note API Connector's Customize Output with JMESPath to extract this data, as shown
in the "Top Products" example.
Yes, you can import Stripe customer data using the /v1/customers API endpoint. This
allows you to create comprehensive customer profiles that can be linked with invoice and subscription
data for complete customer relationship management in Notion.
Update Mode modifies existing records when their data changes in Stripe, ideal for dynamic data like invoice statuses. Append Mode only adds new records without changing existing ones, perfect for finalized data and maintaining audit trails.