How to Import and Sync Toggl Data into Notion
Want to import Toggl data to Notion and keep your time tracking records always up to date? This guide will show you exactly how to set up a Notion Toggl integration in 4 simple steps. You'll be able to sync Toggl with Notion automatically, no coding required.
With Note API Connector, you can seamlessly connect Toggl's API and import data into Notion. Follow along to centralize your time entries, projects, and client data in one place.
TL;DR
- Generate Toggl API Token in your Toggl profile settings.
- Find your Toggl Workspace ID from your workspace settings.
- Create API request in Note API Connector to pull Toggl data into Notion.
- Set up automated imports to keep your time tracking data synced.
Quick start with Note API Connector
Start syncing your data to Notion in just a few clicks. Connect your Notion workspace, grant the necessary permissions, and you're ready to build a full Toggl + Notion workflow integration.
👉 Follow the official setup guide to get started in minutes.
Step 1: Generate Your Toggl API Token
Before you can import Toggl data into Notion, you need to get your API token. This token acts as your secure key to access Toggl's API data.
First, log in to your Toggl Track account and click on your profile in the bottom left corner, then select Profile settings.

Scroll down to the API Token section and click Click to reveal to show your API token.

💡 Keep your API token secure and don't share it publicly. This gives access to your Toggl data.
✅ Copy your API token. You'll need it for authentication in the next steps.
Step 2: Find Your Toggl Workspace ID
To access your Toggl time entries through the API, you need to find your Workspace ID. This ID is required to construct the correct API endpoint.
💡 In Toggl, the Workspace ID and the Organization ID refer to the same number. You'll see it used interchangeably in the URL and in the API documentation.
The quickest way to find it is to simply open any section of your workspace for example, click on Projects in the left sidebar. Look at the URL in your browser's address bar:

The number between /projects/ and /list is your Workspace ID.
Alternatively, you can find it via Manage workspaces from your workspace dropdown menu.

You'll see a list of your workspaces. Click the workspace to see its ID.

Copy the Workspace ID for the workspace you want to sync with Notion. You can see this ID in your browser URL when viewing workspace settings.

✅ Note down your Workspace ID. You'll need it to construct the API URL.
Step 3: Import Toggl Time Entries into Notion
Now, pull your Toggl data into Notion using Note API Connector. You’ll point to the Toggl Reports API, authenticate with your API token, choose a date range, and (optionally) flatten nested fields for clean field mapping.
Set up a Notion database where you want to store your Toggl time entry data.

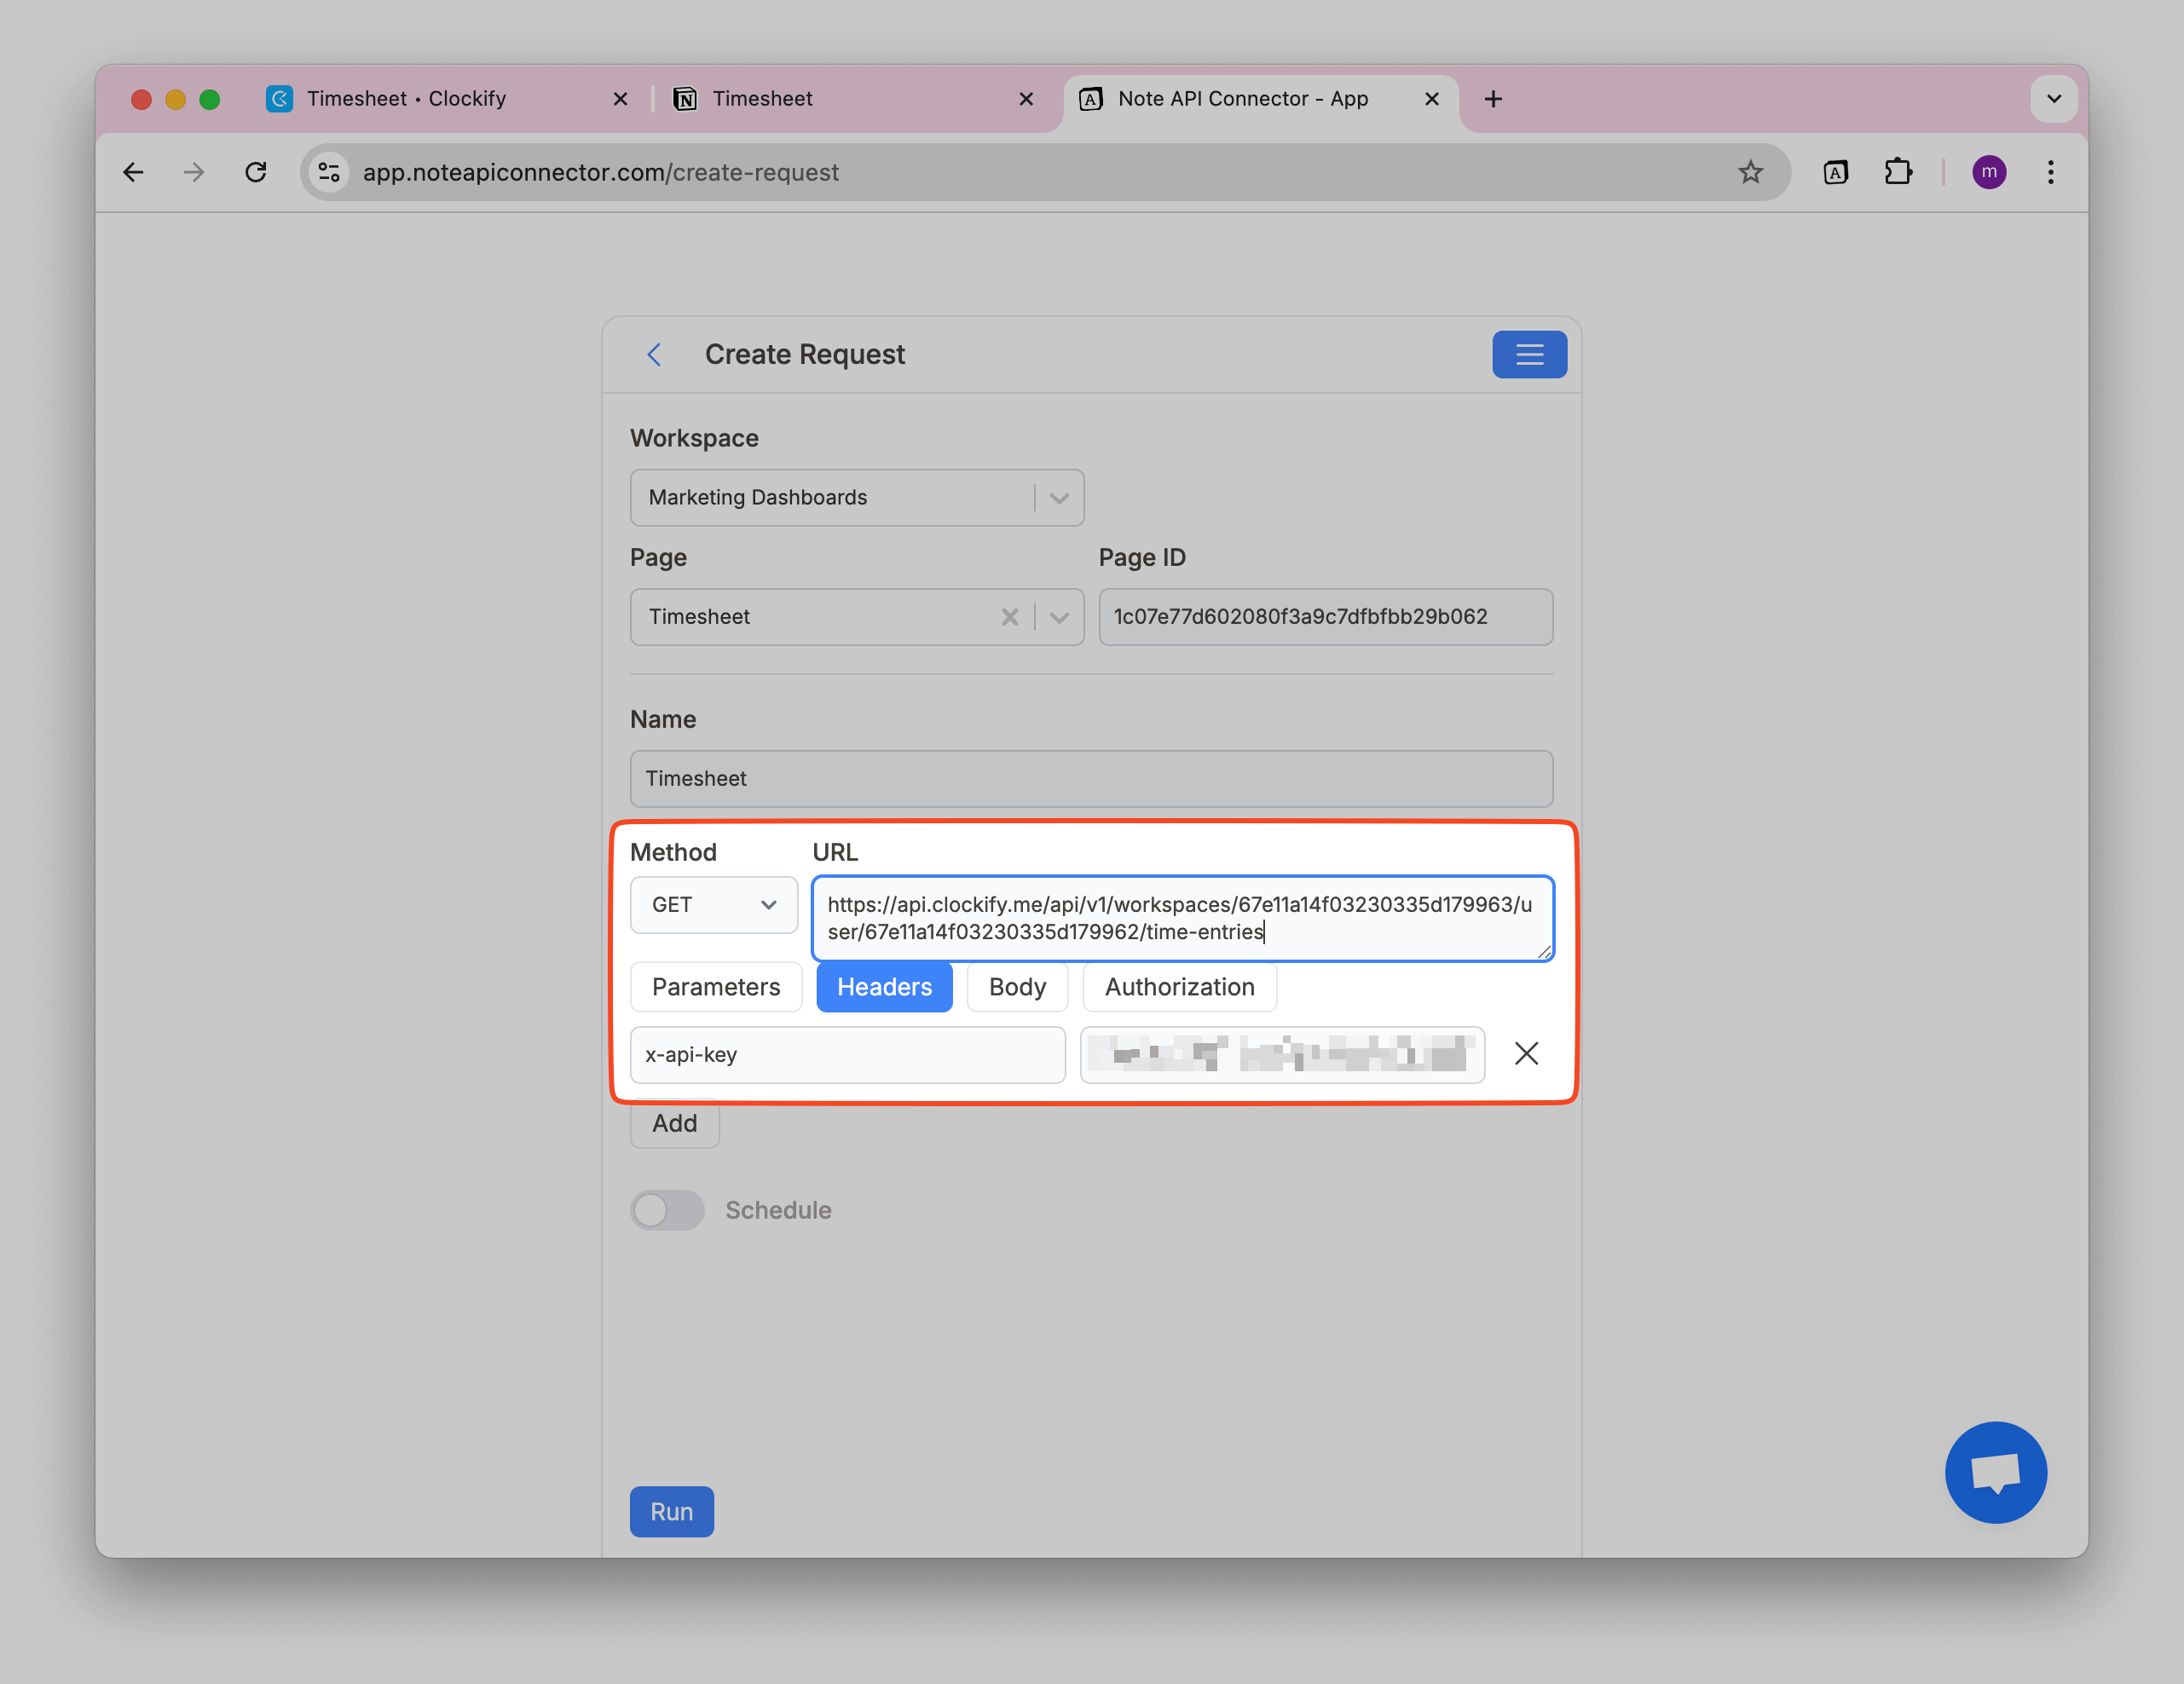
Open Note API Connector and click Create request . Name your request (e.g., Toggl Time Entries ) and select your Notion database as the target.

Authorize the request (Basic Auth):
- Click Authorization → Basic.
- Username: your Toggl API token.
- Password:
api_token.

Paste the Toggl Reports API endpoint and set the method to POST:
https://api.track.toggl.com/reports/api/v3/workspace/{{your_workspace_id}}/search/time_entries
Open the Body tab, choose JSON, and provide a date range (UTC ISO date,
YYYY-MM-DD):
{
  "start_date": "2025-09-01",
  "end_date": "2025-09-15"
}
Click Run to preview the response.

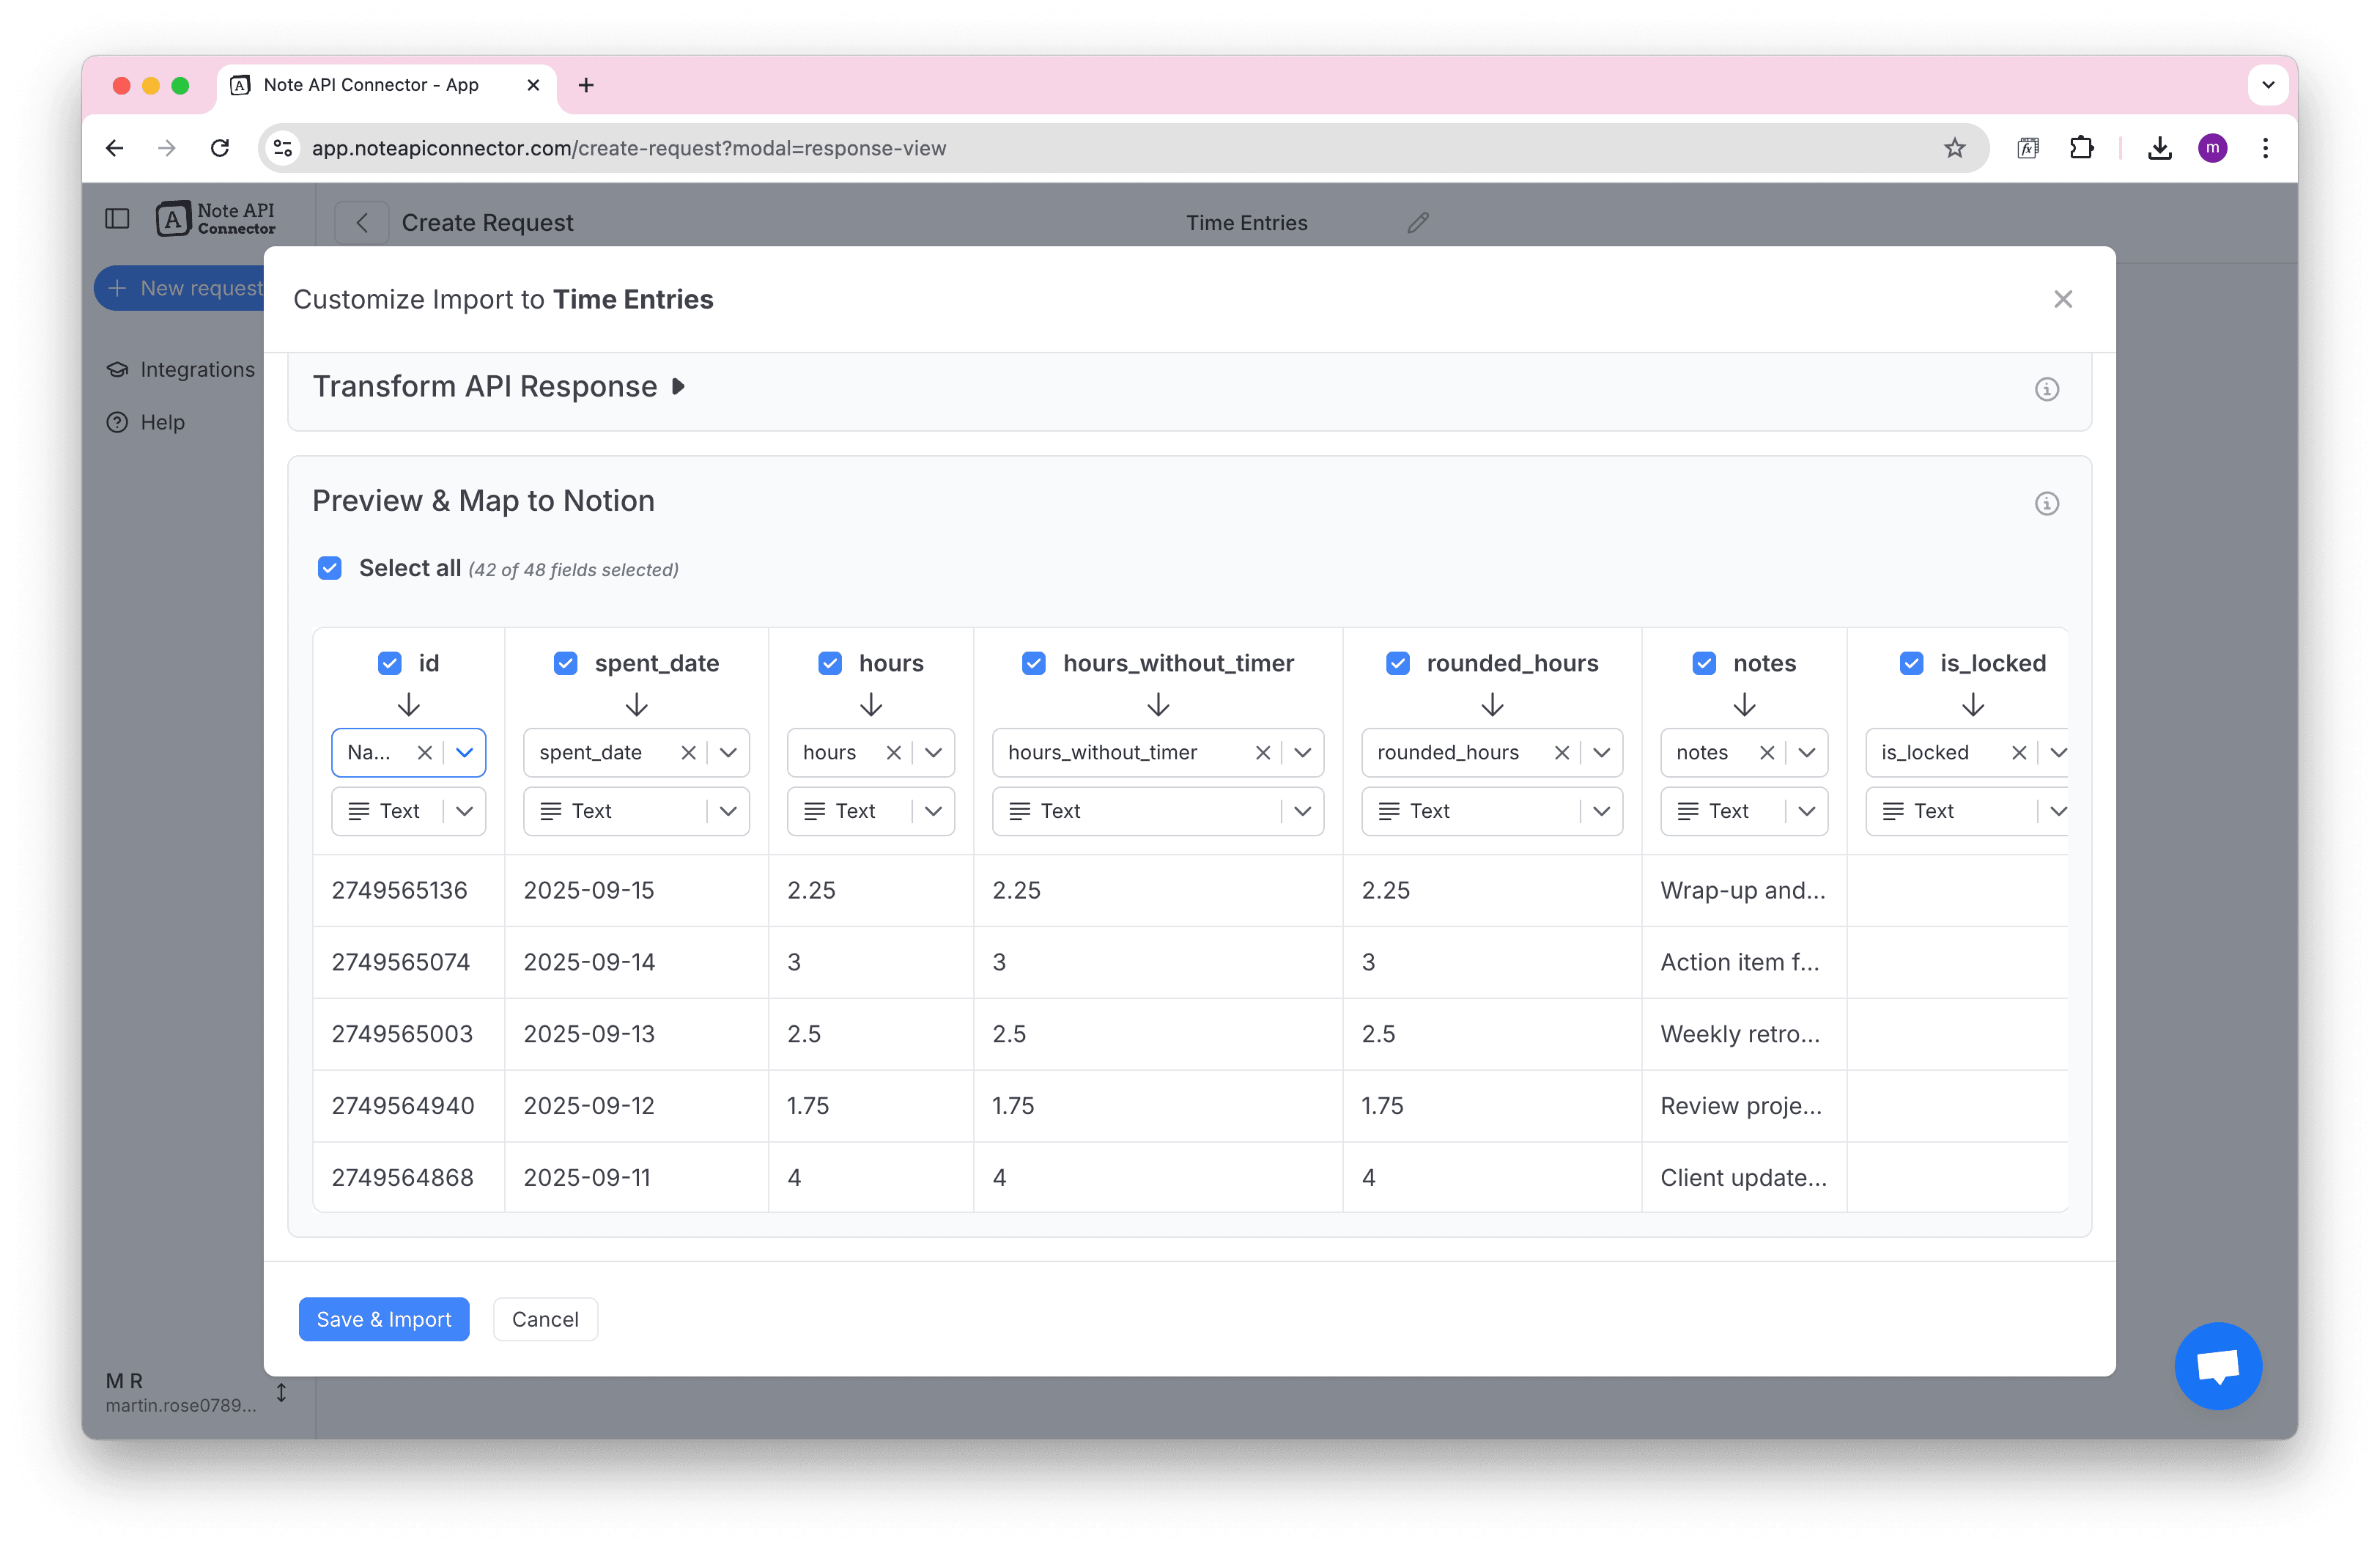
You’ll see a structured response where some fields (like time_entries) are bundled fields
inside your data, these show up as [object Object] in the preview. That’s normal and you can
map what you need directly, or flatten first for a cleaner table.

time_entries column is a multi-part field. We’ll tidy it next (optional).
Advanced (optional): Flatten nested time entries
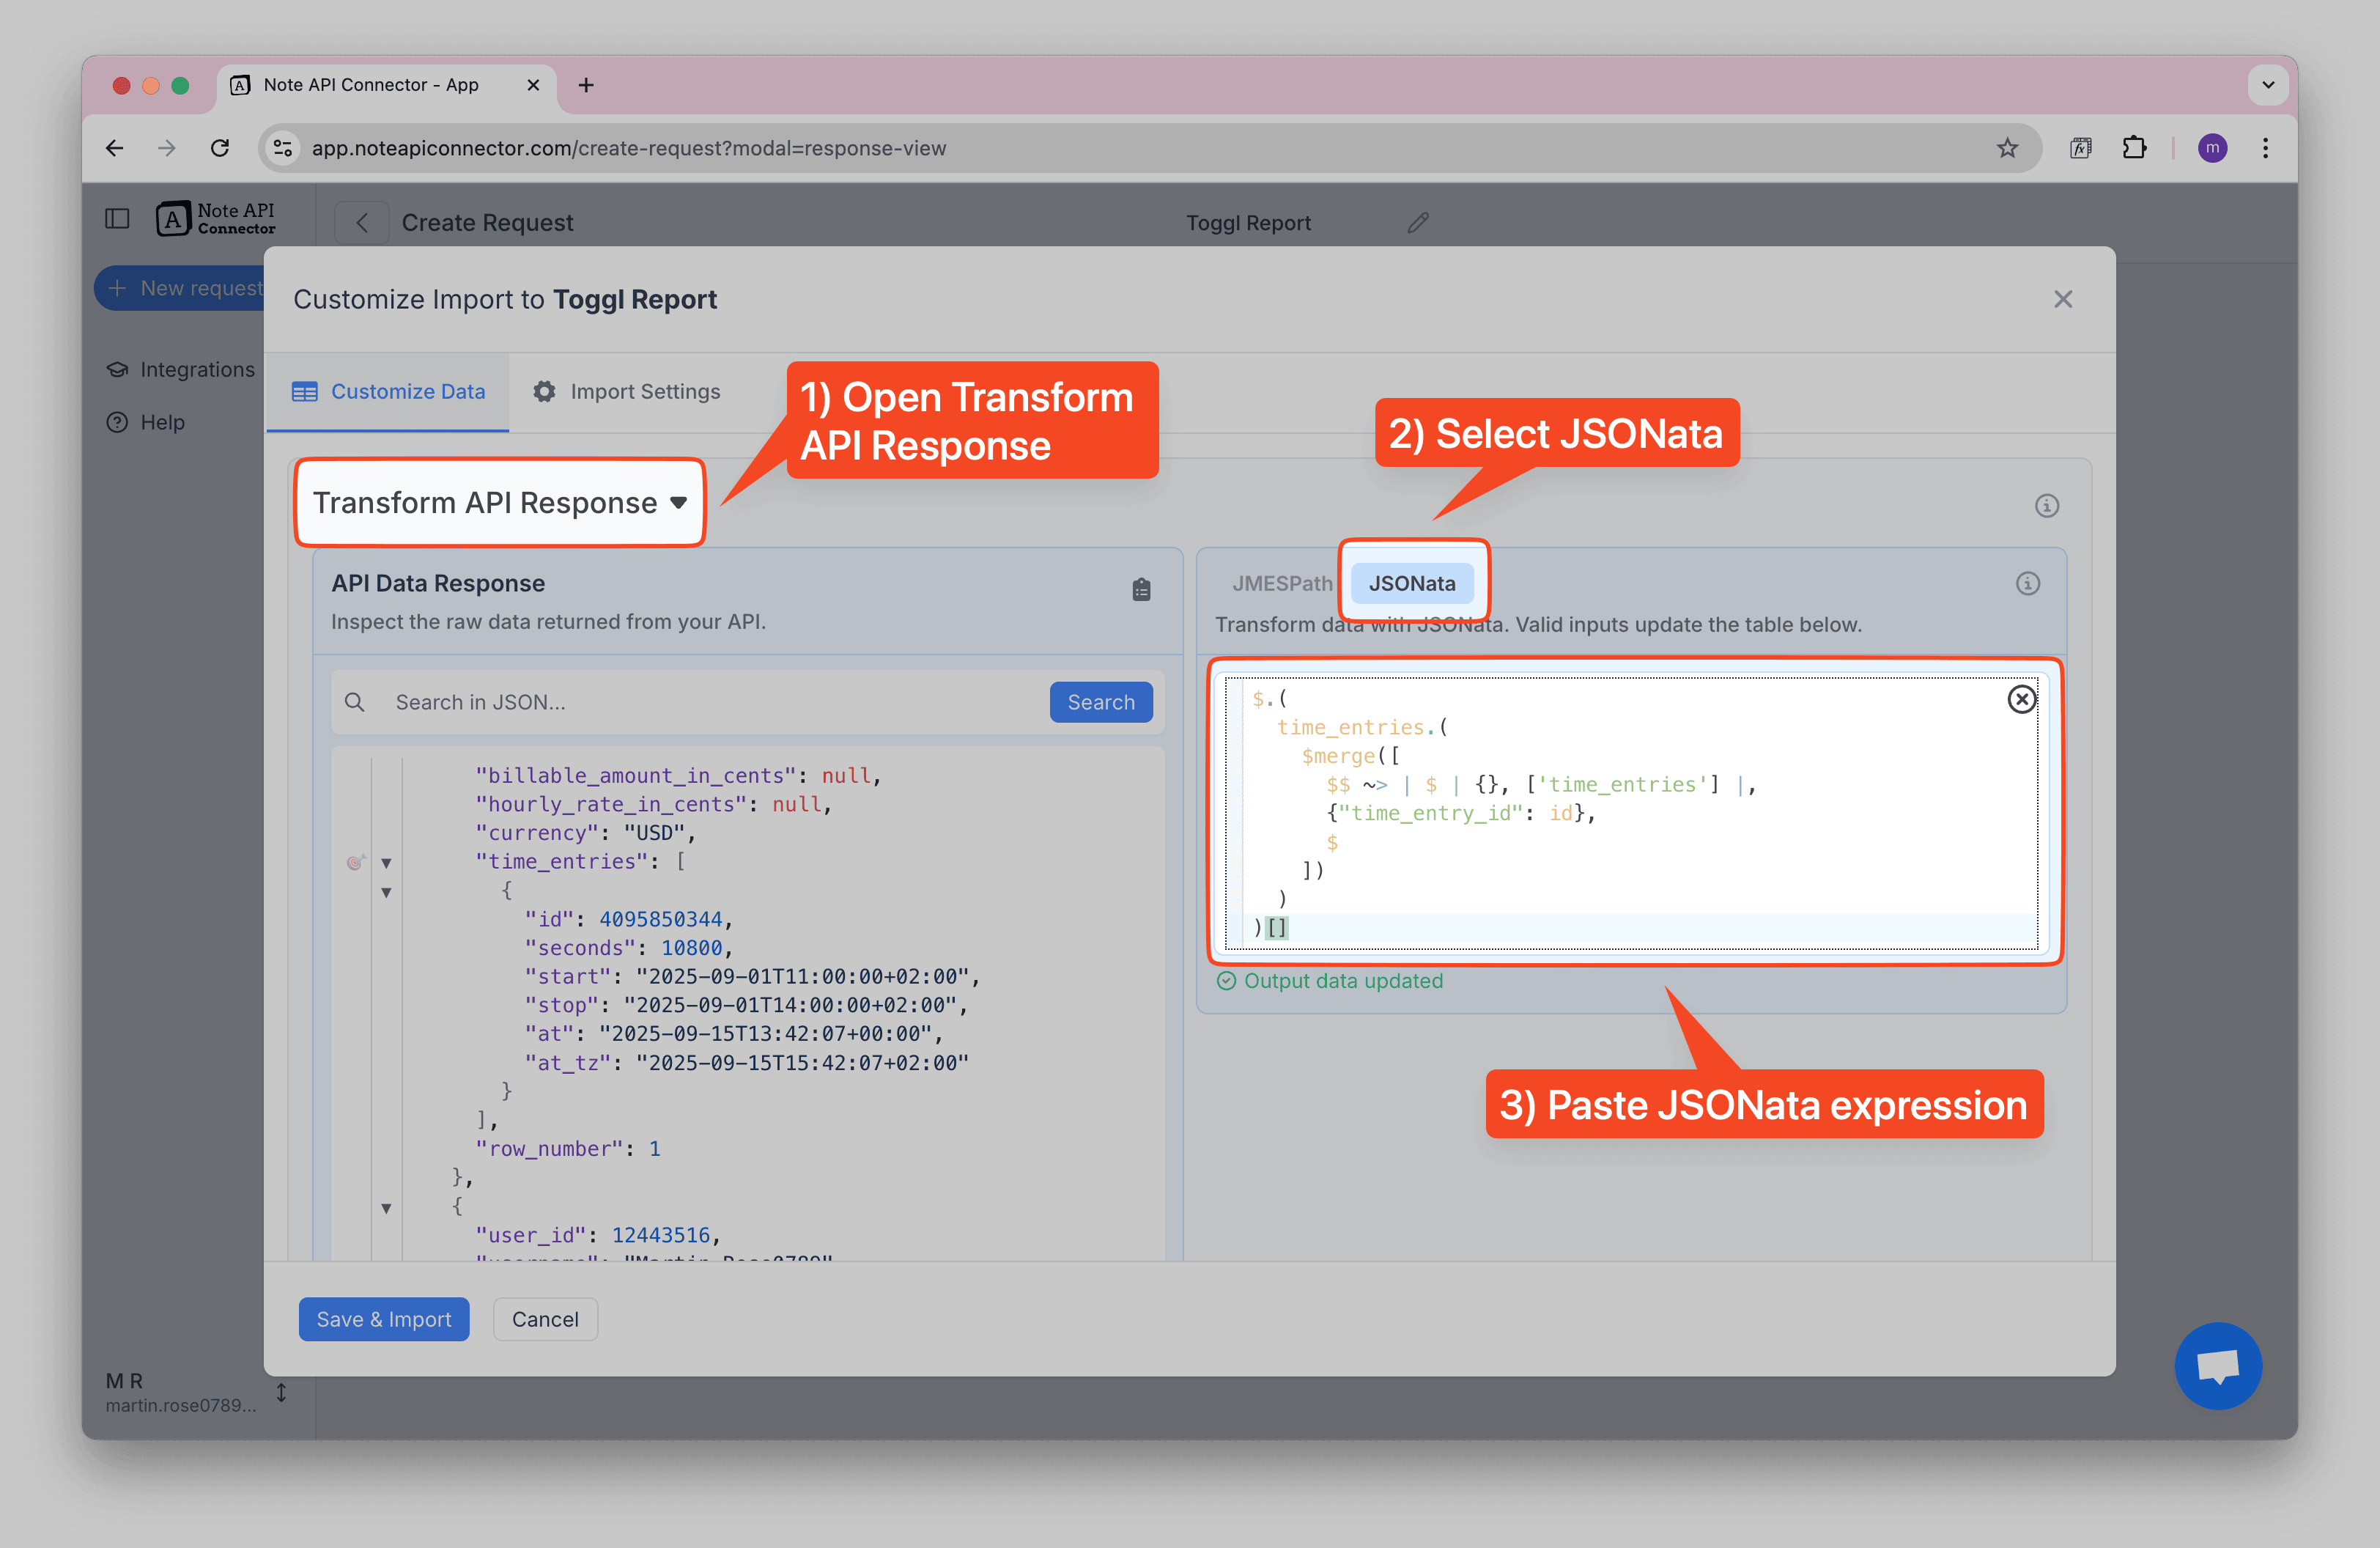
If you want to simplify the nested structure of Toggl time entries, you can use JSONata to flatten the data. This makes it easier to map fields directly to your Notion database properties.
👇 Click to format time entries into one line
If your time_entries column shows [object Object], that just means each entry
is stored as a nested object. You can leave it as is, or use this quick formatter to display one row per
entry in Notion.
Go to the Formatter (JSONata) and paste a flattening expression to simplify the data structure.
time_entries.
$.(
  time_entries.(
    $merge([
      $$ ~> | $ | {}, ['time_entries'] |,
      {"time_entry_id": id},
      $
    ])
  )
)[]
💡 Want to adapt this for other nested fields? You can use your favorite AI agent tool for generating your JSONata expression. Before you begin, make sure to copy the raw JSON and share it with your AI tool.
I have an API response with Toggl time entries. I need a JSONata expression that keeps all fields and converts the time_entries list into individual records. Some items may not have time entries.
Finally, click Save & Import to store the time entry data in your Notion database. ✅ Done! You've successfully imported Toggl data to Notion.

Step 4: Automate Toggl Data Updates in Notion
Manually refreshing your Toggl data in Notion can be time-consuming, especially when tracking billable hours, managing client projects, or analyzing productivity patterns. With Note API Connector's scheduling feature, you can automate data updates , ensuring your Notion dashboard always reflects the latest Toggl information.
Set it to refresh hourly, daily, or at custom intervals , so you never have to worry about outdated time tracking data again. Whether you're a freelancer tracking billable hours or a team lead managing project timelines, automated synchronization lets you focus on your work while your data stays current. With scheduling, you can sync Toggl with Notion automatically, no more manual refreshes.

Conclusion
With Note API Connector, importing and updating Toggl data into Notion is effortless and code-free. This Notion Toggl Integration centralizes your time tracking and project data, making it easier for teams to collaborate and access real-time productivity insights. With this setup, you can import Toggl data into Notion, build a complete Notion Toggl integration, and keep everything in sync automatically.
Whether you're tracking billable hours, monitoring project progress, or analyzing team productivity, connecting Toggl to Notion eliminates data silos and improves workflow efficiency. The ability to create custom views, filters, and dashboards in Notion transforms your Toggl time entries into actionable insights for better project management and time optimization.
Frequently Asked Questions
To import Toggl data into Notion, use Note API Connector. First, get your API token from Toggl Profile Settings, find your Workspace ID, then set up Basic Auth authentication in Note API Connector, and finally map the data to your Notion database.
No, Note API Connector is a no-code tool that allows you to connect Toggl to Notion without any programming knowledge. The intuitive interface makes it easy to configure and sync your data in minutes.
Yes. With Note API Connector's automatic scheduling feature, you can automate your Notion Toggl Integration by setting up hourly, daily, or custom interval updates. This ensures your Notion workspace always reflects the latest Toggl records without manual imports.
You can sync various types of Toggl data into Notion, including:
- Time entries – duration, description, start/end times, and billable status.
- Projects – project names, client info, and color coding.
- Tasks – task descriptions and project associations.
- User data – user names and workspace associations.
- Workspace information – workspace names and IDs.
With Note API Connector, you can customize exactly which fields to map into your Notion database, making your Toggl Notion integration as simple or detailed as you need.